Workflow editor
The Workflow Editor lets administrators create and manage workflow maps in a workspace. To open the Workflow Editor:
From the main menu, go to Administration > Workspace Manager.
In the Workspace Manager, expand a workspace's panel.
Click Workflow Editor.
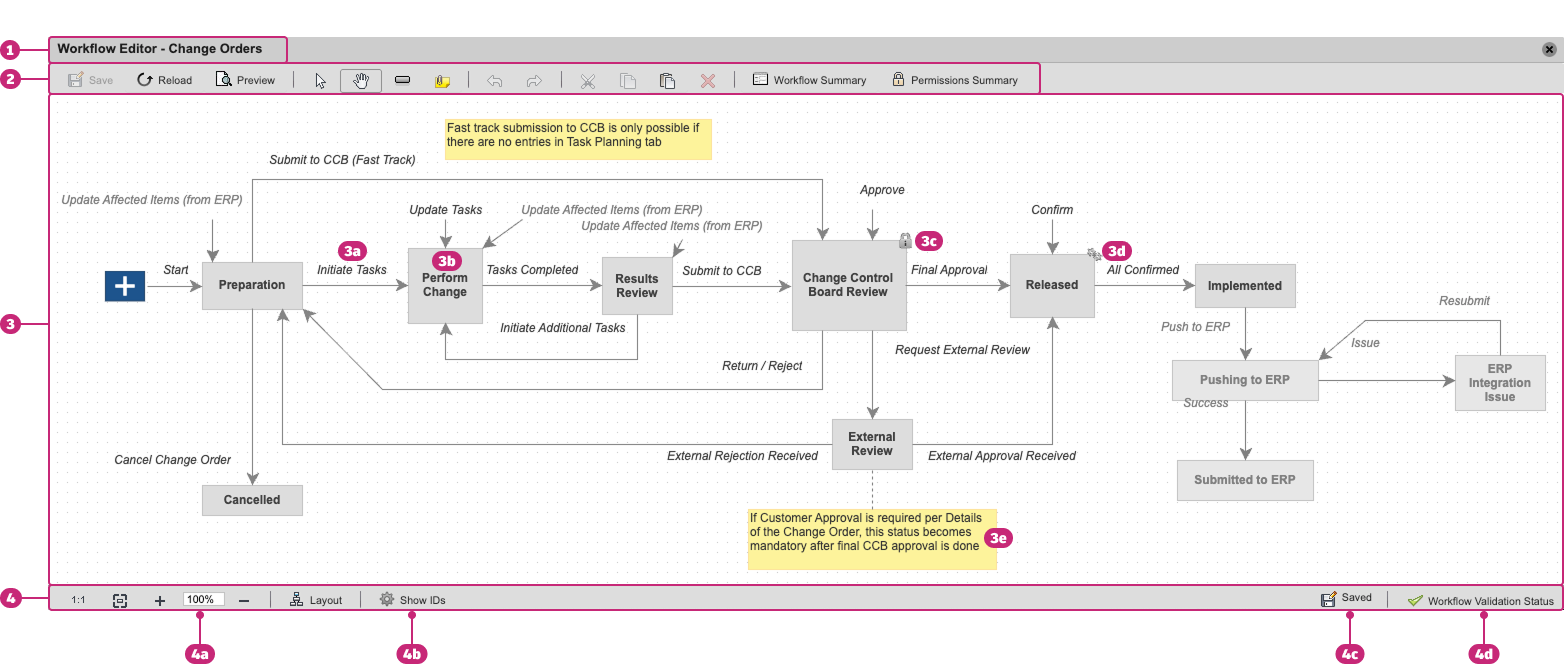
Title bar: Displays the name of the workspace whose workflow map is currently open.
Toolbar: Provides tools for creating, editing, and managing the workflow map.
Workflow mapping grid: The central area where the workflow map is displayed and edited. It includes:
3a. Transition: Defined actions that move items between states
3b. State: Represents steps in the workflow
3c. Locked state: Indicates a state where items become locked
3d. Managed state: Indicates a state where revision-controlled items are revisioned
3e. Notes: Provides instructions or documentation within the workflow map
Status bar: Displays workflow editor status and other controls, including:
4a. View controls: Adjusts the display of the workflow map
4b. Show IDs: Shows or hides states and transition IDs in the Properties dialog. Reverts to off when the editor is closed.
4c. Save status: Indicates whether there are unsaved changes
4d. Workflow validation status: Indicates validation errors. Click to view error details and jump to the error location in the map.
Toolbar

The toolbar includes the following tools:
- Save: Saves changes to the workflow map
- Reload: Reloads the workflow map
- Preview: Shows how the workflow map will appear in the workspace
- Select: Selects states, transitions, and notes on the map
- Pan: Moves the workflow map to focus on different areas
- State: Adds a new state to the workflow map
- Note: Adds a note to the workflow map
- Undo/Redo: Undoes or redoes the most recent action
- Cut, Copy, Paste, Delete: Edits selected elements; transitions, states, and notes can be copied and pasted into other workflow maps
- Workflow Summary: Displays a table of all transitions in the workflow, including their From and To states and assigned permissions
- Permissions Summary: Lists all permissions added to the workflow map and allows you to add new permissions
Workflow summary
Click Workflow Summary on the toolbar to view a matrix of the workflow map. The summary lists all transitions in the workflow along with their From State and To State, along with assigned workflow permissions. To display state and transition IDs in the summary dialog, click Show IDs.
Permissions summary
Click Permissions Summary on the toolbar to view all permissions defined in the workflow map and whether they are assigned to transitions (Used: True/False). You can add new permissions in this summary by clicking New and later assign them to transitions in the workflow mapping grid.
State properties
Double-click a workflow state to open the State Properties dialog.
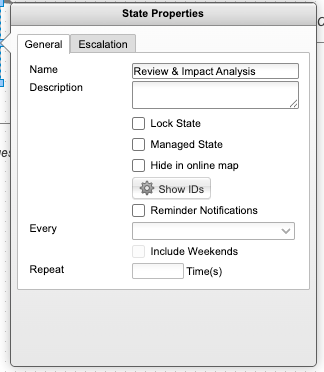
From this dialog, you can configure the state and designate it as:
- Lock State: When an item reaches this state, it becomes locked and cannot be edited unless the workflow loops back to an earlier state.
- Managed State: For revision-controlled items, this state triggers revisioning. This is useful when an item needs to be revisioned before completing the entire workflow.
State IDs and scripting
State IDs are important if you want to use server-side scripting to control workflows. Each workflow state has two IDs:
System ID: Numerical and read-only
Custom ID: Automatically generated when the state's name is entered and editable
Important: When using server-side scripts, always refer to states by their Custom ID. Each Custom ID must be unique within the workflow.
To display the state's ID in the State Properties dialog, click Show IDs. This resets when the dialog is closed.
Transition properties
Double-click a workflow transition to open the Transition Properties dialog.
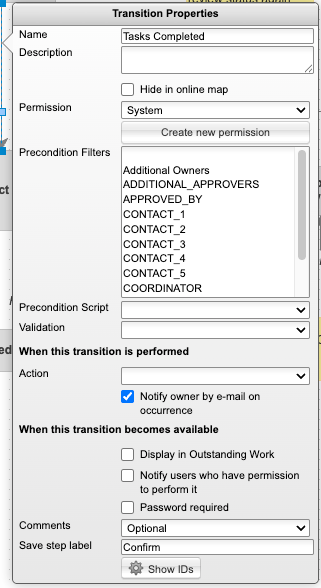
Transition properties include:
- Name (required) and Description (optional)
- Permission (required)
- Connected Precondition, Validation, or Action scripts that are triggered when an action is performed
- Display and notification settings
- Password required option
- Comments settings (Required, Optional, or Disabled)
- Save step label that lets you customize the save button in the workflow map
Transition IDs and scripting
Transition IDs are important if you want to use server-side scripting to control workflows. Each workflow transition has two IDs:
System ID: Numerical and read-only
Custom ID: Automatically generated when the transition's name is entered and editable
Important: When using server-side scripts, always refer to transitions by their Custom ID. Each Custom ID must be unique within the workflow.
To display the transition's ID in the Transition Properties dialog, click Show IDs. This resets when the dialog is closed.
Legacy scripts
The Precondition Script and Validation drop-down lists in the Transition Properties dialog do not display the names of legacy scripts. If a transition uses a legacy script, the corresponding drop-down list appears empty and a scroll icon is shown next to it. To view the name of the legacy script, hover over the scroll icon.

Note properties
Double-click a note in the workflow mapping grid to open the Note Properties dialog. From the dialog, you can:
- Edit the note text
- Hide the note from the online workflow map by selecting Hide in online map
Hidden notes remain visible in the Workflow Editor only.
To close the dialog, click anywhere in the workflow mapping grid.