Picklist Fields
If you're a Fusion user, this feature is not available in the Components or Drawings workspaces. Learn more about system workspaces.
A picklist field is a field type that lets users select a value from a predefined list, called a "picklist." Picklist fields speed up data entry and help maintain consistent data across your workspace.
When you create a picklist field, you choose the picklist that provides the values for the field. Picklists are created and managed through the Picklist Manager. There are two types of picklists:
- Defined picklists: Lists of values you define.
- Workspace picklists: Lists of records from another workspace.
The available configuration options for a picklist field depend on the type of picklist you use. Fusion Manage offers several picklist field types for different use cases. Choose the type that matches how you want users to interact with the data.
Create a picklist field
Using a defined picklist
A common use for a picklist field is to let users choose a customer from a predefined list. Follow these steps to create a picklist field based on values you define:
Create the Defined Picklist of customer names. For instructions, see Create a Defined Picklist.
Go to Administration > Workspace Manager and expand the panel of the workspace where you want to create the field.
Select the tab where you want the field to appear.
Click Add Field.
The Creating a Field dialog opens.
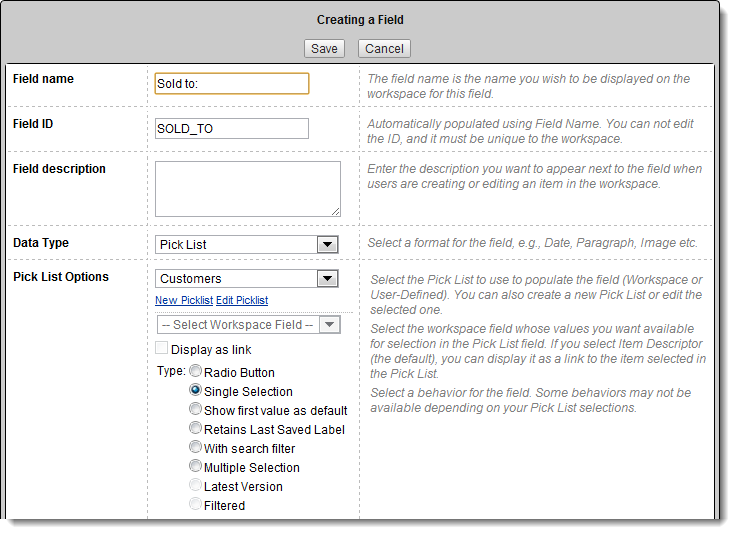
Enter the field name (for example, Sold to:), a description, and select Picklist as the field type.
In the Pick List Options drop-down, select the defined picklist you created (Customers). Alternatively, you can create a new picklist from the dialog.
Choose a picklist field type to determine how users will select values:
Single Selection (default): users can select one value from a drop-down list.
Radio Button: displays the options as buttons instead of a drop-down.
Show First Value as Default: uses a drop-down list and automatically selects the first picklist value as the default.
Enter any remaining details, following the input hints.
Click Save.
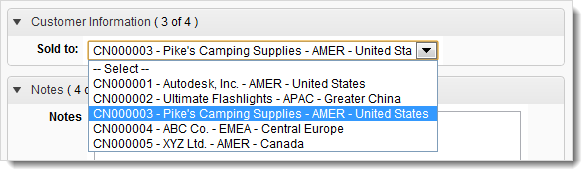
Here's how the picklist field will appear to a user:

Using a workspace picklist
A better way to create a customer picklist is to use a workspace picklist that draws its values directly from the Customers workspace (for example, [WS] Customers). Most Fusion Manage sites already have a Customers workspace, so using it as the source prevents errors and inconsistencies that come with maintaining a manual list. It also provides more options for how the field appears and how the selected value is displayed.
Create the Workspace Picklist of selectable values based on the Customers workspace. For instructions, see Create a Workspace Picklist.
Go to Administration > Workspace Manager and expand the workspace where you want to add the field.
Select the tab where you want the field to appear.
Click Add Field.
The Creating a Field dialog opens.
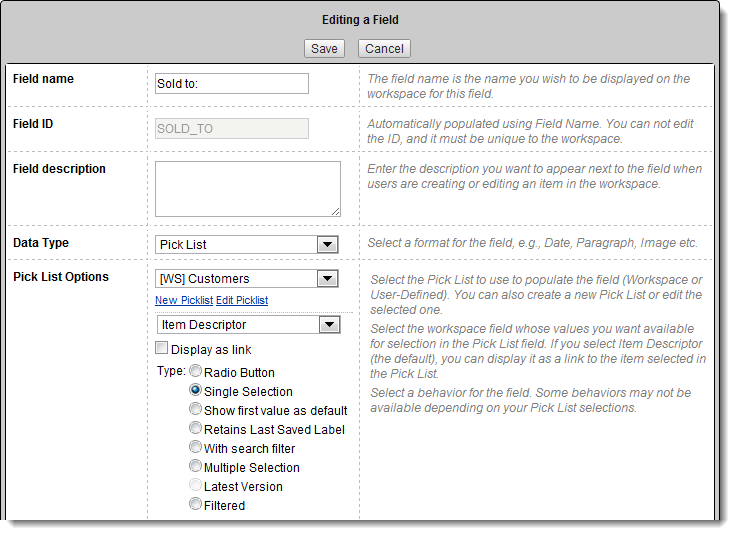
Enter the field name (for example, Sold to:), a description, and select Picklist as the field type.
In the Pick List Options drop-down, select the workspace picklist you created ([WS] Customers). You can also create a new workspace picklist from this dialog.
Choose the workspace field whose values should appear in the picklist.
By default, workspace picklists use Item Descriptor.
Using Item Descriptor allows the saved value to appear as a clickable link to the related workspace item.

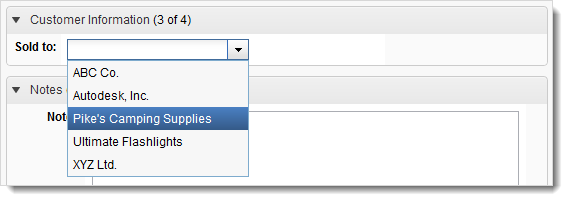
If the Item Descriptor includes more detail than users need, select a simpler field such as Name to make the list easier to scan.
 Note: If you select any field other than Item Descriptor, the selections will no longer be displayed as links. The picklist type automatically changes to Filtered, and all other types become unavailable.
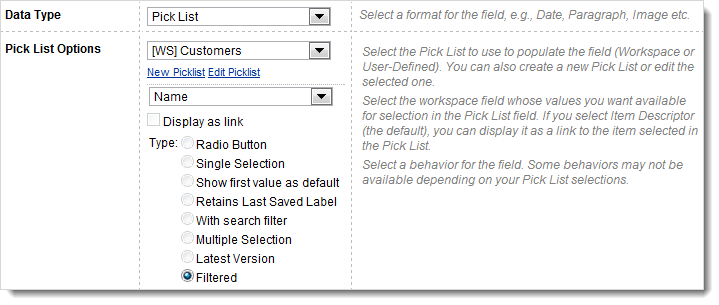
Enter any remaining details, following the input hints.
Click Save.
Create filtered picklist fields
Filtered picklist fields help users narrow down large sets of data by progressively filtering the available choices. To create filtered picklist fields, configure multiple picklist fields that all reference the same workspace picklist. Each field limits the values shown in the next field, guiding users to the right selection more quickly.
Using the Customers example:
If your organization has hundreds of customers across the world, a single “Customer” picklist may be long and hard to scan. Instead, you can create several related picklist fields—such as Geo, Region, Country, and Customer, that all point to the same workspace picklist ([WS] Customers) and filter each other as values are selected.
Here’s how these fields might appear in a Sales Quote form:
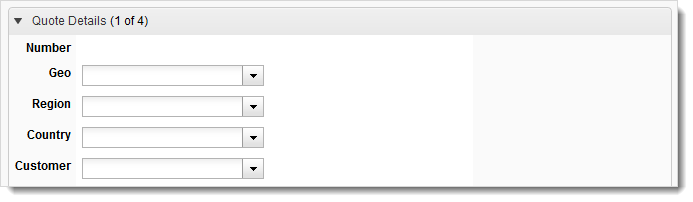
Each field uses a different workspace field as its source: Geo, Region, Country, and Customer. When users select a geolocation, region, and country from the first three fields, the Customer field shows only matching customers. This makes it faster to find the right customer.
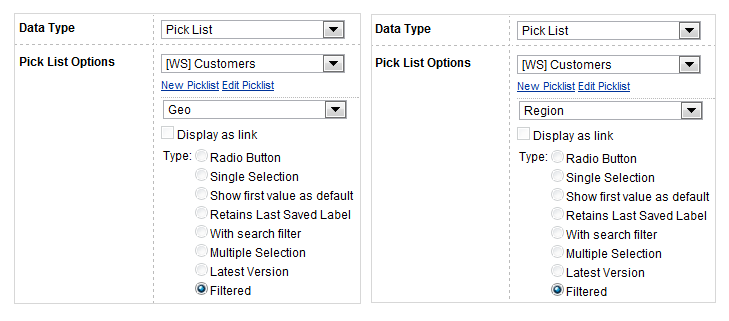
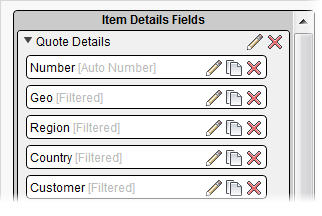
These images show how to create the fields and how they appear on the Workspace Layout page:
This image shows how selections filter the list to help users find the customer they need:

Control field visibility
In the example above, only the customer name is important. The other three picklist fields are used only for filtering. Set the Visibility of the filtering fields to Edit Only so they appear only when adding or editing a Sales Quote, not when viewing the record.
Set visibility as shown here:


Recommendations
- All fields in the filtered group must use the same workspace picklist.
- Filters can be placed in different sections of the same tab, and filtering will still work as long as they all point to the same workspace picklist.
- Filtered picklist fields are supported in the following tabs:
- Item Details
- Grid
- Bill of Materials
- Sourcing
- Filtered picklist fields only work with workspace picklists. If the option is unavailable, you may have selected a defined picklist instead.
- You can create two independent filtered groups using the same workspace. To do this, create two separate workspace picklists that point to the same workspace records but use different picklist names. Assign one picklist to the first group of fields and the other picklist to the second group. Filtering is grouped by picklist, not by workspace.