Activity 1: Configure Zapier
In this activity, you
- Configure a Zap in Zapier to process the calls coming from Fusion Manage through Autodesk Platform Services (APS) Webhooks.
- Process the payload.
- Send out an e-mail containing the item descriptor.
Steps
Log into your Zapier account.
Create a new Zap.
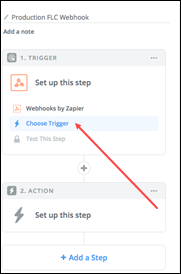
Select Catch Hook.
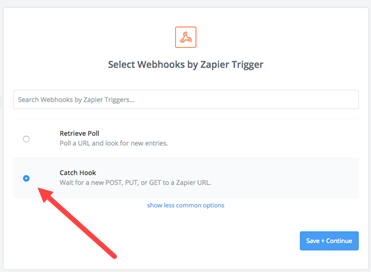
Click Save + Continue.
For the sake of simplicity, you don’t need to pick off Child keys.
Copy the URL to the clipboard.
Zapier will generate a callback URL for you. This is the address that APS Webhooks will be calling for the hook(s) you create for further processing.
Click OK, I did this.
Zapier will wait for a sample event to be triggered.
You have two options:
- You can create the hook on APS Webhooks, and update an item in Fusion Manage, so that Zapier receives a real payload, from an item of your site. Go to Tutorial 2: Using impersonation and Zapier, set everything up, and then continue below from step 9.
- You can create the Zap using a sample payload – use the one from the item update documentation, under Callback Payload.
Issue a call to Zapier and the sample payload, to configure the hook.
Create a new call, change the verb to POST.
Fill in the callback URL you received from Zapier.
Click the Body tab, paste the sample payload from the item update as raw data.
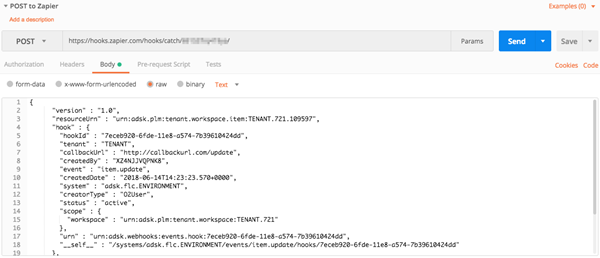
Make sure Zapier is listening for the call.
It will display Looking for the hook, this might take a sec...)
Press Send.
Be aware that Zapier times out after a while, so check the tab and Try again if needed.
You should get a 200 OK response from the POST.
Ensure you get a Test Successful! message from Zapier. The message indicates the webhook was setup correctly.
Click Continue.
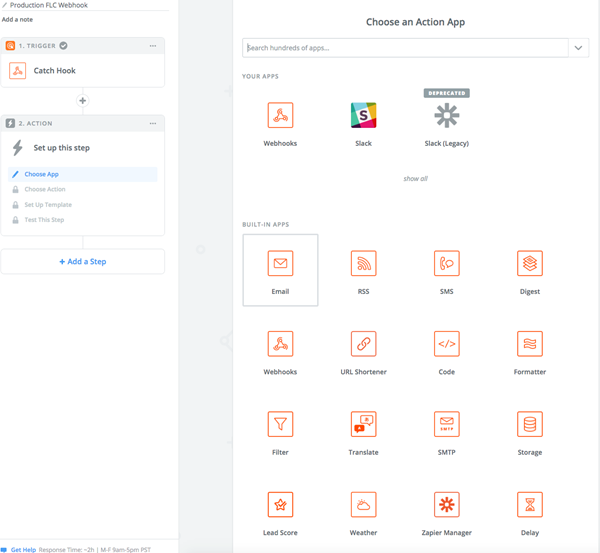
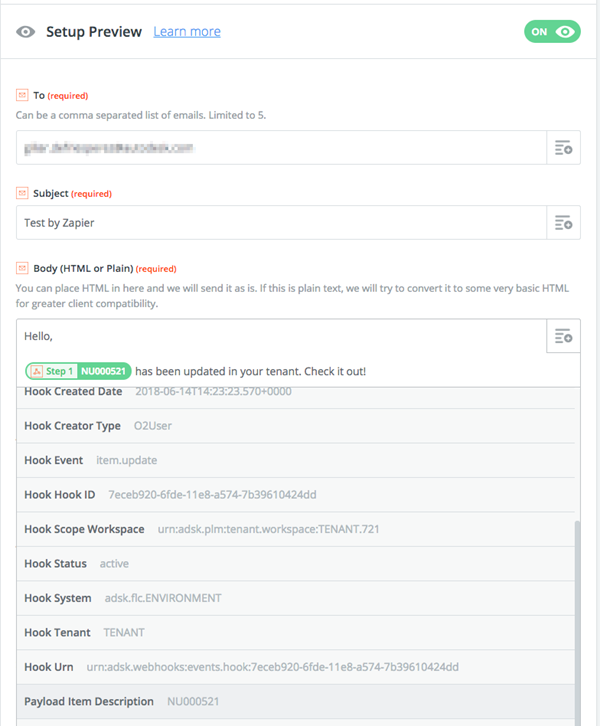
Select E-mail from the list of actions available.
Set up the action.
Zapier will parse the payload supplied by the callback. Zapier is a very visual tool – by clicking the buttons on each input field, you’ll be able to pick and choose different parts of the payload to build your e-mail.
If you performed step 7a, You have finished. Updating an item in your workspace should trigger this Zap, and you should be getting e-mails in your inbox.
If you performed step 7b, continue to Activity 2.
Activity 1 summary
In this activity, you...
- Configured a Zap in Zapier to process the calls coming from Fusion Manage through APS Webhooks.
- Processed the payload.
- Sent out an e-mail containing the item descriptor.