Scan Settings
Settings are accessible once the point cloud has been selected for import. Settings may be adjusted at any time during the project creation process. They can be applied before the project is indexed and finalized into the unified point cloud.
Filtering Settings
The options on the Filtering tab specify what is done with stray points and which points are included by certain perceptions.
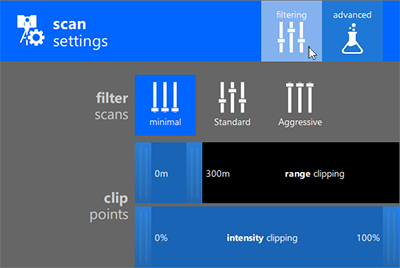
Filter Scans
The Filter Scans setting determines how aggressively stray points are excluded from the imported scan file.
- Minimal: Preserves virtually all points.
- Standard: Preserves most points, filtering only isolated points that do not appear to be part of the surface or object.
- Aggressive: Preserves only points that are part of a surface or object.
Clip Points
The Clip Points setting determines how aggressively stray points are excluded from the imported scan file.
Move the sliders to set values for one or both of the following settings.
- Range Clipping:: Determines the minimum and maximum distance from the scanner at which the points should be included.
- Intensity Clipping: Determines the range of intensity (reflection) values to allow for included points.
E57 Image Settings
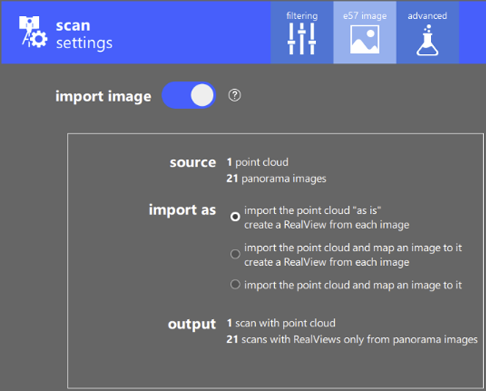
The options on the e57 Image settings tab specify the inclusion of panorama images and how multiple panoramas are used in a point cloud. See the following topics for more information:
- Importing an E57 File with One Panorama for Each Scan
- Importing an E57 File with Multiple Panoramas for Each Scan
Import Image
Enables the use of e57 image data for constructing RealView displays.
Source
(Multiple panorama images per scan only) Read only information displaying the number of point clouds and number of panorama images to import.
Import as
(Multiple panorama images per scan only) Specifies how the imported panorama images from the e57 file display.
- Import the point cloud "as is"and create a RealView from each image.
- Import the point cloud and map an image to it and create a RealView from each image.
- Import the point cloud and map an image to it.
Output
(Multiple panorama images per scan only) Read only information displaying the projected number of scans with point clouds and the number of RealViews created.
Text Options
When a specified dataset for import contains a text file, the Text Options tab displays under Scan Settings. Here you can review the text data and map it accordingly.
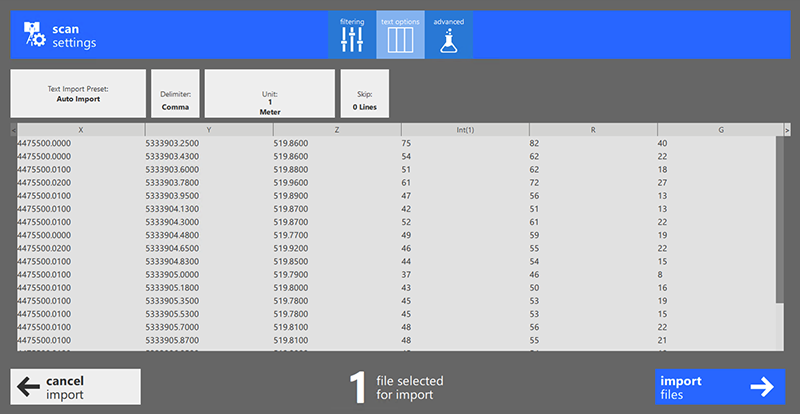
Text Import Preset. Click to apply a saved preset or save the current text options as a new preset.
Delimiter. Specifies the text character to use as a text delimiter for the text file. The 4 available types are: Comma, Period, Space, or Tab.
Unit. Specifies the unit of measurement for the imported text file. The 6 supported units are: Millimeter, Centimeter, Meter, International Inch, International Feet, and US Survey Foot.
The numerical field specifies the conversion value. For example, data in US Survey Foot can be represented in meters. Specify Unit to Meters and the value to 0.3048.
Skip. Specifies the number of lines to skip before parsing data on import.
Column Data Classification
Click on the header of each column to specify the mapping for the values within that column.
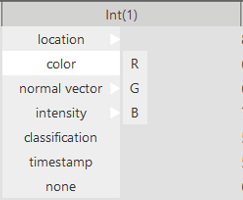
The supported mapping values are as follows:
- Location (Sub map to X, Y, or Z)
- Color (Sub map to R, G, or B)
- Normal Vector (Sub map to V1, V2, or V3)
- Intensity (Sub map to int (1), int (256), or int (4084))
- Classification
- Timestamp
- None
Advanced Settings
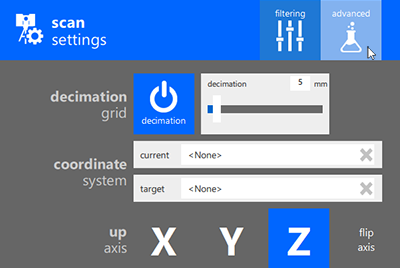
Decimation Grid
The Decimation Grid setting controls the number of points imported with the point cloud by specifying the smallest cubic volume that a single point can occupy. Click the decimation button to turn decimation on and off.
When enabled, drag the slider to specify a value that represents the cubic volume of a single point in millimeters. Lower values increase the number of points that are imported, improving the density of the point cloud, but also increasing the size of the file.
Coordinate System
The Coordinate System setting aligns the point cloud with a specific EPSG coordinate reference system.
To specify the current coordinate system, click in the Coordinate System Current box and enter a few letters of the name, description, or EPSG code.
Select a coordinate system from the list and click OK.
Similarly, to specify the target coordinate system, click in the Coordinate System Current box and enter a few letters of the name, description, or EPSG code.
Select a coordinate system from the list and click OK.
Up Axis
The Up Axis setting appoints the axis considered up.
Select the axis of the point cloud data that you want to represent the up direction. For intended negative axes (-x, -y, and -z), choose Flip Axis with the corresponding letter. There is also an option to preview your orientation in 3D in all configurations before finalizing your selection.
For example, if you specify z + Flip Axis, the point cloud flips upside-down from its default upright orientation.
About Default Units
To change the display unit in ReCap, navigate to Settings > General and set the unit after the project is created.
The setting is saved into rcp file as well as the ReCap configuration, so unit information is saved when reopening a project.
- If a project is opened with a different setting, the unit setting from the opened project will take priority. ReCap display unit will be set to what is saved in the rcp file. And when user creates new project, it will follow the setting of previously opened file.
- If the coordinates system is changed in the product setting, the unit setting will also be updated.
- When exporting a .pts file, the coordinates in pts file will also be in the project unit.
- Because .RCS files and .e57 files only support metric unit internally, the project unit doesn’t apply to the coordinates in the exported .rcs and .e57 files.