Export and Import Scan Regions
Scan Regions can also be imported and exported via the contextual tools available on any Scan Region group, or as an entire assembly of all groups and individual Scan Regions.

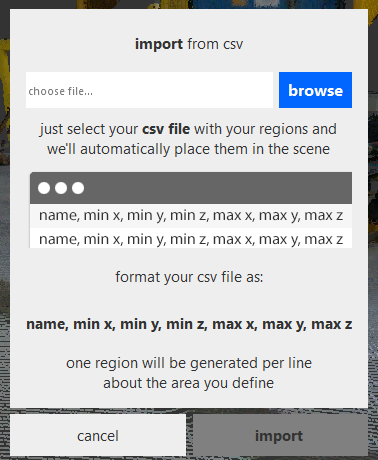
Import
Importing of Scan Regions is accomplished through correctly formatted CSV (comma-separated values) files. These files, typically generated in a text editor or spreadsheet application, should define the Scan Regions as follows: name, min x, min y, min z, max x, max y, max z.
New regions are generated for each line provided in the CSV file and automatically populate the project.
Export
Scan Regions can be exported as RCP, RCS, PTS, E57, or PCG file formats. Again, export is available from the contextual tools apparent on both the Scan Regions main header as well as Scan Region groups.
Exporting Scan Regions from the parent header exports all Scan Regions defined in the project, at all levels.
When exporting a set of Scan Regions from the group menu, all regions contained within that group and any nested child groups are included in the export process.
To export an individual Scan Region, it must first exist alone in a group. The approach to this is to create a group by dragging the Scan Region intended for export onto another Scan Region, creating the group, and dragging the Scan Region unintended for export back out of the group to its original isolation in the Project Navigator. Alternately, you can create a temporary Scan Region, create a group with it and the Scan Region intended to export, and simply erase the temporary region by pressing "X". After either method of creating a group for your individual Scan Region, you can then export by simply hovering over the group and making the selection.
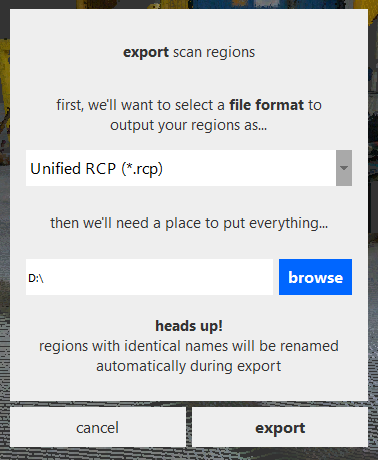
You are prompted to unify at this stage if you choose Unified RCP or Unified RCS export format. Note that this prompt only unifies your exporting Scan Regions, not the entire project.