Delete Points and Optimize Scan
You can delete point clouds in a scan from a 3D view. After deletion, you can then optimize your scan to obscure the deleted point cloud.
Optimize Project
After you've deleted point clouds, navigate to the Home menu and click Save.
A dialog box will display notifying you that your scan can be optimized. From the dialog box, you can choose the following optimization options:
- Do not optimize: No change will be applied to either scans or RealView (.rcs and .rcc files). You can still perform undo and redo actions.
- Optimize 3D point cloud only: Improve point cloud editing and loading performance by burning in the deletion status into the point cloud scan (.rcs files). No change will be applied to RealView (.rcc files). In this case, the deleted area will still be shown in the Realview. You cannot undo this operation but the deleted points are still recoverable.
- Optimize 3D point cloud and modify RealView.: Perform burn operation to point cloud scan and synchronize deleted points to RealView. In this case, the deleted area in RealView will be colored or blurred, depending on the settings. You cannot undo this operation but you can still restore deleted points and revert RealView changes by clicking recover deleted points in the Home menu.

Remove Deleted Points
After you've deleted point clouds, navigate to the Home menu and click Save As.
A dialog box will display notifying you that you can permanently remove deleted points. From the dialog box, you can choose the following removal options:
- Do not remove: Scans and RealView (.rcs and .rcc files) will be copied to a new location. You can no longer perform undo/redo in a Saved As project but you can still recover deleted points.
- Remove 3D point cloud only: Improve point cloud editing and loading performance by creating new point cloud scans with deleted points permanently removed. This will shrink the resulting .rcs files. No change will be applied to RealView (.rcc files). In this case, the deleted area will still be shown in the Realview. Deleted points cannot be recovered.
- Remove 3D point cloud and modify RealView: Perform shrink operation to point cloud scan and synchronize deleted points to RealView. In this case, the deleted area in RealView will be colored or blurred, depending on the settings. The changes are not reversible.
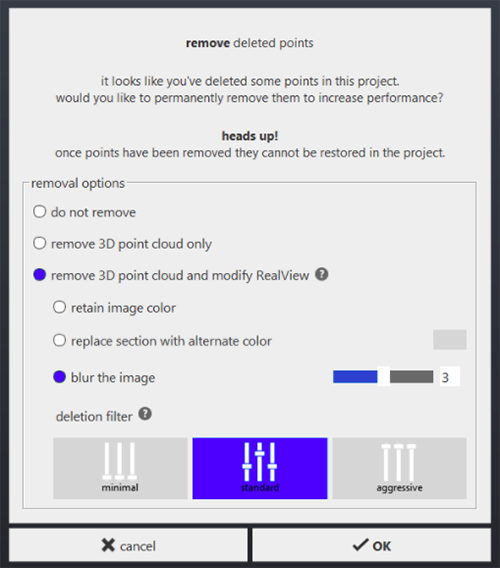
RealView Modification Options
When removing deleted points from RealView, you can choose from the following options:
- Retain image color
- The depth and intensity information of the deleted area will be removed from RealView but the color image shown in RealView won’t be changed.
- For example, if you select Intensity mode in RealView, the deleted area will become black because intensity information is removed. But if you select RGB mode, the deleted area will still be shown in RealView.
- Replace section with alternate color
- The color of the deleted area will be replaced with the specified color and depth information will be removed from the deleted area.
- Blur the image
- The deleted area image will be blurred and depth information will be removed from the deleted area. You can change the blur setting by adjusting the blur level.
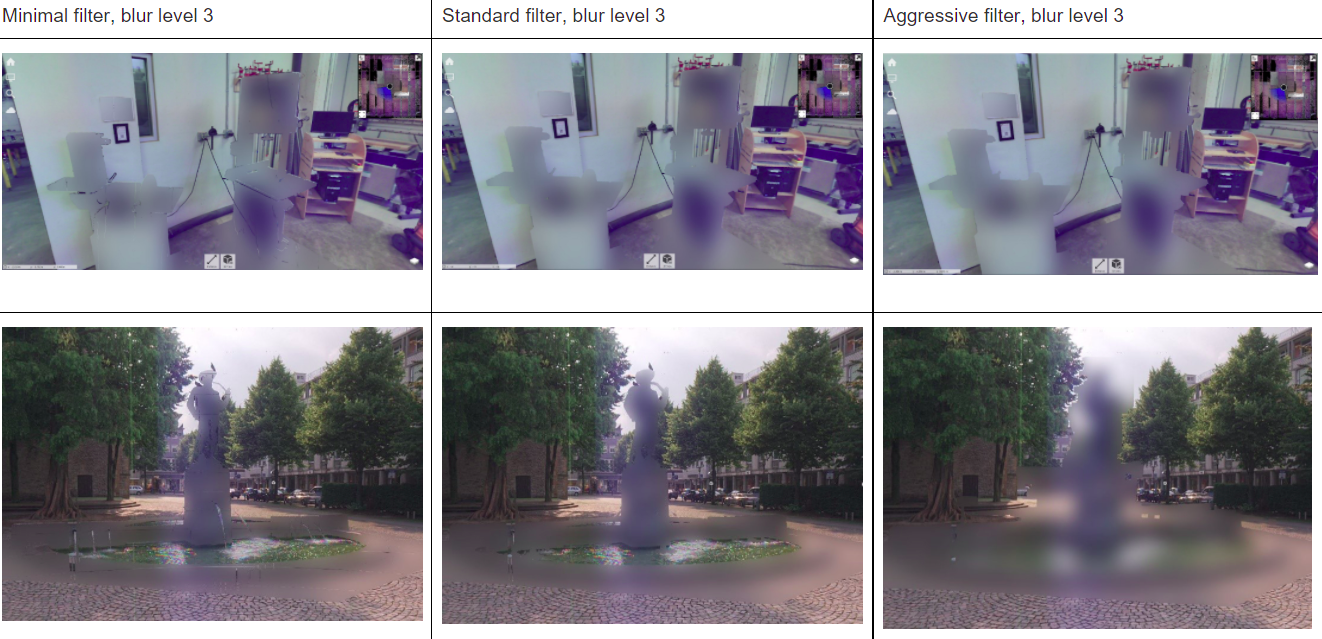
You can also choose the deletion filter level to refine the deleted area.
- Minimal
- Empty area without 3D information is preserved in RealView.
- In this example, you delete a fountain with a statue in a point cloud. In RealView, the statue edges and water in the fountain may still be visible.
- Standard
- Empty area without 3D information may be removed in RealView.
- In this example, you delete a fountain with a statue in a point cloud. In RealView, the statue edges and some water in the fountain may be removed.
- Aggressive
- Empty area without 3D information is removed in RealView.
- In this example, you delete a fountain with a statue in a point cloud. In RealView, the statue and the water in the fountain are removed, and neighboring areas without depth information could be removed as well.
Examples of RealView Modification Settings

Share the Optimized Project
Publish to Autodesk Cloud Drive
If you have published a project to Autodesk connected drive and choose to make modifications to RealView afterward, when you run publish-update, the .rcc and .rch files won’t be updated automatically.To solve this issue, use either of the following steps
- In the publish dialog, choose to publish to a new project
- Delete the existing .rch and .rcc files in Autodesk connected drive before running publish-update to force.rcc / .rch files to be refreshed.
Share the Entire Project
File types ending with bk are used for restoration purposes. They may occupy a lot of disk space for large projects. If your project is already complete, you can delete those files ending with bk files to save some space.
File types include:
- .rcbk
- .llbk
- .sgbk
- .nrbk
- .chbk