Gantt Chart and Tasks
 Contents
There are two parts to a Task page: the Task List View and the Gantt.
Task List View
The Task List View is similar to any other list view page. However, Tasks have some entity-specific fields, such as Milestone, Gantt Bar Color, and Inventory Date.
The Inventory Date field shows the date a Task can be started based on upstream dependencies. If a Task is pinned, the Inventory Date lets you know what date Flow Production Tracking would use as the start date without the pin.
Gantt Chart
To stow or unstow the Gantt, double click on the two vertical lines on the right side of the Task view.

Things you can do in the Gantt
- Click and drag the handles on the ends of the Task bars to change the duration of the Task.
- Select the bar itself to change the Start Date and End Date of the Task.
- Select a number of Tasks and make changes to the group by moving the group bar.
All of the changes made in the Gantt are live and will be reflected in the Task view.
Navigating the Gantt
To adjust the time period you wish to view, use the zoom slider  on the top right of the Gantt. There's a handy “Today” button which will center the Gantt on Today's date.
Things you can display on the Gantt
From the “Gantt Display dropdown” button you can reveal more information on the Gantt:
Bookings & Vacations: These dates are brought through from the booking information you enter in the Crew Planning App. The gray bars represent when people aren’t booked on the Project. Vacations are displayed in gray with a red bar running along the top to help you identify conflicts. This information helps you see when a person is available to work on a Task.
Phases and Milestones: These vertical lines come from information via the Project Timeline App. As you add Project Phases and Milestones into Project Timeline, the Start Date and End Date are displayed on the Gantt Chart, allowing you to see key phases of a Project.
Project Date fields (legacy): These dates are taken from any date fields you have on Projects. This is a legacy feature that allowed people to show a Project's Start Date and End Date on the Gantt. The new way to track this information is to create Phases and Milestones in the Project Timeline App.
Group Bars: These are representative of how you’re grouping your Tasks in the List View. They are helpful for moving a group of Tasks together.
Task Date Fields: Select the date fields to display in the Gantt chart. The selected date fields then appear as a colored dot in the chart. If a selected Task Date and a milestone overlap, they'll combine into a single mark. The tooltip will display both dates separately.
Advanced menu in the Gantt
Under the advanced menu, you can change the color of the Group Bars, and also add in Task fields to be displayed to the left and the right of the Gantt bars.
You can also change the color of any Task bars by right-clicking the bar on the Gantt and selecting "Bar Color...".
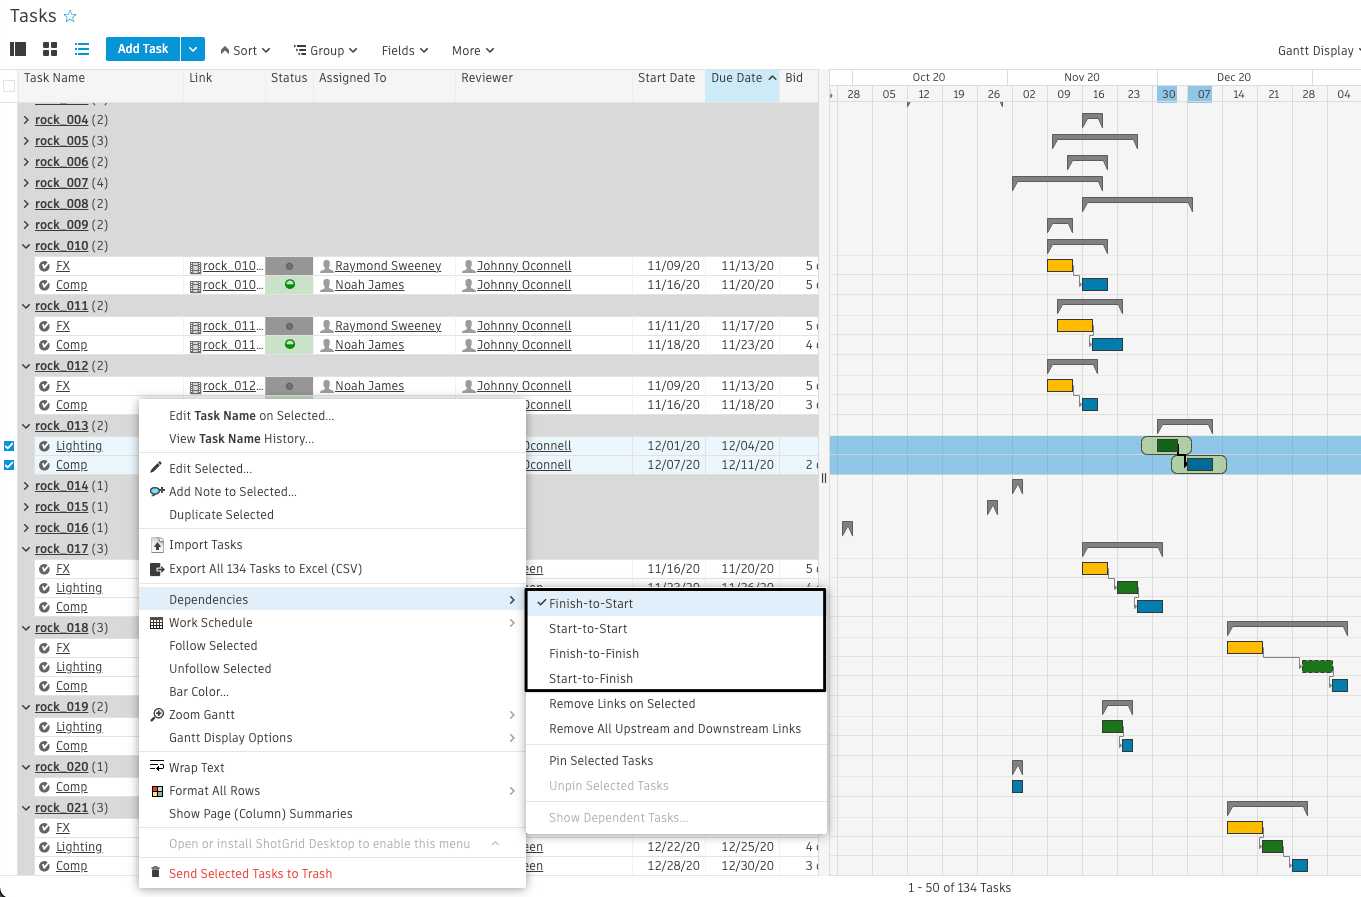
Creating Task dependencies
From a Task page you can elect to make two or more Tasks dependent on each other.
Multi-select the Tasks you want to make dependent on each other and then right click and select Dependencies > Link Selected. The dependency chain is created depending on how you sorting your Tasks, from top Task to bottom Task.
You can also set dependencies in your Task Templates so that the connections are “preloaded” when you go to schedule each Task. To do this, sort your Tasks in the Task Template so that they appear in the right order on the page, then select all, right click, and select Dependencies > Link Selected. If your Tasks have a default “Duration”, all you’ll need to do is add a “Start” for the first Task in every Shot or Asset to automatically build your schedule.
All Tasks will now be linked from Due Date to Start Date. Shifting the upstream dependent Task will move all downstream dependent Tasks.
If you move a Task in the middle of the dependency chain, it will pin that Task to that particular date and all upstream and downstream Task shifts will no longer affect that Task.
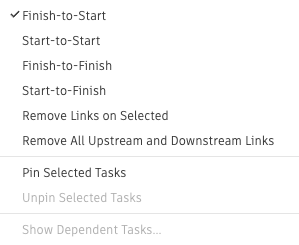
You can also choose to pin any Task that you don’t want your Task dates to update automatically. This keeps the connections between Tasks, but takes the Task off auto-pilot. You can pin Tasks by right clicking on a Task and selecting Dependencies > Pin Selected Tasks.

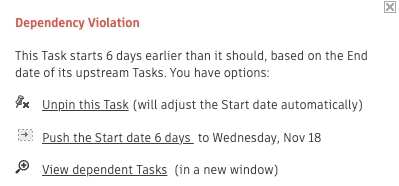
If you move a Task’s Start Date earlier than the Due Date of its upstream dependent Task, you will create a “Dependency Violation”  which is flagged on your Task List View. Clicking on the violation will provide three options:
- Unpin this Task,
- Push the Start Date [number of] days—to realign with your upstream dependent Task, or
- View dependent Tasks in a new window. Please note: You can always ignore the violation if you’re happy with your schedule.
From a Task Page you can also display the upstream and downstream dependent Tasks by revealing the corresponding fields from the fields menu.
If you’re viewing Tasks from a restricted view, for example from the Tasks tab of a People detail page, then you can display any dependent Tasks by right-clicking on the Task and choosing Dependencies > Show Dependent Tasks.
Offsets
Sometimes you may not want a Task to start right after its upstream Task’s due date. You can add a positive or negative offset by holding down the Option or Alt key and moving the Task bar. A tooltip tells you the duration of the offset (positive or negative days).
To set dependencies on Tasks in a different order than they appear on the page, use the option-click-drag method.
Creating a Split Task
Split Tasks allow you to split a Task bar on the Gantt into smaller segments to indicate a gap in performing the task. Multiple splits are supported and the duration field accurately represents the total of the splits.
On the Task bar, right-click where you want to split the Task and choose “Split Task on [date].” The Task will split into two from where you selected.
Once split, you can move each segment independent of the other and adjust the Start Date, Due Date, and Duration by dragging the segments of the bar as you would with any other Task bar on the Gantt. Clicking once creates a yellow box around the Task bar that allows you to interact with the bars of the Task as a whole. Double-clicking the bar creates a blue box around the Task bar and lets you manipulate the individual split portions.
You can remove all the splits from a Task by right-clicking on the Task in the Gantt and then choosing “Clear all Splits on Task.” You can also drag one segment into the another to “heal” that part of the Task. This will only clear the split that sits between these two segments.
Developer: How do I access splits on Tasks via the API?
Splits on Tasks are stored in the Task’s splits field. This field is not visible via the UI, though you can read and write to it via the API.