Part 2: Selecting the Internationalization Approach
The two primary entities that need to be substituted during UI internationalization are text field strings and fonts. Text field strings are substituted to achieve language translation, replacing development text with the corresponding phrases in the target language. Fonts are substituted to provide the correct character set for the target language, as the original development fonts may not contain all of the required characters.
In this document we describe three different approaches you can use for internationalizing art assets, which are:
- Imported font substitution.
- Device font emulation.
- Custom asset generation.
Imported font substitution is the recommended approach for internationalizing fonts and relies on the GFx::FontLib and GFx::FontMap objects for substituting font symbols originally provided by the default ‘fonts_en.swf’ library.
Device font emulation is similar to imported font substitution, except it relies on font mapping to provide actual fonts instead of their imported symbols, which is a bit easier to setup but has several limitations.
Both imported font substitution and device font emulation rely on the user-created GFx::Translator object for translating text strings.
The custom asset generation is different from the above approaches in that it does not utilize font mapping or translator objects, relying instead on the Flash Studio features to generate custom UI asset files for each target language. This approach may be chosen on extremely memory limited platforms with a small number of fairly static UI assets.
Imported font substitution relies on the Flash font symbol import/export mechanism for binding text fields to substitutable fonts. To use this method developers first create a default font library file called, for example, “fonts_en.swf” as described in Part 1, and then use exported font symbols from that file in all of the game UI files. When the UI files are tested in the Adobe Flash player, they will be imported from “fonts_en.swf”, allowing content to be rendered correctly in the development language. When running those assets in Scaleform, however, international configurations can be loaded instead, enabling translation and font substitution.
Note, that you should call Loader::SetDefaultFontLibName (const char* filename) C++ method and pass a filename (just filename, no path!) as a ‘filename’ parameter. For example, if the default development language is Korean you need to make the following call:
Loader.SetDefaultFontLibName(“fonts_kr.swf”);
This method should be called BEFORE calling CreateInstance for the main SWF file.
Fundamentally, international configuration for a game consists of the following data sets:
- String translation table that maps each phrase in the game to its translated version.
- A set of fonts that provide glyphs for characters used in the translation.
- Font substitution table that maps font symbol names, such as “$NormalFont”, to their fonts available in the configuration.
In Scaleform, these components are represented by the GFx::Translator, GFx::FontLib and GFx::FontMap state objects installable on GFx::Loader. When a movie file is loaded with a call to GFx::Loader::CreateMovie, it is bound to the font configuration states provided by the loader, relying on fonts in those states for rendering text. To create a different font binding, users need to set a new state combination on the loader and call CreateMovie again.
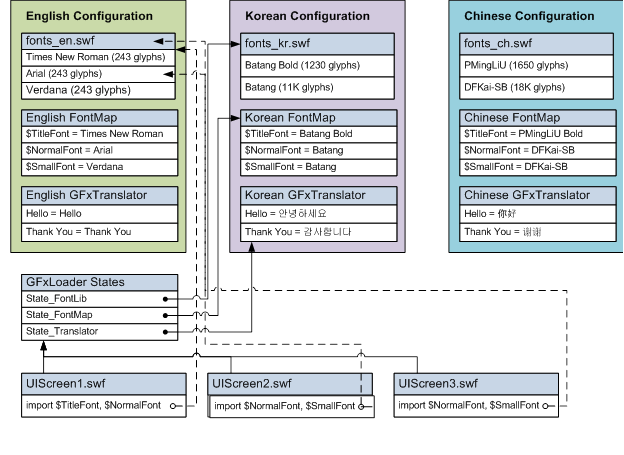
The figure above demonstrates a potential internationalized font setup. In this setup, three user interface files named “UIScreen1.swf” through “UIScreen3.swf” import a set of fonts from the “fonts_en.swf” library. The import file links are illustrated by the dashed arrow lines. Instead of taking the fonts from the import file, however, Scaleform can substitute fonts based on the FontLib and GFx::FontMap states set on GFx::Loader. This substitution will take place automatically if (1) the import file is matched with the one specified by Loader::SetDefaultFontLibName() method and (2) a non-null GFx::FontLib state is set on the loader before the UI screen is loaded.
To support international translation, the above figure uses three configurations: English, Korean and Chinese. Each configuration includes its own font file, such as “fonts_kr.swf” used for the Korean language, and a font map that maps imported font symbol names to the actual fonts embedded into the font file. In our example, the loader states are set to the Korean configuration, causing Korean fonts and translation tables to be used. Loader states, however, could have just as easily been set to the English or Chinese configuration, in which case the user interface would have been translated to those languages instead. The UIScreen files do not need to be modified for this translation to take place.
When internationalizing a game with imported font substitution, developers will first need to create the international art assets and the required language configurations. The art and font assets will normally be stored in the SWF format (convertible to GFX before shipment), while the font map and translation table data can be stored in game specific data formats that support creation of GFx::FontMap and GFx::Translator objects. In Scaleform samples, we rely on the “fontconfig.txt” configuration file to provide this information; however, game developers should create a more advanced scheme for production.
Formally, the process of creating internationalized configurations can be broken down into the following steps:
- Create a default library file (e.g. “fonts_en.swf”) as described in Part 1 and use it to create your game assets.
- Create a translation string table for each language that can be used to create a corresponding GFx::Translator objects.
- Decide on what font mappings will be used for each language; store this map in a format that can be used to create GFx::FontMap.
- Create language-specific font files such as “fonts_kr.swf” for each target language.
Once the international configurations are created, developers can load internationalized UI screens into their game. With the target language selected, they need to take the following steps:
- Create a translator object for the language and set it on GFx::Loader. Translation is implemented by deriving your own class from GFx::Translator and overriding the Translate virtual function. By overriding this class, developers can represent translation data in any format they choose.
- Create a GFx::FontMap object and set it on GFx::Loader. Add the necessary font mappings to it by calling the MapFont function. An example of using GFx::FontMap is provided in Part 3.
- Set any other font related states necessary for the game, such as GFx::FontProvider and/or GFx::FontPackParams, on the loader. Configure dynamic cache through GlyphCacheConfig on the render thread, if necessary.
- Create a GFx::FontLib object and set it on GFx::Loader.
Call the SetDefaultFontLibName(filename) method for the default font library (the one that was used in the swf content):
Loader.SetDefaultFontLibName(“fonts_en.swf”);
After GFx::FontLib is created, load the font source SWF/GFX files used in the target language and add them to the library by calling GFx::FontLib::AddFromFile. This call will make the fonts embedded in the argument files available for use as font imports or device fonts.Load the user interface files by calling GFx::Loader::CreateMovie. The font map, fontlib, and translator states will automatically apply to the user interface.
To demonstrate internationalization, Scaleform Player supports the use of the international profile file, normally called “fontconfig.txt”. When you drag and drop an SWF/GFX file into the player, the ‘fontconfig.txt’ configuration will automatically load from the files local directory, if available; it can also be loaded with the /fc option at command line. When the international profile is loaded, user can switch between its language configurations by pressing the Ctrl+N key. The current configuration is displayed in the bottom of the player HUD when the F2 key is pressed.
The international profile file can be saved in either 8-byte ASCII or UTF-16 format and has a linear structure created by listing font configurations followed by their attributes. The following international profile can be used to describe the game setup presented in the previous section.
[FontConfig "English"]
fontlib "fonts_en.swf"
map "$TitleFont" = "Times New Roman" Normal
map "$NormalFont" = "Arial " Normal
map "$SmallFont" = "Verdana" Normal

[FontConfig "Korean"]
fontlib "fonts_kr.swf"
map "$TitleFont" = "Batang" Bold
map "$NormalFont" = "Batang" Normal
map "$SmallFont" = "Batang" Normal
tr  "Hello" = "안녕하세요"
tr  "Thank You" = "감사합니다"

[FontConfig "Chinese"]
fontlib "fonts_ch.swf"
map "$TitleFont" = "PMingLiU" Bold
map "$NormalFont" = "DFKai-SB" Normal
map "$SmallFont" = "DFKai-SB" Normal
tr  "Hello" = "你好"
tr  "Thank You" = "谢谢"
As can be seen from the sample, there are three separate configuration sections each beginning with a [FontConfig "name"] header. The name of the configuration is displayed in the Scaleform Player HUD when that configuration is selected. Within each configuration, a list of statements is used that is applied to that configuration. The possible statements are outlined in the following table.
Configuration - Statement Meaning
fontlib "fontfile" Loads the specified SWF/GFX font file into GFx::FontLib. The first fontlib appearance will be used as a default font library. map "$UIFont" = "PMingLiU" Adds an entry to GFx::FontMap that maps a font used in game UI screens to a target font provided by the font library. With imported font substitution, the $UIFont should be a name of the font symbol originally imported into UI files from the default “fonts_en.swf”. tr "Hello" = "你好"Adds a translation from the source string to its equivalent in the target language. Developers should use a more advanced solution for storing translation tables.
Users should be aware that configuration file functionality is provided primarily as a sample of how internationalization can be achieved with Scaleform. The structure of configuration file can change in the future without notice; furthermore, we plan to transition it to XML format as Scaleform internationalization functionality evolves. Developers can refer to source code in the FontConfigParser.h/.cpp file for an example of how font states can be configured.
A more complete imported font substitution sample is shipped with Scaleform in the Bin\Data\AS2\Samples\FontConfig and Bin\Data\AS3\Samples\FontConfig directories. This directories includes the “sample.swf” file that can be dropped into the Scaleform Player and a “fontconfig.txt” file, which translates it into a variety of languages. Developers are encouraged to examine the files in that directory to better understand the internationalization process.
Device font emulation is different from imported font substitution in that it does not make use of imported font symbols and relies on GFx::FontMap to substitute system font names instead. During UI creation, artists choose a set of development system fonts, such as “Arial” and “Verdana”, and use them directly as device fonts for all of the UI assets. When running in Scaleform Player, a font configuration file can be used to map system font names to their alternatives in the target language. As an example of such mapping, “Arial” can be mapped to “Batang” for Korean user interfaces. The “Batang” font, in turn, can be loaded from a “font_kr.swf” file through the use of GFx::FontLib.
Device font emulation can be useful if developers plan to use system fonts directly through GFx::FontProviderWin32 or font files through GFx::FontProviderFT2, without relying on GFx::FontLib. Although this approach may seem simpler to setup, device fonts have a number of limitations that make using them less flexible than imported font substitution:
- Device fonts cannot be transformed in Flash. Adobe Flash player will fail to display the device font text field if any rotational transformation is applied to it. Furthermore, the player will not scale device font text correctly and will ignore masks applied to it. Although all of these features will work fine in Scaleform, limited support in Flash makes UI art asset testing more difficult.
- Device fonts cannot be visually configured to have the “Anti-alias for animation” setting. Scaleform Player will always anti-alias device font text for readability, unless specified otherwise through the TextField.antiAliasType property in ActionScript.
- When device fonts are used it becomes impossible for artists to modify development fonts without re-editing all of the UI assets. The use of the font map is possible on the Scaleform side, of course, but that will not apply when the files are tested in the Adobe Flash player. When the imported font substitution is used instead, different development fonts can be chosen by simply editing and re-generating the default font lib file (“fonts_en.swf”).
- When working with TextFormat in ActionScript, Flash will not recognize font symbol names unless they have been imported. This means that developers will need to use direct font names, such as “Arial”, instead of symbolic names, such as “$TitleFont”.
With device font emulation the “fonts_en.swf” file is not strictly necessary, although it is still useful as a font symbol repository during development. If artists choose to use “fonts_en.swf” file, they should NOT export its font symbols; instead those symbols can be copied into the target UI files where they can act as aliases to the mapped device fonts they represent.
Here we will show steps how to create a simple SWF that uses font library with two languages and with using fontconfig.txt.
- Create a new FLA, choose ActionScript 2.0 or 3.0. Call it ‘main-app.fla’. This will a main application SWF that uses font library.
- Create another FLA, choose the same ActionScript you chose on previous step. Call it ‘fonts_en.swf’. This will be our default font library.
- Go to ‘Library’ window, click right mouse button and choose ‘New Font…’ Specify name as $Font1, choose “Family” as “Arial”, “Style” as “Regular”.
- In “Character ranges” choose characters you want to embed. For English it is enough to choose ‘Basic Latin’.
- Switch to ‘ActionScript’ tab. Check ‘Export for ActionScript’, ‘Export for frame 1’, ‘Export for run-time sharing’. In ‘URL’ input field type ‘fonts_en.swf’. Click ‘OK’ button. For ActionScript 3.0 Flash Studio will show you a warning ‘A definition for this class could not be found…’ – ignore it and click ‘OK’ again.
- Repeat steps 3 – 5 for another font, name it ‘$Font2’ and choose DIFFERENT ‘Family’ and/or ‘Style’. If both ‘Family’ and ‘Style’ are the same then Flash Studio may discard the second font as duplication of the first one. Let say we choose ‘Times New Roman’ this time.
- Create one more FLA, same ActionScript setting. Call it ‘fonts_kr.fla’ or ‘fonts_ru.fla’ or any other name depending on language you want to use. Let say it is Korean, so ‘fonts_kr.fla’.
- Go to ‘Library’ window, click right mouse button and choose ‘New Font…’ Specify name as ‘$Font1’, but choose “Family” as some Korean font, for example as “바탕”, “Style” as “Regular”.
- In “Character ranges” choose characters you want to embed. For Korean it might be ‘Korean Hangul (All)’.
- Switch to ‘ActionScript’ tab. Check ‘Export for ActionScript’, ‘Export for frame 1’, ‘Export for run-time sharing’. In ‘URL’ input field type ‘fonts_kr.swf’. Click ‘OK’ button. For ActionScript 3.0 Flash Studio will show you a warning ‘A definition for this class could not be found…’ – ignore it and click ‘OK’ again.
- Repeat steps 8 – 10 for another font, name it ‘$Font2’ and choose ‘Family’ as, let say, ‘바탕체’
- Publish both ‘fonts_en.swf’ and ‘fonts_kr.swf’
- Now it is time to come back to our main-app.fla. But first go to our default font library file (which is ‘fonts_en.swf’), go to Library, select both ‘\(Font1’ and ‘\)Font2’ there and copy them into a clipboard (Ctrl-C or right mouse click -> ‘Copy’).
- Switch to ‘main-app.fla’, go to Library and paste font symbols (Ctrl-V or right mouse click -> ‘Paste’). You will see your fonts with ‘Import:’ prefix.
- Create a text field on the stage of ‘main-app.fla’. Make it ‘Classic Text’, ‘Dynamic Text’. Choose ‘\(Font1*’ from the dropdown ‘Family’ list. Type ‘\)TEXT1’ as a content of the text field (this will be used as ID for translation).
- Create a second text field, choose ‘\(Font2*’, type ‘\)TEXT2’ in it.
- Publish the ‘main-app.swf’, we are done here.
Now, need to create a fontconfig.txt in the same directory where we store all our swfs. Open ‘Notepad’ or any other text editor that can work with Unicode or UTF-8. Type the following:
IMPORTANT: Even though we used Korean names for fonts (“바탕” and “바탕체”), Flash may use English names in SWFs (“Batang” and “BatangChe”). This is why we use English font names in fontconfig.txt. To make sure which font names were generated in the SWF you may use gfxexport –fntlst[FontConfig "English"] fontlib "fonts_en.swf" map "$Font1" = "Arial" map "$Font2" = "Times New Roman" tr "$TEXT1" = "This is" tr "$TEXT2" = "ENGLISH!" [FontConfig "Korean"] fontlib "fonts_kr.swf" map "$Font1" = "Batang" map "$Font2" = "BatangChe" tr "$TEXT1" = "이것" tr "$TEXT2" = "은 한국이다!"
command and analyze the output *.lst file. Save the file (don’t forget to save it as Unicode or UTF-8!). You are done! Open the ‘main-app.swf’ in GFxPlayer and you’ll see the default text as ‘This is’ and ‘English!’. Use Ctrl-N to switch to Korean and you’ll see how English text will be replaced by Korean with using fonts from fonts_kr.swf (since we embedded Korean glyphs only in fonts_kr.swf).
As its name implies, custom asset generation relies on creation of custom SWF/GFX files for each target language distribution. If a game uses the “UIScreen.fla” file, for example, a different version of a SWF can be generated manually for each game distribution, with Korean “UIScreen.swf” being different from English “UIScreen.swf”. The different versions of the file can be placed into different file system directories or not distributed at all in the target market.
The primary benefit of custom assets use is that they allow the absolute minimum number of glyphs to be embedded in each file. Although we do not generally recommend this approach, custom asset generation can be considered when memory is extremely limited (as in less than 600K available for the UI) and art assets meet the following criteria: - The number of UI asset files is relatively small and their text content is simple. - Multiple UI files are rarely loaded together (if they are, they would benefit from the font sharing feature provided by other approaches). - Dynamic text field updates are limited and use a small number of embedded characters. - UI does not require Asian language IME support.
If developers choose to adopt custom asset generation for a game title, we recommend that they read the “Authoring multilanguage text with the Strings panel” topic in Flash Studio documentation and consider using the Strings panel (Ctrl + F11) for their international text. Artists will need to set the “Replace strings” setting to “manually using stage language” in order for Flash text substitution to work correctly with current version of Scaleform.