Appendix C: Windows IME Setup
This appendix provides instructions for installing input method support on your Windows system.
We demonstrate how to install Japanese IME on a Windows XP machine. The process of installing other IMEs (Chinese Simplified, Chinese Traditional, Korean) is similar.
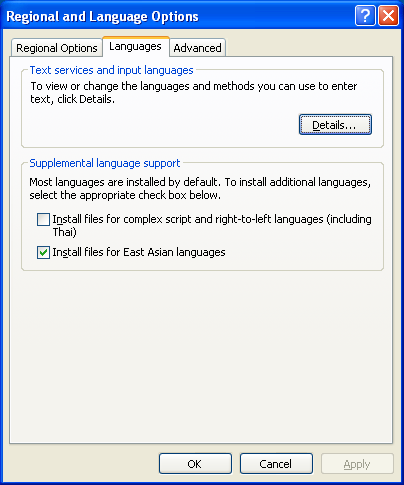
To install Japanese, start by opening the Control Panel (Click the "Start Menu" and chose the "Control Panel"). Then click the "Regional and Language Options" icon. You should then see the "Regional and Language Options" dialog box as shown below.

Two things need to be done here:
- Click on the "Install files for East Asian Languages" check box (This ensures that the correct fonts are installed).
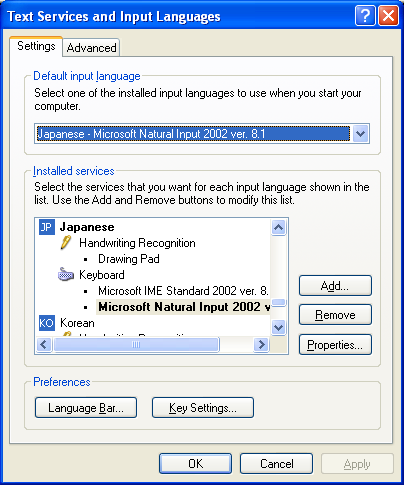
- Then click the "Details" button. You should then see the "Text Services and Input Languages" dialog box.

Click the "Add..." button. You should now see the "Add Input Language" dialog box, show on the next page. Chose "Japanese" in the "Input language" combo box as illustrated below.

Still in the "Add Input Language" dialog box, in the "Keyboard layout/IME" combo box and chose "Microsoft IME Standard 2002 ver. 8.1". Finally click the "OK" button. You may be asked to put your Windows XP CD-ROM in the CD drive so that the relevant files can be copied across to your hard drive. NOTE: You cannot install the IME without the CD. After rebooting you should see Japanese icon in the language bar. Select Hiragana in the input mode tab.
The process of installing IMEs on Windows Vista is similar to that on XP. One noticeable difference is that the "Text Services and Input Languages" dialog box is now summoned by using the “Change keyboards…” button of the “Keyboards and Languages” tab of regional options. The rest of the input language configuration should work identically to XP. With Vista, the files needed for installation are already present on the system, so they just need to be configured for use.