Overview
The files associated with this demo are located in the following locations:
- Bin/Data/AS3/Kits/StarforceTD/ - Contains ActionScript 3 source code, Flash content, and other resources used during gameplay (icons, sounds, etc…).
- Projects/Win32 /{Msvc11, or Msvc14}/GFx 4.6 SDK / – Contains the Visual Studio project for building and debugging FxPlayer Visual Studio 2005/2008/2010 on Windows. Note that this application is not automatically configured to playback Starforce.
- Projects/iPhone/Xcode4/GFx 4.6 iPhone SDK – Contains the Xcode 4 project for “Shippable Mobile Player” on iOS. Note that this application is not automatically configured to playback Starforce.
- LocalApps\StarforceTD\Android – Upon your first successful build of Scaleform via make, this directory will contain a properly configured Eclipse project for “Shippable Mobile Player” already configured to playback StarforceTD on Android.
A pre-built executable of the demo for Windows, StarforceTD.exe, is included in Bin/Data/AS3/Kits/ StarforceTD. It is also accessible via the Windows Start Menu or the Scaleform SDK Browser.
The project/solution files for FxPlayer or the FxMobilePlayer applications are used to compile, deploy, and run the mobile game kit on different platforms.
On Windows, ensure that the “Working directory” for Debugging is set to the Bin/Data/AS3/Kits/StarforceTD directory and that “Command line arguments” is set to StarforceTD.swf.
On iOS, after building and deploying the application to the device via Xcode, copy the SWF files and subdirectories (audio, icons) to the application using iTunes.
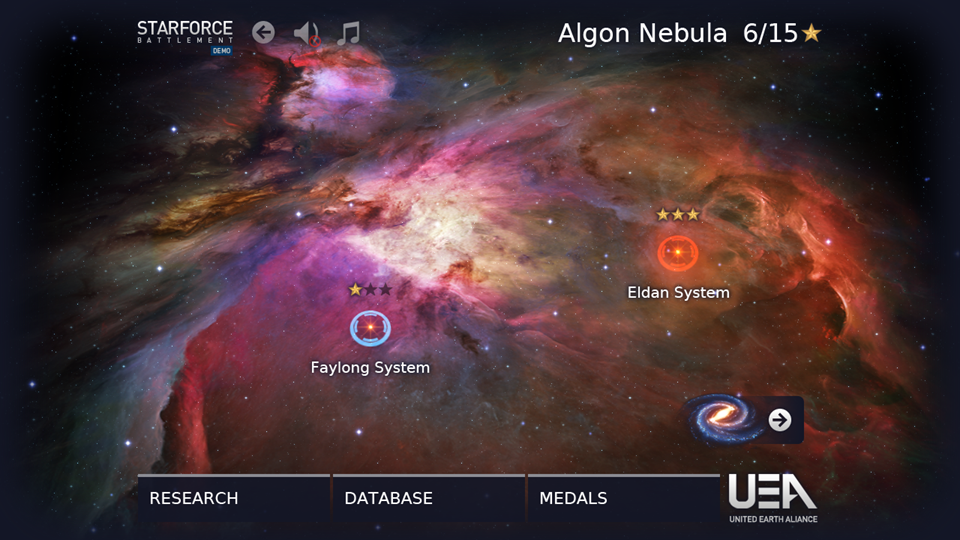
Figure 3: Starforce - Main Menu
StarforceTD.as is the entry point for the game. This class is the Document Class for StarforceTD.fla and when initialized, initializes the MainMainState, which loads StarforceMenu.swf. StarforceMenu.swf contains the Main Menu art assets and the ActionScript 3 class definitions that drive the main menu.
The Main Menu allows the player to select a mission and provides additional options for changing the player’s technology tree and viewing tutorials, the player’s statistical history, and the player’s achievements. The buttons at the top left of the Main Menu allow the player to toggle music, toggle sound effects, or exit the game.
Level selection consists of indicators placed on the galaxy/nebula map which the player can select. Each nebula contains a set of missions that are unlocked in a linear progression. The player can drag the map around in 2D space to explore available options before selecting a particular mission.

Figure 4: Starforce - Mission Data
When the player selects an available mission, the Mission Data View (MissionDataView.as) is displayed. The Mission Data View provides the player with details about the mission. From this view, the player may either launch the mission by selecting the “Enter Mission” button or may return to the Mission Select View by selecting the “X” button at the top right of the view.
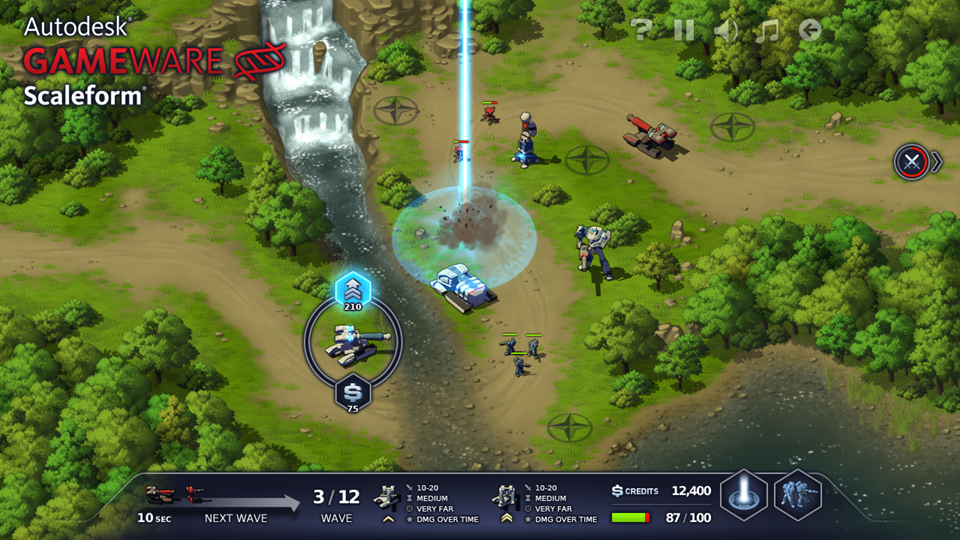
Figure 5: Starforce - Level 1 Gameplay w/ UI
The levels and gameplay for Starforce Battlement are packaged in StarforceTD.swf. All data for the game’s levels is loaded into memory when StarforceTD.swf initially begins, but no level is initialized until the LevelGameState is created. The game is broken up into five missions/levels, each with a unique setting.
The first wave of enemies will not be launched until the “Rush Wave” button, the pulsating crossed-swords button on right-hand side of the screenshot above, is clicked. After launching the first wave, enemies will arrive at set intervals for the duration of the level until all enemies are eliminated or the player is defeated. The current wave number and total number of waves are shown in bottom left hand corner of the HUD, along with a preview of the enemies that makeup the next wave.
If the player successfully eliminates all enemy waves, the player will be awarded a 1, 2 or 3-star rating for the level depending on the number of enemies that were allowed to reach the destination. These stars can be used to develop the player’s technology tree.
Tower build sites, denoted by the black circles with diamonds on the map, are scattered throughout the level. When selected, a contextual radial menu appears above the site that allows the player to build a new tower. Only one tower may be built on a tower build site at a time. Towers can only be built on valid, available sites and the player must have enough credits to afford the tower. The player’s current credit count is displayed on the right side of the HUD, just above the player’s health.
Once a tower has been constructed, it can be upgraded a maximum of twice. Statistics for the current tower level along with the next level are presented at the center of the HUD when a tower is selected.
The player has two abilities, “Orbital Strike” and “Deploy Mercenaries,” that may be used at any time by clicking respective ability button at the bottom right of the HUD. After activating an ability, the player must select a location on the map where the ability should be launched or directed. Note that the Orbital Strike can be dragged after being launched by pressing and dragging the input, either the mouse or touch. Once an ability is used, the ability will ‘cool down’ and will become disabled for a set period of time. The duration of the cool down is indicated to the user by a dark tint over the ability button that drains as time passes.
The set of buttons at the top right of the HUD allow the player to view the tutorial, pause/resume the game, toggle sound effects, toggle music, and restart/exit the current mission.