Interactive Windows
This section provides examples of interactively resizable windows and describes the ActionScript source code required to make them work with user input.
The following example demonstrates how to create a Flash compatible version of an interactively resizable window. The example relies on the scale9grid_window1.fla and scale9grid_window1.swf sample files. Suppose we created the following movie clip in the Flash Studio.
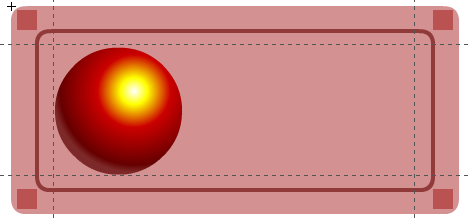
The idea is to resize the window by dragging the little squares in the corners and move it by dragging any other part of its surface. The major problem here is that Flash and its ActionScript do not provide any mechanism for hit-testing that would distinguish between the different shapes and layers inside the movie clip. Furthermore, the 9-slice scaling does not work for nested movie clips in Flash. This contradiction makes it hard to program the resizing logic. As a work-around for hit-testing shapes, programmers have to explicitly check the coordinates. The example below illustrates the ActionScript program associated with the given movie clip.
import flash.geom.Rectangle;

var bounds:Object = this.getBounds(this);
for (var i in bounds) trace(i+" --> "+bounds[i]);
this.XMin = bounds.xMin;
this.YMin = bounds.yMin;
this.XMax = bounds.xMax;
this.YMax = bounds.yMax;
this.MinW = 120;
this.MinH = 100;
this.OldX = this._x;
this.OldY = this._y;
this.OldW = this._width;
this.OldH = this._height;
this.OldMouseX = 0;
this.OldMouseY = 0;
this.XMode = 0;
this.YMode = 0;


this.onPress = function()
{
    this.OldX = this._x;
    this.OldY = this._y;
    this.OldW = this._width;
    this.OldH = this._height;
    this.OldMouseX = _root._xmouse;
    this.OldMouseY = _root._ymouse;
    this.XMode = 0;
    this.YMode = 0;

    var kx = (this.XMax - this.XMin) / this._width;
    var ky = (this.YMax - this.YMin) / this._height;
    var x1 = this.XMin + 6  * kx;   // Left
    var y1 = this.YMin + 4  * ky;   // Top
    var x2 = this.XMax - 26 * kx;   // Right
    var y2 = this.YMax - 25 * ky;   // Bottom
    var w  = 20 * kx;
    var h  = 20 * ky;
    var xms = this._xmouse;
    var yms = this._ymouse;

    if (xms >= x1 && xms <= x1+w)
    {
        if (yms >= y1 && yms <= y1+h)
        {
            this.XMode = -1;
            this.YMode = -1;
        }
        else
        if (yms >= y2 && yms <= y2+h)
        {
            this.XMode = -1;
            this.YMode =  1;
        }
    }
    else
    if (xms >= x2 && xms <= x2+w)
    {
        if (yms >= y1 && yms <= y1+h)
        {
            this.XMode =  1;
            this.YMode = -1;
        }
        else
        if (yms >= y2 && yms <= y2+h)
        {
            this.XMode =  1;
            this.YMode =  1;
        }
    }

    if (XMode == 0 && YMode == 0)
    {
        this.startDrag();
    }
}


this.onRelease = function()
{
    this.XMode = 0;
    this.YMode = 0;
    this.stopDrag();
}

this.onReleaseOutside = function()
{
    this.XMode = 0;
    this.YMode = 0;
    this.stopDrag();
}

this.onMouseMove = function()
{
    var dx = _root._xmouse - OldMouseX;
    var dy = _root._ymouse - OldMouseY;

    if (this.XMode == -1)
    {
        this._x = this.OldX + dx;
        this._width = this.OldW - dx;
        if (this._width < this.MinW || _root._xmouse > this.OldX + this.OldW)
        {
            this._x = this.OldX + this.OldW - this.MinW;
            this._width = this.MinW;
        }
    }
    if (this.XMode == 1)
    {
        this._width = this.OldW + dx;
        if (this._width < this.MinW || _root._xmouse < this.OldX)
        this._width = this.MinW;
    }
    if (this.YMode == -1)
    {
        this._y  = this.OldY + dy;
        this._height = this.OldH - dy;
        if (this._height < this.MinH || _root._ymouse > this.OldY + this.OldH)
        {
            this._y  = this.OldY + this.OldH - this.MinH;
            this._height = this.MinH;
        }
    }
    if (this.YMode == 1)
    {
        this._height = this.OldH + dy;
        if (this._height < this.MinH || _root._ymouse < this.OldY)
            this._height = this.MinH;
    }
}
As you can see, the logic is rather complex. We need to have the initial bounding box of the movie clip and other variables. The important values that control movement are XMode and YMode. The mode value of ‘-1’ means we are dragging the left or the top window border, respectively. The value of ‘1’ means we are dragging the right or the bottom one.
The main hit-test logic is contained in the onPress() function. First, we have to calculate the scaling coefficients kx and ky, because the mouse coordinates do not automatically preserve the Scale9Grid transformation logic:
var kx = (this.XMax - this.XMin) / this._width;
var ky = (this.YMax - this.YMin) / this._height;
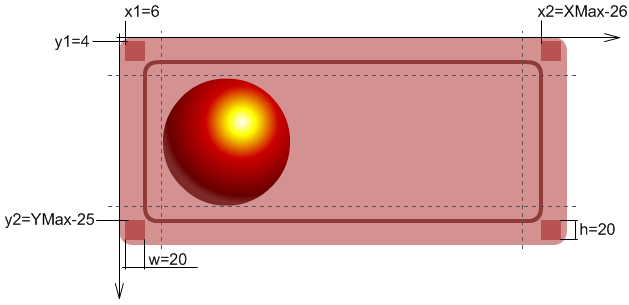
Then we calculate the hit-test rectangles (actually, squares in our case) which are:
Left-Top: x1, y1, x1+w, y1+h Right-Top: x2, y1, x2+w, y1+h Left-Bottom: x1, y2, x1+w, y2+h Right-Bottom: x2, y2, x2+w, y2+h
var x1 = this.XMin + 6  * kx;   // Left
var y1 = this.YMin + 4  * ky;   // Top
var x2 = this.XMax - 26 * kx;   // Right
var y2 = this.YMax - 25 * ky;   // Bottom
var w  = 20 * kx;
var h  = 20 * ky;
Note the constant values 6, 4, 26, 25, and 20. They are actually the coordinates that must exactly correspond with the respective shapes in the movie clip. In fact, the squares in the corners are not necessary and can be removed. This is the major disadvantage of the method: when changing the shapes you have to modify the ActionScript code accordingly. The following picture explains the meaning of the used constants.
In the next step we programmatically verify the coordinates and assign the respective resizing modes.
var xms = this._xmouse;
var yms = this._ymouse;
if (xms >= x1 && xms <= x1+w)
{
    ... and so on
Needless to say, the more complex shapes in the corners would require more complex logic. For example, the following corners would need to check for 2 rectangles each:
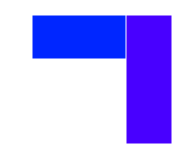
Checking for rounded corners or any other irregular shapes becomes very complex. Furthermore, this example does not handle resizing borders.
The rest of the ActionScript logic deals with changing the window coordinates and size while respecting the minimal width and height restrictions.
Note that a window with an image background requires manual tiling to be fully compatible with Flash.
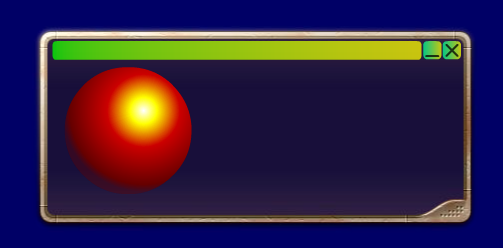
An example that works in Scaleform, but not in Flash is more advanced. It relies on the fact that Scaleform transforms nested movie clips correctly, which means you can use the mouse hit-test functionality for arbitrary, irregular shapes. It is included in files scale9grid_window2.fla and scale9grid_window2.swf. The graphics for this example are more complex, providing advanced functionality based on the generalized ActionScript code that does not use hard-coded coordinates and can be easily reused.

The sample Flash file consists of separate movie clips and buttons, such as Border1 to Border4 (blue), Corner1 to Corner4 (pink), TitleBar, and so on. Since Scaleform adjusts the nested movie clips correctly based on Scale9Grid, all you have to do is assign functions to the movie clips. The ActionScript becomes simple and obvious. Note that the OnResize() function is the same as in the previous example.
import flash.geom.Rectangle;
//trace(this.scale9Grid);
this.MinW = 100;
this.MinH = 100;
this.XMode = 0;
this.YMode = 0;
this.OldX = this._x;
this.OldY = this._y;
this.OldW = this._width;
this.OldH = this._height;
this.OldMouseX = 0;
this.OldMouseY = 0;

function AssignResizeFunction(mc:MovieClip, xMode:Number, yMode:Number)
{
    mc.onPress  = function() { this._parent.StartResize(xMode, yMode);
    mc.onRelease= function() { this._parent.StopResize(); }
    mc.onReleaseOutside = function() { this._parent.StopResize();   }
    mc.onMouseMove  = function() { this._parent.OnResize(); }
}

AssignResizeFunction(this.Border1,  0, -1);
AssignResizeFunction(this.Border2,  1,  0);
AssignResizeFunction(this.Border3,  0,  1);
AssignResizeFunction(this.Border4, -1,  0);
AssignResizeFunction(this.Corner1, -1, -1);
AssignResizeFunction(this.Corner2,  1, -1);
AssignResizeFunction(this.Corner3,  1,  1);
AssignResizeFunction(this.Corner4, -1,  1);
this.TitleBar.onPress  = function() { this._parent.startDrag(); }
this.TitleBar.onRelease= function() { this._parent.stopDrag(); }
this.TitleBar.onReleaseOutside = function() { this._parent.stopDrag(); }

function StartResize(xMode:Number, yMode:Number)
{
    this.XMode = xMode;
    this.YMode = yMode;
    this.OldX = this._x;
    this.OldY = this._y;
    this.OldW = this._width;
    this.OldH = this._height;
    this.OldMouseX = _root._xmouse;
    this.OldMouseY = _root._ymouse;
}

function StopResize()
{
    this.XMode = 0;
    this.YMode = 0;
}

function OnResize()
{
    var dx = _root._xmouse - OldMouseX;
    var dy = _root._ymouse - OldMouseY;

    if (this.XMode == -1)
    {
        this._x = this.OldX + dx;
        this._width = this.OldW - dx;
        if (this._width < this.MinW || _root._xmouse > this.OldX + this.OldW)
        {
            this._x = this.OldX + this.OldW - this.MinW;
            this._width = this.MinW;
        }
    }
    if (this.XMode == 1)
    {
        this._width = this.OldW + dx;
        if (this._width < this.MinW || _root._xmouse < this.OldX)
            this._width = this.MinW;
    }
    if (this.YMode == -1)
    {
        this._y  = this.OldY + dy;
        this._height = this.OldH - dy;
        if (this._height < this.MinH || _root._ymouse > this.OldY + this.OldH)
        {
            this._y  = this.OldY + this.OldH - this.MinH;
            this._height = this.MinH;
        }
    }
    if (this.YMode == 1)
    {
        this._height = this.OldH + dy;
        if (this._height < this.MinH || _root._ymouse < this.OldY)
        this._height = this.MinH;
    }
}
This method has two disadvantages. First, it becomes incompatible with the Adobe Flash player. The second problem is it has many movie clips in it, which generates extra draw primitives and consumes extra memory. This is the price you pay for the simple and general solution. If extra draw primitives are critical, it is possible to combine both methods and replace the borders and corners with a single shape that represents the frame of the window. In which case it is necessary to add extra logic to the ActionScript code, but it should be less complex and less “fragile” than in the first example. The major advantage is that you can use arbitrary shapes for the hit-testing movie clip with irregular borders and corners. Shape and motion tweens will also work.
It is important to mention that the Flash Studio has a potential bug when generating SWF files with Scale9Grids. You can reproduce it with scale9grid_window2.fla. If you select the “TitleBar” layer and draw a small rectangle in the center of the window, the Scale9Grid will be incorrect. It appears that the Flash Studio does not tolerate nested movie clips and other graphics in the same layer. In a few cases it even fails to restore the correct Scale9Grid after removing this rectangle. The “Save and Compact” operation may help. If the problem persists, it is possible to restore the Scale9Grid from the ActionScript. You just trace it while it is correct:
trace(this.scale9Grid);

If the bug appears and cannot be eliminated, you can restore it using the following code:

this.scale9Grid = new Rectangle(24, 35, 363, 138);
For an example of a bitmap based background, see scale9grid_window3.fla and scale9grid_window3.swf. In this file the movie clips for the corners and borders are made fully transparent, because their only purpose is to support the hit-test functionality. They just replicate the shapes of the corners in the background image.
As mentioned earlier in the document, in Scaleform you can use a single image as the background, while in Flash you have to slice and tile it manually. In addition, the corner and border movie clip trick will not work in Adobe Flash Player, since it does not preserve the hit-test transformations correctly. Similarly, rotation and skewing of a Scale9Grid clip will not work correctly in the standard Flash Player. However, with Scaleform we tried to make creation of resizable windows as simple and efficient as possible, while also making sure scale9grid supports transformations correctly.