Audio
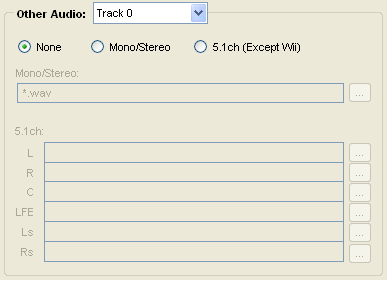
The Audio Channel section of the encoder allows for adding multiple audio tracks of either mono/stereo audio or 5.1 channel surround sound. Each channel can include a different audio file, which is useful for encoding multilingual vocal tracks.
- First, select an audio track from the drop down next to Other Audio in the Scaleform Video Encoder.
- Choose the type of audio — None, Mono/Stereo, or 5.1ch (Except Wii). Note: As the name suggests, 5.1 is not available for the Nintendo Wii; however, 5.1 will work on all other supported platforms.
- For Mono/Stereo, use the Browse button next to the Mono/Stereo text field, to locate the source audio file in WAV format.
This field will already be populated with the path to the source video file if the Use Audio Track checkbox is enabled.

Figure 6: Choose a subtitle track and browse for a file.
For 5.1ch audio, use the Browse buttons next to each channel listed — L, R, C, LFE, Ls, Rs — to load the source audio file for each channel.
The channels for use with 5.1 channel surround sound:
L – Left Speaker
R – Right Speaker
C – Center Speaker (used primarily for voice)
LFE – Subwoofer
Ls – Rear Left Surround Sound Speaker
Rs – Rear Right Surround Sound Speaker
- Open the Scaleform Video Encoder.
- Load C:\Program Files\Autodesk\Scaleform\GFx SDK 4.6\Bin\Tools\VideoEncoder\sample.avi
- Press the browse button next to the Cue Point File text field, and locate and load the file sample_cue_points.txt – this file is found in the same location as sample.avi
- Press the browse button next to the text field directly below the Subtitle Text dropdown, and locate and load the file sample_subtitles.txt — this file is found in the same location as sample.avi.
- Set the Other Audio dropdown to ‘Track 1’.
- Select the Mono/Stereo radio button.
- Browse to and load the sample_audio.wav file by pressing the browse button next to the Mono/Stereo text field. This file is located in the same place as the sample.avi file.
- Press Encode to begin encoding the sample movie with default settings. Note: You may get a warning message indicating the video duration is longer than the audio duration. Ignore this warning. The encoding process will still be successful.
- When the encoding process completes successfully, the Preview button will become available. Press the button to preview the USM encoded video.
- Press the left and right arrow buttons of the Audio Channel combo box at the bottom right of the video player, just above the Subtitle combo box, to switch between the audio channels.