Video Settings
The Video Settings section is used to set the desired level of quality, compression, and file size of the final video using one setting — Bitrate, as well as setting the framerate and final width and height of the video.
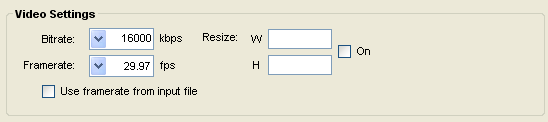
Figure 7: Video Settings
Use the Bitrate stepper — or type the value in for the desired quality of the video. Bitrate is measured in kilobits per second. It determines how much compression is used on the video. The higher the bitrate, the better the quality of the video file, and the larger the file size. The lower the bitrate, the greater the compression, and thus lower quality and lower file size.
The following list represents the optimal encoding rates for each platform. It is often best to encode at a lower resolution and a higher bitrate in order to speed up the encoding process at first, and then later create a higher resolution video, at one of the target rates below, once the final version of the video is ready.
Maximum Practical Bitrates for each platform (kbps)
Video Format PS3 Xbox360 Wii PC 1080p High Quality 40000 40000 n/a 40000 1080p Standard 30000 30000 n/a 30000 1080p High Compression 20000 20000 n/a 20000 720p High Quality 36000 36000 n/a 36000 720p Standard 26000 26000 n/a 26000 720p High Compression 16000 16000 n/a 16000 480p High Quality 16000 16000 8000 16000 480p Standard 12000 12000 6000 12000 480p High Compression 8000 8000 4000 8000 (Optional) Adjust the framerate for the encoded video using the Framerate dropdown. This is defaulted to 29.97 fps — standard NTSC video. When an AVI is loaded into the encoder, the checkmark next to Use framerate from input file will become checked, and the encoder will use the source video’s original framerate. Uncheck this option and use the dropdown if you wish to manipulate the final output framerate. Framerate is a measure of how many frames of the video are displayed in one second. Standard NTSC television signals are broadcast at 29.97 frames per second, and this is the recommended setting. PC Monitors are typically synced at 60 frames per second or 60 hertz.
(Optional) Adjust the final output size of the encoded video using the Resize W and H text fields. Enter a width in W, and a height in H, and place a checkmark in On.
- Press Encode. Once encoded, press Preview to play the video. Encoding the video will create a batch file in the same directory as the output USM video file. This batch file contains the commands necessary to encode the video using the command line encoder.
Once the encoding process finishes, press Preview to play the video. The video may be previewed without any playback controls by unchecking the Preview in extended Video player option next to the Encode button. Otherwise leave this option checked.