Add beats and flow events to animation clips
Beats are used to synchronize transitions between animations.
Suppose that a character has a running animation and a jump animation that starts with the right leg extended forward and proceeds into a long jump.
If we transition between the two animations with a simple crossfade blend we can get very strange results, depending on where the character is in the running animation (for example, if the running animation has the left foot forward and we blend that to an animation with the right foot forward).
Using beats, you can create a beat called left when the left foot is forward and right when the right foot is forward. Then you can specify that the transition should wait for a synchronized beat before transitioning. This means that when the transition is taken, the running animation continues to play until it hits the right beat, which is matched by a corresponding right beat in the jump animation. Only then, when the animations are synchronized, are they blended.
Open the Animation Clip Editor.
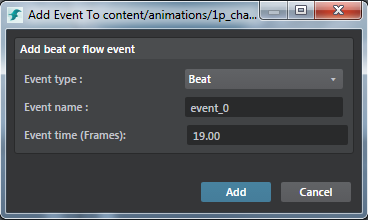
Right-click on the timeline, and select Add Beat > New Beat or Add Flow Event > New Flow Event.
In the options that appear, set the following:

- Event type
- Set to beat, or flow event.
-
Event name
- Enter a name for this event.
- Event time (Frames or Seconds)
- Enter an exact frame value (or time in seconds depending on the toggle option) where you want the beat or flow event to occur. (By default the value is set to the frame where you right-click.)
(All events that you add – you right-click to create the event type/marker type.)
- In the Clip Editor timeline, right-click on the frame where you want to add the beat or the flow event, click Add Beat > Existing or Add Flow Event > Existing and select one of the existing beat or flow events.
The beat or the flow event is set to the timeline and upon selection, you can view its properties in the Property Editor.
Click the beat or the flow event on the Clip Editor timeline.
In the Property Editor, select a different flow event in the Name field or set a new time.
You can use beats to effectively trim an animation loop to only a certain section of the clip.
To do this, you essentially exit early from a state by placing a beat and using the Sync_Beat_Wait_Until_Beat transition mode. You'll need to also add the same beat on the next animation you are transitioning to.
You can also add an anim event in the state (in the Animation Controller Editor) and transition on this event.