Create and import blend shapes into Stingray
This method of shape animation lets you create target shapes directly on the base object without needing to create separate multiple target objects. This means less geometry in the scene to slow down the interaction time. You can also create multiple target objects that are duplicates of the base object, then modify the vertex positions on each one of the target objects into the forms you want. For example, you can use this method for facial animation, with each target object representing a different facial expression. For more information on this method, see Create blend shapes using multiple target objects. Your shape workflows can be performed in Maya or Maya LT.
Select the object you want to use for your blend shape.
Tip: This is the object to be deformed with the target shapes. When exporting to Stingray, it is recommended you use objects with low polygon counts.
- Open the Shape Editor (Windows > Animation Editors > Shape Editor).
- With your object selected, click Create Blend Shape.
Do the following to add your targets:
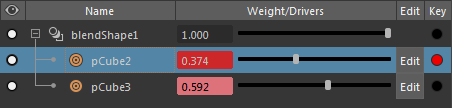
Click Add Target.
Ensure the Edit button is red, letting you edit the target.
Use the Sculpting Tools to quickly reposition vertices, and change your object's shape.
Click Edit when you are done editing your target layer to disable editing mode.
Do the following to add animation to your target layers:
On the Time Slider, drag the time indicator to the desired frame.
In the Shape Editor, drag the Weight/Drivers slider to adjust the object's shape.
Click the red button next to Edit to add a key.
- Select your object, and then select File > Send to Stingray > Selected.
In the window that appears, select a name and location for your exported file, and click Export Selected.
In Stingray, ensure the following options are selected in the Import FBX window that appears:
Blend Shapes
Skeleton with New or update skeleton selection: The name of your shape should appear in the Skeleton Name.
Import Clips
Create Animation Folder
Click Import.
When you initially import your object, the animation you applied in your DCC tool is not visible. You can add your animation in Stingray using an animation controller. See View animated blend shape targets in Stingray.