Organize level objects in categories
You can keep the objects in your game levels organized in the Explorer panel by creating your own custom categories. These new categories appear in the tree view of Explorer view, and in the filter control in both Explorer view and Layers view.
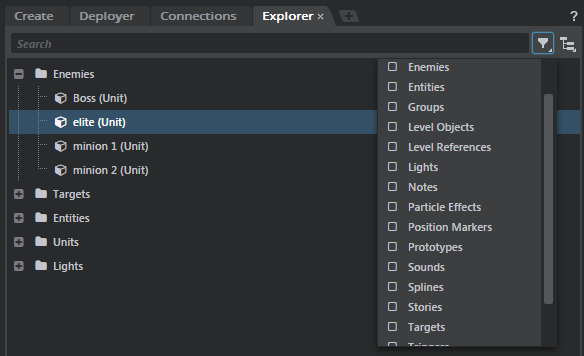
For example, this image shows custom categories like "Enemies" and "Targets" alongside the built-in categories like "Entities", "Units", "Lights", and "Triggers".
To create a new category:
Categories are defined in .object_filter resource files in your project folder. For each new category you want to show up in your Explorer panel, you need to create a new text file that follows the SJSON format shown below, and give it the .object_filter extension.
To re-apply a category filter
When you create or modify a category, you do not need to restart the Stingray Editor to make your changes show up in the Explorer panel. Instead, press F5 to refresh the resource from your project's source folder.
The following .object_filter example was used to create the "Enemies" category shown above:
category_display_name = "Enemies"
category_type_name = "enemies"
evaluation_priority = 10.0
ui_order = 0.0
is_type = """
    -- params: (level_object, engine_object)
    if level_object._unit ~= nil then
        if Unit.has_data(level_object._unit, "is_enemy") then
            return Unit.get_data(level_object._unit, "is_enemy")
        end
    end
    return false
"""
You can set the following parameters:
category_display_name
The name of the category as it will appear in the Explorer panel.
category_type_name
An internal name for this category type. This name must be unique across all .object_filter definitions used in the project, including the built-in categories in the core resources.
evaluation_priority
Specifies the priority of this filter. If an object in the level matches the filter function for more than one category, the object will be placed in the category that has the highest evaluation priority value.
ui_order
Specifies the ordering of this category in the Explorer tree view. The ordering is from top to bottom, so higher numbers will place the categories lower in the list. Categories with the same ui_order value are sorted alphabetically.
This field is optional. If you don’t specify a value, the category will be put at the end of the list and sorted alphabetically with any other categories that do not have a ui_order value.
Note that the categories in the filter list are always sorted purely alphabetically.
is_type
A Lua function that will be called for each object in the level, in order to determine whether or not that object should be placed in this category. Make sure that you enclose your Lua code between triple-quotes: """. See the next section for details.
Each category must contain an is_type function, which the editor calls for each object in the level. The job of the is_type function is to determine whether or not a single level object passed in by the editor should be included in this category.
The editor passes two parameters to this function:
level_object: A wrapper object that represents the game object you need to test within the level editor's Lua environment. You can use this wrapper to find out information about the game object, such as what type of object it is, or what are its coordinates in 3D space.
These wrapper objects are not currently documented, but you can find their code in the core/editor_slave/editor folder. The base object definition is in object.lua, which is inherited by other kinds of specialized objects such as the UnitObject defined in unit.lua. See also the LevelEditing object in level_editing.lua, which provides some object management and testing utilities.
engine_object: The game object that is wrapped by the first parameter. This may be any of various kinds of objects exposed in the Stingray runtime Lua API, such as a stingray.Unit, stingray.Light, stingray.Camera, and so on. Once you find out from the level object what kind of game object this parameter represents, you can use the appropriate runtime API to interact with the object.
The function must return true if the object passed in should be included within this category, and false otherwise.
In the example above, the filter function returns true only for units that have a certain type of script data set on them:
if level_object._unit ~= nil then
    if Unit.has_data(level_object._unit, "is_enemy") then
        return Unit.get_data(level_object._unit, "is_enemy")
    end
end
return false
Using this code, you would divide your game units into categories by tagging them with different script data that identifies their object types. For example, you might set different script data values for scenery objects, props, vehicles, or characters. depending on what categories you want to set up.
You can set script data for a unit resource in the Unit Editor.
You can organize your objects into categories based on their resource names. For example, the following function returns true only for objects whose unit resources match one of a specified list of values:
local resource_names = {
    "content/models/character/character",
    "content/models/props/target"
}
if level_object._unit ~= nil then
    for _, name in pairs(resource_names) do
        if stingray.Unit.is_a(level_object._unit, name) then return true end
    end
end
If you have a well-defined scheme for assigning names to the units you spawn in the Editor, you can make use of this naming scheme to organize your objects into categories. For example, the following function returns true only for units whose names start with the string enemy_:
if level_object.name:find("^enemy_") then return true end
return false
You are not limited to filtering by static properties of the objects. You can also make your filters take into account dynamic aspects of the current state of the level editor.
The only catch is that if your filtering relies on data that can change over the course of editing the terrain, you will have to press F5 to reapply the category filtering when that data changes.
For example, the following function gathers up all the objects that are currently selected in the editor. This lets the level designer add an arbitrary set of objects to the category on the fly.
if level_object._unit ~= nil then
    if LevelEditing.selection:includes(level_object.id) then return true end
end
return false
Other uses of this technique might be to group together all objects within the camera's current frustum, or all objects that are currently hidden in the editor (in order to pull them out of other lists).
You can organize resources by their position in the 3D scene. For example, the following function includes any units that are within 10 meters of a reference position.
reference_point = stingray.Vector3(0,0,0)
distance_threshold = 10
if level_object._unit ~= nil then
    local position = level_object:local_position()
    if stingray.Vector3.distance(reference_point, position) < distance_threshold then return true end
end
return false
In this example the reference point is the origin, but you could use other points like the viewport's camera position, a selected object, or a unit picked by the screen position of the mouse.
Any time a unit is added to the scene in that area, it will automatically be added to the category. However, if you move an existing unit into the area, you will need to press F5 to re-apply the filter in order for the change to apply.