Working with Manufacturing Configurations
TruPlan data can be used in other Autodesk applications; for example with:
- TruFiber: Generate tool paths and associated NC codes for manufacturing from TruPlan files.
- Nesting Utility: Create nests from TruPlan flat patterns, including the nest and laser data created in TruPlan.
In TruPlan, a manufacturing configuration is set of strategies and geometry that will be used in other applications. Because every ply or sub-ply in an assembly can have multiple strategies associated with it, you use configurations to indicate which strategy to use for each ply or sub-ply.
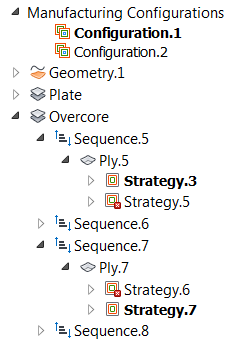
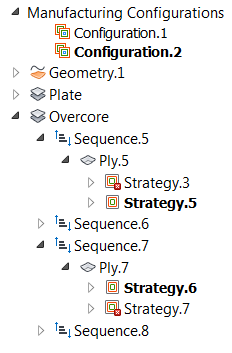
In these examples in the TruPlan browser:
- Configuration.1 includes Strategy.3 and Strategy.7.
- Configuration.2 includes Strategy.5 and Strategy.6.
|
|
The bolded configuration is the default, or "active." When you open your file in TruFiber, this is the one you see, but you can switch to the other configurations.
Bolded strategies are the ones included in the active configuration.
By default:
- TruPlan creates a configuration for you when you start a project.
- The top-most configuration in the browser is the active configuration.
- The top-most strategy in each ply is included in the default configuration.
- The top-most subdivision in each ply is included in the default configuration. (Subdivisions are only present if your project includes sub-plies.)
Create a Configuration
- In the TruPlan browser, right-click Manufacturing Configurations.
-
Select Add Manufacturing Configuration from the context menu.
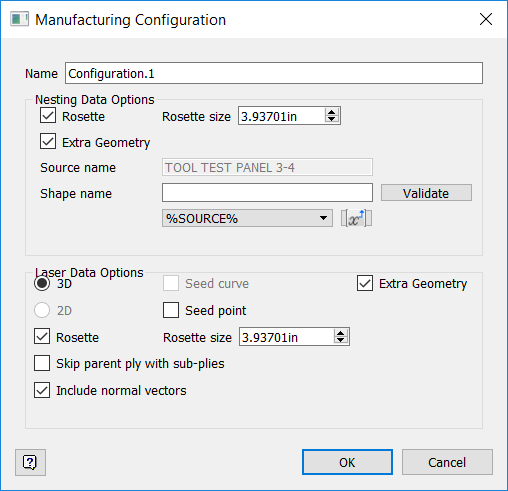
The Manufacturing Configuration dialog box opens. It contains the current settings for nesting and laser data.
-
Optional: Make changes to nest and laser output data in the Manufacturing Configuration dialog box.
- Click OK.
Activate a Configuration
- Right-click the configuration in the browser.
- Select Activate from the context menu.
This configuration will now be the one in effect in TruPlan, and the default configuration when you open the file in TruFiber.
Include Strategies in a Configuration
- Activate the configuration you want to add strategies to.
- Right-click the strategy you want to include in the configuration.
- Select Include from the context menu.
- Navigate to each ply or sub-ply and repeat the previous two steps for other strategies you want to include.
If a ply or sub-ply contains strategies, at least one must be marked as included in the current configuration.
Include Sub-Plies in a Configuration
If you have sub-plies in your project, they are organized into one or more subdivisions beneath a ply in the TruPlan browser. If a ply contains more than one subdivision, make sure to include the one you want as part of the active configuration.
- Right-click the subdivision you want to include in the configuration.
-
Select Include from the context menu.
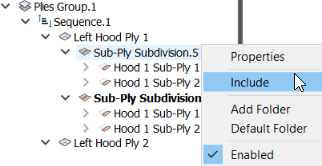
The active subdivision is bolded.
-
Navigate to each ply and repeat the previous two steps for other subdivisions you want to include.
Edit Nest and Laser Data for a Configuration
Adjust settings that can be used with your part for laser projection or nesting software.
- Double-click the configuration in the TruPlan browser.
-
Make changes in the Nesting Data Options and Laser Data Options Manufacturing Configuration dialog box.