Converting an Interior Scene to C4DtoA

This tutorial is a breakdown of the workflow required to convert an interior scene that has been setup for another renderer for rendering with Arnold. Scene setup and rendering should take no longer than an hour. The scene used in this example is part of this collection of architectural interiors.
The scene has been exported from 3ds Max as an .fbx file and imported using the FBX plugin.
The workflow covers the following topics:
Note: Another tutorial that demonstrates different ways to approach lighting a room can be found here.
Lighting
The scene is lit very simply with quad lights positioned outside of the windows of the room. The color_temperature has been set to that of daylight (5500). Leave the default light samples setting at 1. For final rendering, increase this value to 4 to reduce any noise in the shadows.
Increase the exposure of the light to around 20.
Use a directional_light to simulate sunlight coming through the far window. Increase the angle slightly to around 0.2. This will give the sunlight a softer edge to the shadow on the floor. You may need to increase the samples of the directional_light (distantant_light) if you do (3 should suffice). Enable color_temperature and choose a slightly warmer temperature like 5000.

Scene lit with Quad lights outside of the windows and a Directional light representing sunlight
To preview how the lighting will affect the scene, you can apply a standard_surface (reduce specular_weight to 0) shader override to the scene. This effectively creates a 'chalk preview' of your render and allows you to focus purely on lighting without being concerned about shading.

Reducing the diffuse_samples to 0 will effectively disable indirect lighting. This is useful when you want to test render direct lighting in the scene and will also be quicker to render.
diffuse_samples : 0 (disables indirect lighting)
Floor Shader
- Connect the diffuse color map to the base_color of a standard_surface shader.
- Connect the bump map to the bump attribute. Reduce the bump_depth to a small amount like 0.03.
- Increase the specular_weight to 0.3 and increase the specular_roughnes to 0.2 to give the floor a glossy appearance.
Information about specular_fresnel can be found here.
Mirror
- Assign a standard_surface shader to the mirror and rename it 'Mirror'.
- Reduce the base_weight to 0.
- Increase the metalness to 1.
- Reduce the specular_roughness to 0.
Curtain
Here, we will use thin_walled and subsurface to provide the effect of translucency with the curtain being lit from behind.
- Assign a standard_surface shader to the curtain and rename it 'curtain'.
- Enable thin_walled (Geometry).
- Increase the subsurface_weight to around 0.5.
 |
 |
| without translucency | with translucency |
Glass Door
Ensure that the polygon face normals are all facing in the right direction (especially important when rendering glass surfaces with Arnold).
- Assign a standard_surface to the glass door and rename it 'Glass'.
- Reduce the base_weight to 0.
- Increase the specular_weight to 1.
- Increase transmission_weight to 1 (this makes the glass transparent).
- Increase the index of refraction (IOR) to 1.5 (glass).
- You can also add a tint to the glass very easily by adding a subtle hue to the transmission_color.
[Render Settings](http://support.solidangle.com/#Render Settings)
Sampling
- For the final render, the Camera (AA) settings were increased to 6.
- The diffuse_samples were also increased to 6 to reduce noise in indirectly lit areas of the room. The images below show the difference between rendering 2 (default) diffuse_samples and 6.
 |
 |
| diffuse_samples: 2 | diffuse_samples: 6 |
Note: Care should be taken when increasing this value as your render times will increase dramatically.
Note: More information and tutorials about removing noise can be found here.
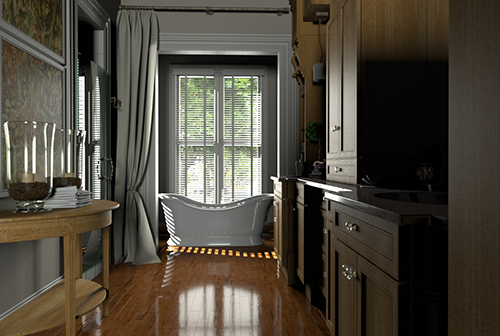
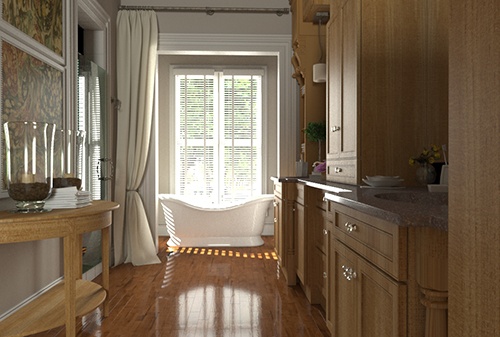
Diffuse Ray Depth
The images below were rendered using a diffuse_ray_depth of 1 (default) and 4. You can notice a clear difference of bounced light around the curtain for example.
 |
 |
| diffuse_ray_depth: 1 | diffuse_ray_depth: 4 |
Note: Note that render times will linearly increase with regards to the number of ray diffuse bounces and therefore care should be taken when increasing this value.
Transmission Ray Depth
You can 'clearly' see the difference in the glass vases when increasing the transmission_ray_depth in the images below.
 |
 |
 |
| 2 | 4 | 8 |
Note: More information about rendering glass surfaces can be found here.
That concludes this tutorial on converting an interior scene for rendering with Arnold.