• Help Home
  • English (US)
    1. English (US)
    2. 简体中文
    3. 日本語
    • Arnold User Guide
    • Arnold for 3DS Max
    • Arnold for Houdini
      • Arnold for Houdini User Guide
      • Release Notes
      • Getting Started
        • Environment Variables
        • Arnold Toolbars
        • Color Management
        • Rendering Contexts
        • Rendering Your First Scene
        • Arnold
        • Installation
        • Licensing
        • Watermarks
      • Tutorials
      • Getting Started with Arnold GPU
      • Introduction to Arnold USD
      • Render Output
      • Properties
      • Shapes
      • Lights
      • Cameras
      • Operators
      • Shaders
      • Textures
      • Environment
      • Solaris
      • Arnold Menu
      • Denoising
      • Desktop Analytics Program
      • Advanced Features
    • Arnold for Cinema 4D
    • Arnold for Katana
    • Arnold for Maya
    • Arnold Developer Guide
    Share
    • Email
    • Facebook
    • Twitter
    • LinkedIn

    Arnold Toolbars - Arnold for Houdini

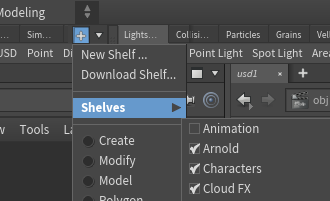
    The Arnold toolbars are available with some commonly used tools. To add the Arnold Toolbars click on the + icon at the end of the shelf tabs, then Shelves > and enable Arnold.
    The toolbars have buttons to add and remove Arnold Properties, create volumes, procedurals, and all lights.

    Parent page: Getting Started

    Was this information helpful?

    Except where otherwise noted, this work is licensed under a Creative Commons Attribution-NonCommercial-ShareAlike 3.0 Unported License. Please see the Autodesk Creative Commons FAQ for more information.

    • Privacy Statement
    • Legal Notices & Trademarks
    • Report Noncompliance
    • © 2025 Autodesk Inc. All rights reserved