
CORs, OCOs, and SCOs
The COR (Change Order Request), OCO (Owner Change Order), and SCO (Subcontractor Change Order) tabs all function similarly within Cost Management.
All change orders can be generated from the PCOs (Potential Change Orders) on the PCO tab. SCOs and RFQs can also be generated from the cost items.
The different change order types are related in that:
- One or more PCOs can form a COR.
- One or more CORs can form an OCO.
- One or more SCOs can be generated from a single OCO.
As a result, within Cost Management:
- A PCO can be used to generate CORs, OCOs, or SCOs.
- A COR can be used to generate OCOs or SCOs.
- An OCO can be used to generate one or more SCOs.
In this article:
- Change Order Tabs Overview
- Generate a Change Order
- Edit Qty and Unit Cost in Cost Summary
- Choose Change Order Type
- Send a Change Order
- Create a Budget Transfer from SCO
- How Owners Can Collaborate on Change Orders
- Export a COR, OCO, or SCO Report
- Related Articles
Change Order Tabs Overview
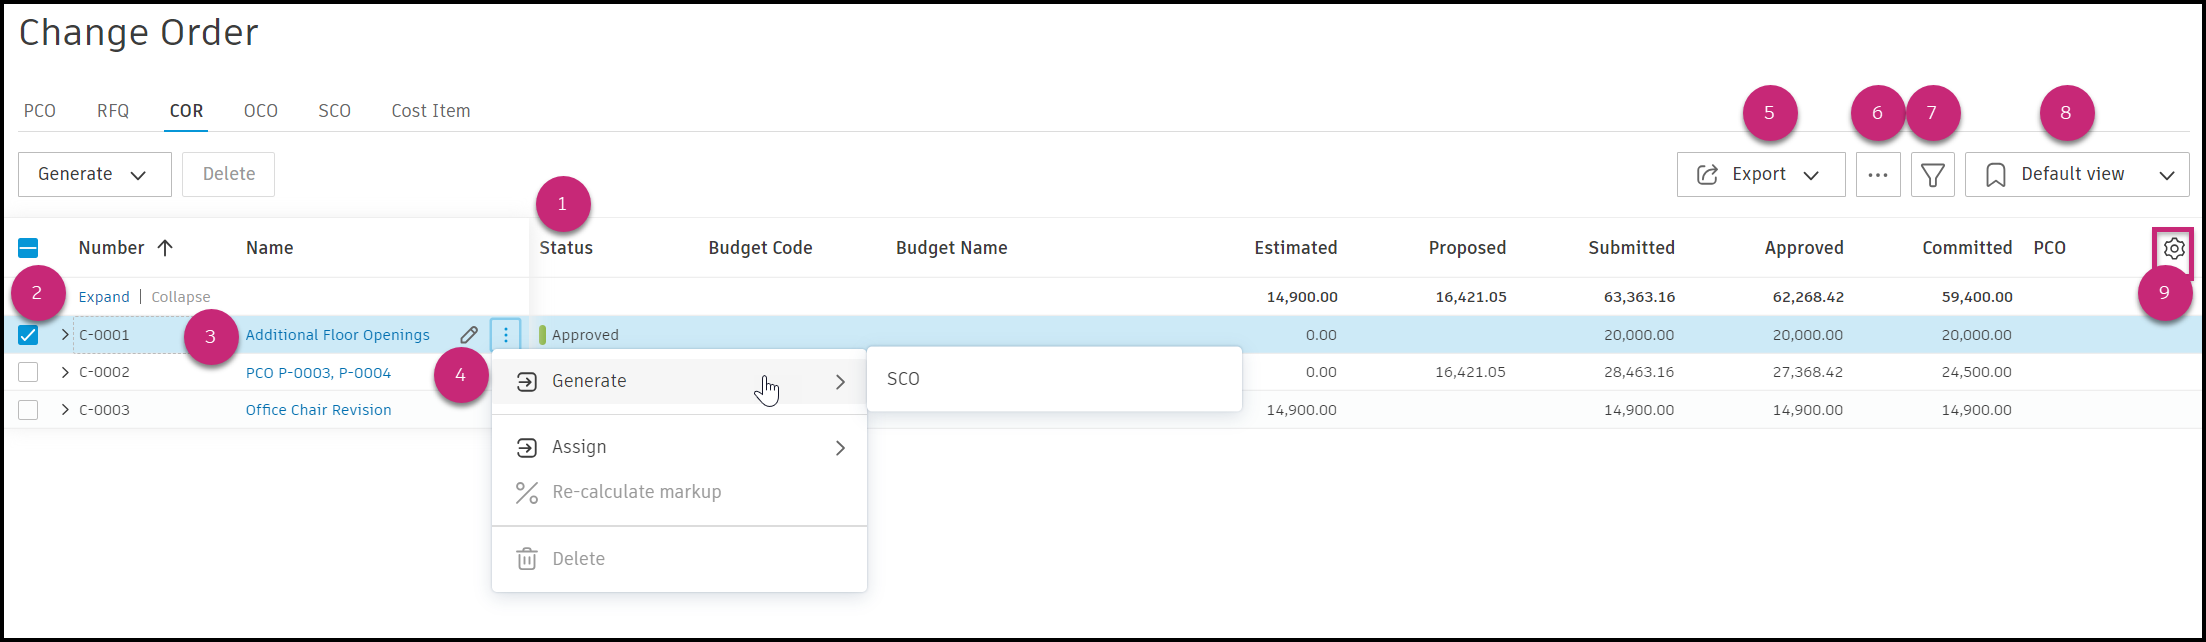
The COR, OCO, and SCO tabs all function similarly within Cost Management, with only small differences. Tab names can be customized by project administrators within settings.
The item's status automatically updates to Draft after a change order is generated from a PCO. See the Change Order Statuses article to learn more about change order management statuses.
Select the checkbox next to one or more change orders to change the status, generate the next change order, or delete a change order.
Select the item’s name to open the flyout panel. In the flyout panel, selectable workflow-based actions will appear to guide you through the change order management process.
For example:
- When the COR status is Submitted, Set as Accepted and Set as Rejected buttons are visible.
- By selecting Set as Accepted, the status color changes, and the next options are Set as Rejected, Generate, and Revert to Submitted.
- With the status Accepted, an OCO or an SCO can be generated.
What else, in the flyout panel, you can edit change orders' details. For example, the Cost Summary section displays five sets of values: Estimated, Proposed, Submitted, Approved, and Committed. You can edit Qty, Unit, and Unit Cost fields when the change order status allows editing.
Note: Qty and Unit are shared across all five value sets. When you change them in one set, they update in all sets.Click the More menu
 to set the status of the change order, generate or assign a change order, add markup or recalculate one, or delete the item.
Click Export to create a change order report.
Click this icon to show or hide change orders' hierarchy. To learn more about using the hierarchy view to navigate between related change orders, see the Navigating Change Orders with Hierarchy View section.
Click the
 to filter and group the table.
See the available predefined views of the table or save the current view of the table.
Select the
 icon to edit the position and visibility of columns within the table.
Generate a Change Order
You can generate CORs, OCOs, or SCOs from a PCO. To do that:
Select the Change Order tool from the left navigation.
Select the PCO tab.
Select the checkbox for one or more PCOs.
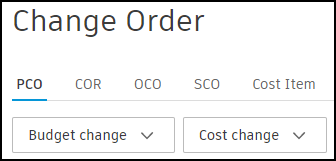
Note: If you haven't created a PCO yet, see the Potential Change Orders article to learn more about creating PCOs.Click Budget Change or Cost Change and choose the change order type.
Enter a committed value if necessary. You can copy cost item amounts from another column.
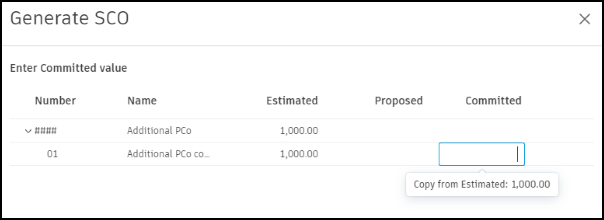 Tip: You can use a copy button on change order level as well.
Click Generate.
Next, send a change order to the owner or supplier.
Edit Qty and Unit Cost in Cost Summary
For change orders without cost items (PCO, RFQ, COR, OCO, SCO), you can edit Qty, Unit, Unit Cost, and Amount directly in the Cost Summary section of the flyout panel:
- Edit Qty, Unit, or Unit Cost when the status allows editing.
- Qty and Unit are shared across all value sets.
- Unit Cost equals Amount divided by Qty.
- Toggle the lock button to switch between editing Amount or Unit Cost.
When you add the change order to a payment application, these values sync automatically.
Choose Change Order Type
When generating a change order (or later), you can choose its type for better categorization. Project administrators can add change order types or deactivate them in the Settings tool.
Owner Change Directive in Budget Payment Application
Construction Change Directives (CCD) are used when work must proceed without an agreed price. Contractors can bill for completed work using estimated values under the Owner Directive change order type.
As long as the OCO with CCD has a status of at least Open, it can be added to a budget payment application. To do so:
- Go to the Budget tool and switch to the Budget Payment Application tab.
- Select a line item from your change orders and select Add Change Order at the bottom of the SOV. In column mode, members can use the button in the flyout panel under Change Order Details.
- In the Add Change Order, select the type of OCO.
- Once added, it can be billed for this period.

As work continues, it might be required to re-estimate, so the member can change the amount in the OCO. When you create a pay app for the next month, the scheduled amount will be updated accordingly.
Send a Change Order
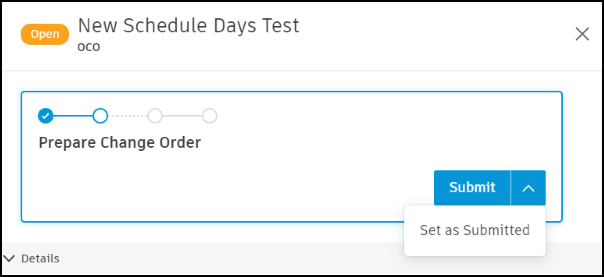
Your generated change order will show in the appropriate tab. Switch to the relevant tab and find the newly created change order. Prepare a change request. To do that:
Click the relevant change order item. The details panel opens.
Set the status as Open.
Enter a scope of work if necessary. For example, fill in information in the Owner or Supplier Details section and add a Response Due date.
In the Documents section, create a document package and add more attachments as required.
For RFQs and SCOs, check the Compliance Requirements section in the details panel. Upload any required documents to meet compliance requirements before submission. See the Compliance Requirements article to learn more.
Once your change order is ready to send, click Submit.

Check the information in the pop-up window. You can change this information by closing this window and returning to the details panel of the change order.
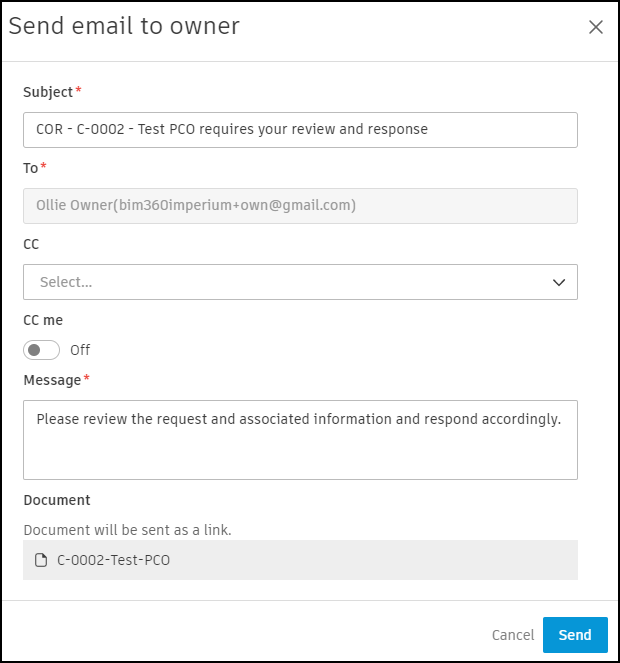 Tip: The owner's contact from the PCO flyout is the default recipient. You can change the owner's contact in the Company Setup setting.
Click Send.
When a change order is in the:
- Sent (for SCO),
- Approved (for COR), or
- Executed (for COR, OCO, SCO) status,
A collaborator can read cost information or download documents in the view-only details panel. Click View Cost Detail in the More menu.

Create a Budget Transfer from SCO
Project administrators and members with both Budget and SCO full control permissions can create internal budget transfers directly from SCOs. This is useful when you need to move money from one budget item to another to pay for supplier change orders without requiring extra approvals.
To create a budget transfer from an SCO:
Go to the Change Order tool and select the SCO tab.
You can create a budget transfer in several ways:
From an SCO: Click the More menu
next to the SCO and select Transfer budget. From a cost item: Open the SCO, find the cost item, click its More menu
, and select Transfer budget. From multiple items: Select multiple SCOs or cost items, then click Transfer budget in the batch actions.

Then, in Internal budget transfer:
- Each selected cost item with a non-zero Committed value creates one transfer line.
- For positive Committed values (money allocated), the system automatically uses the cost item's linked budget in the To field.
- For negative Committed values (money being removed), the system automatically uses the cost item's linked budget in the From field.
- The Amount is automatically set to the absolute value of the Committed amount.
- A note is automatically added referencing the source cost item.
Click
 to add more transfers, even those that are not linked to the cost items. Those transfers are separated in the table.
Click
 to delete a transfer from the list.
You can use Copy to all "From" or Copy to all "To" buttons to quickly populate all transfer lines with the same budget.

Click Save to create one or more internal budget transfers.
You'll receive confirmation that the budget transfer was completed.
How Owners Can Collaborate on Change Orders
Receive and Respond to Owner Change Order Email
In the change order workflow, an email will notify an owner of the change order for review, if they have a collaborate permission for change orders.
As an owner:
Open the received email and select Open in Cost Management. When Cost Management opens, only the information pertaining to the owner will be visible.
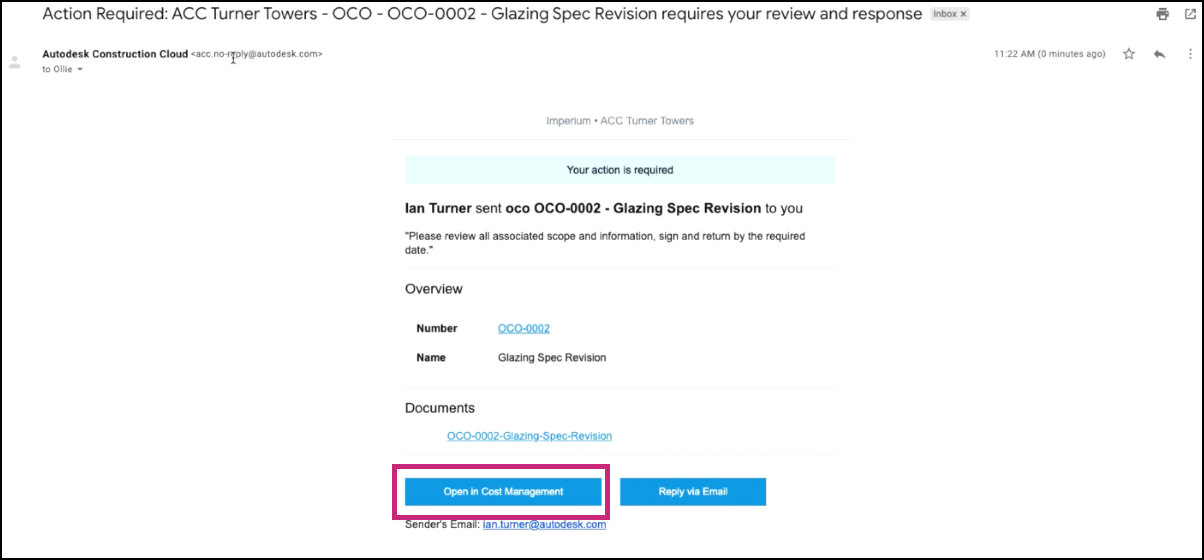
Click the change order name to open the details flyout panel.
Scroll to review details, including any documents. When the collaborative access is assigned to an owner, you can review, accept, reject, or request a revision.
Select Respond in the workflow bar.
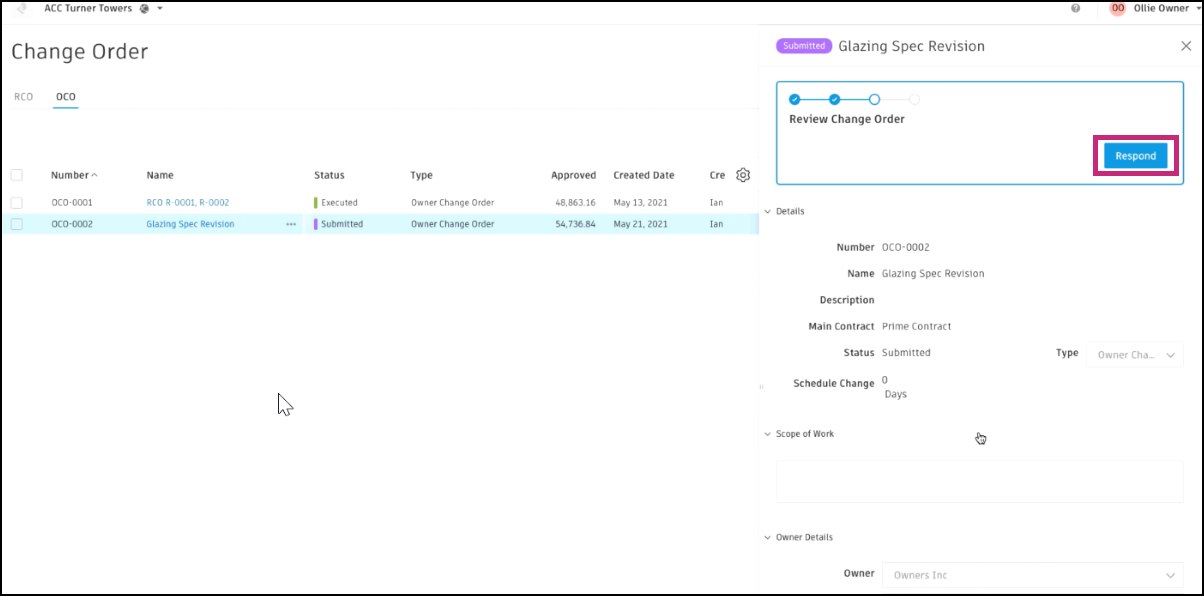
Review the Scope of Work and attached documents. To add attachments, select Add Document.
Respond by clicking the drop-down in the Response section and selecting Approved, Revise and Resubmit, or Rejected.

Include a comment before hitting Submit.
Once submitted, a general contractor will be notified.
Export a COR, OCO, or SCO Report
You can export a COR, OCO, or SCO report that will contain all details or a minimal number of them. To do so:
Select the Change Order tool from the left navigation.
Switch to the COR, OCO, or SCO tab.
Click Export
 .
. Choose one of the following:
- PDF Report – to export a report in a noneditable PDF format.
- Excel Report – to export a report in an editable Excel format.
Add the Report Title.
Choose the Report Template:
- Current View - you can export a report from the current view, for example with applied filters.
- System Default Report – you can export a report with all default columns.
Choose whether you want to include the Cost Item information in the report. By deselecting this option, you can export a report only with the minimum details.
Add an optional message.
Click Run report.
You’ll receive the report by email. You can also find and download it from the Reports tool.
Reports for Collaborative Access Users
Members with collaborative access are able to export reports from change order tables (PCO/RFQ/COR/OCO/SCO).
Reports include associated cost items and their respective amounts, such as proposed amounts in RFQ reports. However, budget codes or budget names are not currently displayed.