
The Strategy tab contains these options:
Below centerline — Enable this option to make the tool work on the negative X side of the spindle centerline.
Reuse path in canned cycle — Relates to Use canned cycle. Enable this option to output the curve to the NC file once and then reference it in both the Rough and Finish canned cycles. This option is enabled by default.
Cycle — Select from:
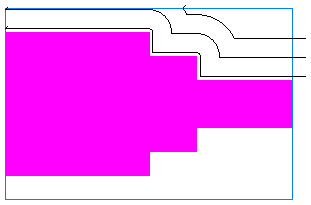
- Turn/Bore — This cycle roughs within the defined material boundaries by feeding parallel to the part's center line along the Z axis while stepping down in the X axis. Select Toward spindle or Toward face. If the Total stock attribute is set, then the part is roughed using curves that are offset from the feature's profile.
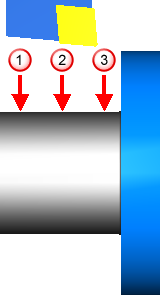
- Face — This cycle roughs within the defined material boundaries by feeding from the outside of the part to the center while stepping into the face of the part along the Z axis in the negative direction.
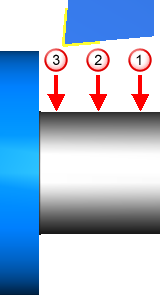
- Back face — This cycle roughs within the defined material boundaries by feeding from the outside of the part to the center while stepping into the face of the part along the Z axis in the positive direction.
Toolpath — Select from:
- Turning — Normal roughing passes are enabled. Each roughing pass is cut in the same direction. For finishing, the tool traces the contour of the feature from right to left and is withdrawn from the part.
Roughing
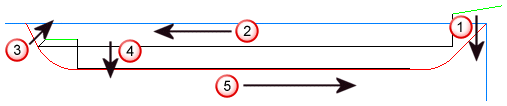
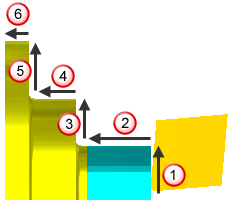
If the Toolpath attribute is set to Turning, the normal roughing passes are enabled. Each roughing pass is cut in the same direction.
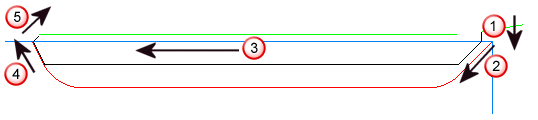
 Feed straight down into the part. The distance is based on the depth of cut.
 Cut down the right-hand wall.
 Feed straight across.
 Feed up the left-hand wall.
 Withdraw from the wall, retract all the way across the feature.
Finishing
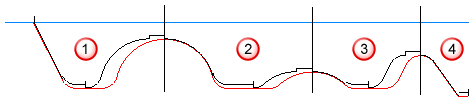
If the Toolpath attribute is set to Turning, the toolpath is generated as shown below.
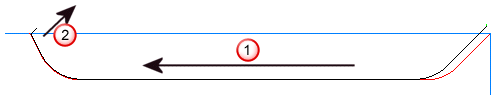 The tool traces the contour of the feature from right-to left.
The tool is withdrawn from the part based on withdraw angle and withdraw length.
The tool traces the contour of the feature from right-to left.
The tool is withdrawn from the part based on withdraw angle and withdraw length.
- Offset — Roughing toolpaths are created using offsets of the Turn feature's curve. These offsets are clipped against the stock.
For the offset toolpath type, the roughing toolpaths are created using offsets of the Turn feature's curve. These offsets are clipped against the stock.
- Cut-Grip — Roughing with Iscar cut grip tools is bi-directional. The cut grip finishing style is performed using a unique strategy that is enabled by having a grooving tool that cuts in both directions.
Roughing
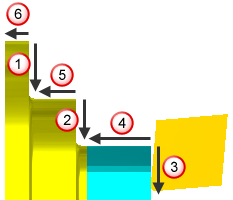
Roughing with Iscar cut grip tools is bi-directional. The steps of the cuts are as follows.
 Feed straight down into the part. The distance is based on the depth of cut.
Feed straight over in Z.
Withdraw away from the wall and rapid back slightly in Z.
Feed straight down again based on the depth of cut.
Feed straight in the -Z direction.
Feed straight down into the part. The distance is based on the depth of cut.
Feed straight over in Z.
Withdraw away from the wall and rapid back slightly in Z.
Feed straight down again based on the depth of cut.
Feed straight in the -Z direction.
Finishing
The cut grip style of finishing is performed using a unique strategy that is enabled by having a grooving tool that cuts in both directions.
 Cut down the left hand wall up to the bottom radius.
Rapid up and over and plunge a relief groove.
Cut down the right-hand wall, through the bottom radius into the relief groove.
Cut along the bottom of the groove. This move is offset by a
deflection amount.
Cut up the left-hand bottom radius. This move is offset by a deflection amount.
Cut down the left hand wall up to the bottom radius.
Rapid up and over and plunge a relief groove.
Cut down the right-hand wall, through the bottom radius into the relief groove.
Cut along the bottom of the groove. This move is offset by a
deflection amount.
Cut up the left-hand bottom radius. This move is offset by a deflection amount.
If the Turn feature has multiple groove cavities, each cavity is cut in this way and the cavities are ordered from left to right:
- Round Insert — Round tool roughing toolpaths are designed to ease the tool more gently into a groove shape.
Round tool roughing toolpaths are designed to ease the tool more gently into a groove shape. Instead of plunging straight into the material, part entry is controlled by the Engage angle turning attribute.
Note: A round tool is required and you must manually select the tool for this toolpath type.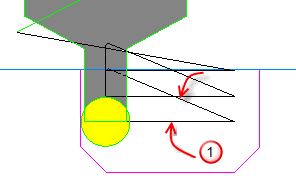 Engage angle
Note: Round insert tool finish toolpaths are the same as Turning finish toolpaths.
Engage angle
Note: Round insert tool finish toolpaths are the same as Turning finish toolpaths. - Turnmilling — Uses a rotating endmill tool with rotating stock. Control the turning spindle speed on the Turn F/S tab. Control the milling spindle speed on the Mill Speed tab.
- Back cutting — The Back Cutting strategy is for use with specialized tools that allow the toolpath to work from the spindle to the face of the part. The toolpath is recognizable by the arc lead-ins that are included at the beginning of each cut.
Rough pass — Enable this option to add a Rough operation to the feature.
Semi-finish pass — Enable this option to add a Semi-finish operation to the feature.
Finish pass — Enable this option to add a Finish operation to the feature. When this option is deselected, the rough pass is still machined as if the finish pass were included. The Finish allowance is left on the roughing pass, and the Bottom finish allowance is left on the roughing pass when Finish bottom is selected, even though the check box is unavailable.
- Conventional — The feed moves in the +X direction, followed by the -Z direction, and so on, until it reaches the end of the stair step.
- No drag — Using the
Conventional finish type can reduce the tool life and also result in chips being dragged along the face of the part. Select the
No drag finish, to cut the vertical faces first, in the -X direction, then the horizontal -Z areas.
Feed dir — This is the direction that the tool feeds for the operation. For Turn and Bore features, select Toward spindle or Toward face. For Face and Backface features, select Positive or Negative to specify the direction along the X axis. Set this separately for the Rough, Semi-finish, and Finish operations.