
Issue:
Point clouds are attached to a Revit project in the wrong position and appear moved, regardless of the chosen linking method.Causes:
- The origin of the RCP point cloud is not the same as the position of the Project Base Point (PBP).
- When the point cloud is linked to Revit using Origin to Internal Origin, the Origin from ReCap will be aligned with the position of the Project Base Point.
- When a point cloud is linked to Revit using Shared Coordinates, it is loaded so the Origin from ReCap will be aligned with the global position in a Revit project.
- The original position is not preserved after the point cloud link placeholder is moved in Revit.
Note: Revit does not use the GIS coordinate system set in the ReCap RCP file even if the same system is set for the Revit project.
Solution:
Try one of the following approaches:
Adjust the Origin within the Point Cloud file based on the Shared Coordinates in Revit
- Link the Point Cloud into Revit using by shared coordinates.
- Use a Spot Coordinate in Revit on a known point in the Point Cloud.
- Use Spot Coordinate on the corresponding point in the Revit modeled content.
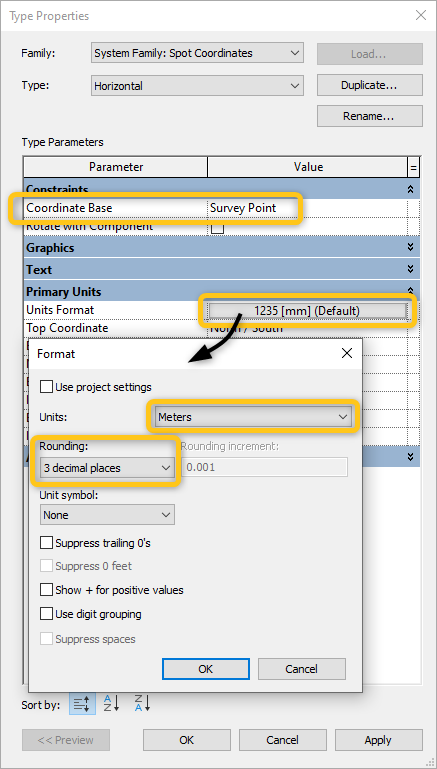
- Select the Spot Coordinate and click Edit Type.
- Set the Units to show meters with the Coordinate Base set to Survey Point.
- Note the values Northing (N/S position) of Spot Coordinate related to the point cloud and the Spot Coordinate related to model elements.
- Calculate a delta (a difference) between the values.
- Do the same for Easting (E/W position).
- Go to an elevation or section view.
- Use Spot Elevation in Revit on a known point in the Point Cloud.
- Use Spot Elevation on the corresponding point in the Revit modeled elements.
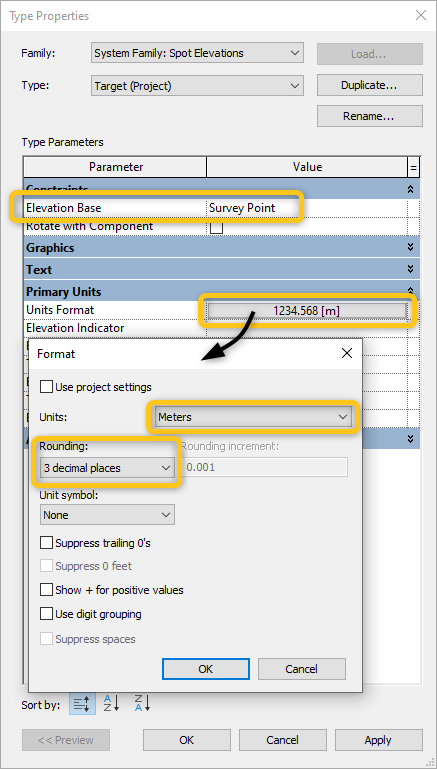
- Select the Spot Elevation and click Edit Type.
- Set the Units to show meters with the Elevation Base set to Survey Point.
- Note the values for two Spot Elevations and calculate a delta (a difference) between them.
- Open the point cloud project in ReCap.
- Go to Display Settings > Points > Update Origin.
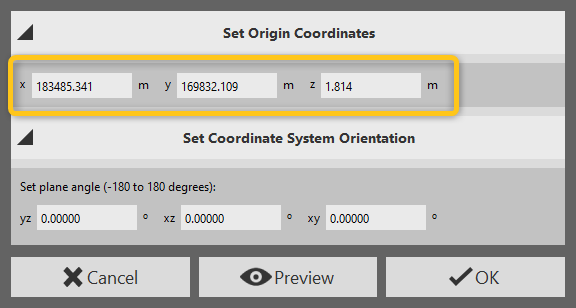
- Click (select) the known point used in the step 2. (The values in the Set Origin Coordinates should update to match the chosen point).
- Take note of the values for X (easting) Y (northing) and Z (elevation) listed in the Set Origin Coordinates window.
- Subtract these values from the deltas noted earlier.
- Select OK to update the origin without changing any of the values. (The Origin will now show at the selected point.)
- Use the Update Origin button again.
- Without selecting any point, type the values calculated in the step 19, but with negative numbers.
- Confirm with OK.
- Save the file as an RCP (New ReCap project) or export the file as a Unified RCS.
- Note: When choosing saving as RCP the Origin can be reversed to an eartlier value, when exporting Unified RCS the position is permanently embedded into a new RCS file.
- Link the newly saved Point Cloud in Revit using By Shared Coordinates positioning.
- Verify the point cloud position.


Link the point cloud to Revit through a different Revit file
- Create a Revit project file.
- Link the point cloud to the newly created project in a way that would stay within the 10-mile / 16-km limit from the internal origin.
- Save the file and attach it to the main Revit model
- Adjust the position to the correct location.