
Issue:
When inserting a georeferenced point cloud into Autodesk Revit, the point cloud may contain large coordinate values, such as MGA2020 easting and northing coordinates. The point cloud may appear very far from the Revit model, become difficult to locate or work with in sections and levels, or result in large-coordinate messages.
Solution:
Shared Coordinates
The normal method for linking georeferenced point clouds would be to use Shared Coordinates. For example, finding a known location in the Revit model, and using the Specify Coordinates at Point command.
Workflow for large-coordinate point clouds
For scan-to-BIM workflows using georeferenced point clouds with large coordinates:
- In ReCap Pro, create a copy of the point-cloud project before modifying its origin.
- Use Update Origin to establish a local working origin close to the intended Revit model location.
- Set the appropriate coordinate-system orientation for the point cloud.
- In Revit, establish the project's Shared Coordinates using the actual real-world coordinates and rotation.
- Link the adjusted point cloud using Auto - Origin to Internal Origin.
- Keep the Revit model geometry close to the Internal Origin rather than positioning the model at the raw easting/northing coordinates.
- Use the Revit Survey Point and Shared Coordinates to maintain the project's real-world position for coordination with survey data and other models.
Reset RCP Coordinates
The point cloud reference point in ReCap can be changed so that the point has X and Y (horizontal) coordinates close to 0.0 and the Z coordinate (elevation) remains unchanged:
- In Revit, select the project base point.
- Copy the N/S, E/W, and "Angle to True North" values of the project base point into Notepad.
- If necessary, convert the copied N/S and E/W values to the correct units for use in ReCap.
- Open the RCP file in ReCap Pro.
- Choose "Display Settings" > "Points" > "Update Origin".
- Under Set Origin Coordinates, replace the X and Y values with the copied E/W and N/S values of the project base point from Notepad.
- Set the Z value to 0.
- Subtract the "Angle to True North" value of the project base point from 360.
- Under Set Coordinate System Orientation, replace the xy value with the value obtained in the previous step.
- Save the RCP.
- Return to Revit and link the point cloud using the "Auto - Origin to Internal Origin" option.
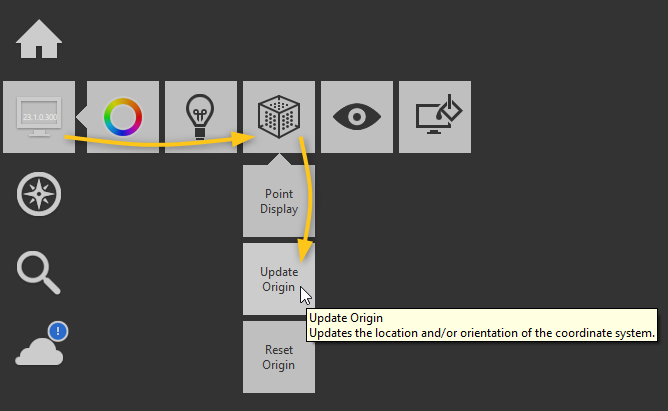

Note 1: The above operation is where you indicate where the new reference point will be in the original coordinates.
Note 2: Calling the function again should display 0 values for the X, Y and Z fields.
Note 3: A point cloud file saved with a new name always contains information about the original coordinates. Simply use the Reset Origin function to return to the original settings.
Reset RCS Coordinates
There is no update origin option in ReCap for RCS files. To move an RCS close to the origin for direct linking in Revit:
- Import the RCS into an empty RCP in ReCap Pro.
- Follow the steps in the previous section to reset the RCP's coordinates.
- Select Home in the upper left corner, then export (below import).
- Select RCS as the file type and pick a unique name.
- Click Save. The unified confirmation will appear. Click the gear icon to expand the refined grid option.
- Choose the required spacing (select 1mm to avoid loss of points).
- Click "let's go!"
- Return to Revit and link the exported RCS using the "Auto - Origin to Internal Origin" option.


See Also:
- Point clouds don't align in Revit
- Report Large Coordinates (What's New in 2023.1)
- About Using Grid Coordinates from a Linked DWG
- "The coordinates of the points in the point cloud file(s) you are trying to import are larger than 30000" when inserting a point cloud in Revit
- Inaccurate position of the Point Cloud link when reloaded in Revit
- Point cloud moves to unexpected position in Revit model after modification in ReCap
- Update Origin Location & Orientation