
Quick overview: Download post processors from the Autodesk Post Library for standard CNC machines, use CAM resellers for custom development, or edit existing post processors yourself using JavaScript and community resources.
Post processors are vital tools in computer-aided manufacturing (CAM). They take generic toolpaths created by your CAM software and translate them into machine-specific code your machines can understand and act upon. In this article, we look at how to find, edit, customize, or request post processors for Autodesk Fusion, Inventor CAM, and HSMWorks. You need post processors when:
- Setting up new CNC machines.
- Switching between machine types.
- Customizing machine output.
- Troubleshooting G-code issues.
- Upgrading software versions.
- Optimizing manufacturing workflows.
Causes:
Why doesn’t Autodesk provide post processors for Fusion, HSMWorks, and Inventor CAM?
Autodesk does not provide custom post processors or support post processor edits. Instead, we are focused on building and maintaining the freely available, open-source post library.
The volume of post processor customization requests is too large to support effectively. This step-by-step guide provides a solution to help you find the resources you need.
How to find and install standard post processors: Step by step
Note: This guide provides a comprehensive outline on how to locate, install, and customize post processors in Autodesk Fusion for CNC operations.
If your CNC machine matches standard configurations in the Autodesk library, you can easily find and add standard post processors. If none of the suggested machines meet your specific requirements, try searching for your desired post processor in the Post Library using the available filters.
How to download post processors for Fusion, Inventor CAM, and HSMWorks from the Autodesk library
To download post processors from the Autodesk library, you need to know the type of machine you have and the job you want to do. From there:
- Navigate to the Autodesk Post Processor Library.
- Search for your machine using the manufacturer name, model, or control type.

- Review available options: Check the post processor description and compatibility notes.
- Download the post processor by clicking the Download button below your selected post (select the previous versions option to download the previous version of the desired post processor).
- Choose your installation method based on your software.
Important notes for using the library
- Post processors are updated regularly. Check for newer versions periodically.
- Some post processors include setup instructions in their descriptions.
- Test with simple geometry before using it on complex parts.
How to install post processors for Fusion
Once downloaded, Fusion post processors can be installed either locally or via the cloud. For local installation:
- Open Fusion and navigate to the Manufacturing workspace.
- Access the Post Library by navigating to Manufacture > Manage > Machine Library.
- Under My posts, select the Cloud, Local, or Linked library as the post processor location.
- Import the downloaded post using the "Import" option.
- Verify installation by checking the post appears in your available post processors list.
How to install cloud post processors in Fusion
To use cloud post processors in Fusion, start by enabling cloud libraries in Preferences:
- Access the Preferences dialogue box in the user account in the upper right corner of the Fusion window and select Preferences.
- Select General > Manufacture on the left side of the dialogue.
- Click the check mark to enable cloud libraries.
From there, you will have two options for installing your cloud post processor. To upload through your web browser:
- Sign in to the Fusion web client.
- Navigate to the Assets > CAMPosts folder in the Fusion Drive.
- Drag and drop the downloaded CPS file from its location on your computer into the CAMPosts folder.
- Check you can access the post processor through the My Cloud Posts library in Fusion.
To upload a cloud post processor to Fusion through the Fusion Data Panel:
- Navigate to Libraries > Assets in the Fusion Data Panel.
- Double-click the Assets > CAMPosts folder to enter it.
- Upload your post processor to the Assets > CAMPosts folder using the Upload button.
Once uploaded, you can access your cloud post processors in Fusion by navigating to the Manufacturing Workspace, and choosing Post Library from the Manage drop-down.
How to install post processors for Inventor CAM and HSMWorks
After downloading the right post processor for your machine, you can install it in Inventor Cam and HSMWorks by using your CAM software:
- Open your CAM software and access the Post Processor Manager.
- Add the downloaded post processor through Tools > Post Processor Manager.
- Browse to your downloaded file and import the CPS file.
- Test the installation by generating a simple toolpath and posting G-code.
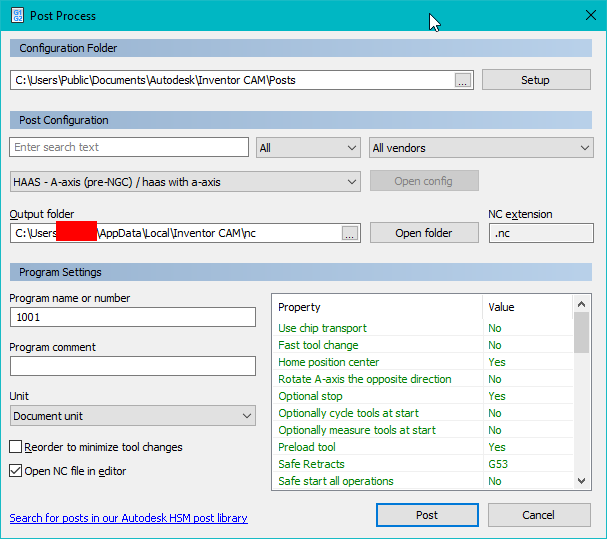
You can also install post processors in Inventor CAM and HSMWorks by:
- Locating your downloaded CPS file after downloading a post processor from the Post Library.
- Determining where post processor files are stored. This is usually C:\Users\Public\Documents\Autodesk\Inventor CAM\Posts or C:\Program Files\HSMWorks\Posts, depending on your software.
- Pasting the CPS post processor file that you would like to add in this file location.
- Closing the Post Process dialog and reopening to test that the new post was added.
Note: You may need to restart your CAM software for the changes to take effect.

Adding custom post processors to your personal library
If you can’t use standard Fusion post processors and need to add modified or custom post processors to your machine instead, there are several options, depending on the CAM software you’re using.
Installing post processors to the personal posts folder (local installation)
- Move the post processor to your personal posts folder:
- Windows: %appdata%\Autodesk\Fusion 360 CAM\Posts
- Mac: Macintosh HD> Users> MAC USERNAME> Autodesk> Fusion 360 CAM> Posts
- Start Fusion and open a CAM design with a valid toolpath.
- Under Action in the menu, choose Postprocess.
- Select Setup > Use Personal Posts.
- Select the post processor from the drop-down under Post Configuration.
Cloud installation for custom post processors
To install a custom post processor in the cloud:
- Go to preferences in Fusion.
- Navigate to settings General -> Manufacture.
- Ensure cloud libraries are enabled.
- Navigate to Assets in the Data Panel and open the Assets > CAMPosts folder.
- Upload the post processor to the Assets > CAMPosts folder using the Upload button.
- Open a CAM design.
- Navigate to Action > Postprocess and select Setup > Use Cloud Posts.
- Select the post processor from the drop-down under Post Configuration.
How to edit and customize existing post processors for Fusion, Inventor CAM, and HSMWorks
If none of the standard post processors supplied in the Post Library meet your requirements, and you’re comfortable working and coding in JavaScript, you can also customize existing post processors to meet the specific needs of your machines. This can be useful if you want to make changes to things like:
- Spindle speed format: Adjust
sFormatfor your control's requirements. - Coolant commands: Customize
mFormatfor your machine's M-codes.
Note: You should always back up your original post processors before editing, and test thoroughly with non-production parts before putting them into action.
Understand your post processor structure
First, you need to understand the structure of your post processor. Post processors use JavaScript and follow the CPS (CAM Post Script) format. Common customization areas include:
- Machine definitions: Axis limits, spindle specifications, tool changer configuration.
- Output formatting: G-code style, line numbering, coordinate formatting.
- Custom functions: Tool change sequences, coolant control, safety protocols.
How to edit post processors
Once you’re comfortable with your post processor’s structure, it’s time to start editing it. To do so:
- Start with a similar post processor from the Autodesk library as your base.
- Open it in a text editor. You can use any JavaScript-compatible editor, such as Visual Studio Code’s Fusion Post Processor Utility.

- Identify the sections you want to modify:
- Machine configuration variables at the top.
- Tool change and setup procedures.
- Output formatting functions.
- Make incremental changes and test these with simple toolpaths as you go to minimize larger problems.
- Validate G-code output against your machine's requirements.
For more in-depth steps for editing and customizing post processors, download the Post processor training guide.
Custom development through CAM partners
If you need comprehensive post processor development or machine kinematics setup, you may want to work with Autodesk CAM partners.
Working with Autodesk partners can be useful for projects with:
- Complex multi-axis machines requiring specialized kinematics.
- High-value production environments where accuracy is critical.
- Custom machine configurations not covered by standard post processors.
- Integration with existing manufacturing execution systems.
- Tight project timelines requiring immediate results.
Finding qualified CAM partners
To find a partner to work with on post processor customization:
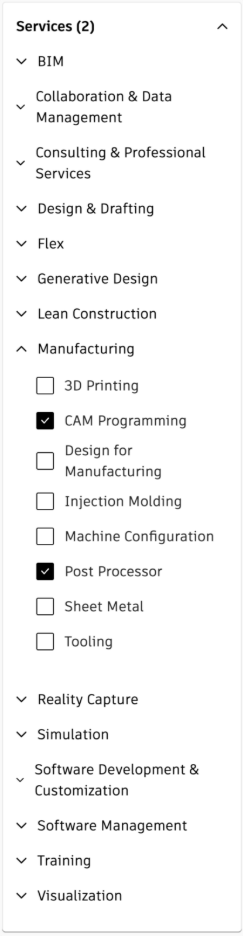
- Visit the Autodesk Partner Finder.
- Filter by services - Select "CAM Programming" and "Post Processor" services.
- Review partner capabilities:
- Post processor development experience.
- Machine kinematics setup.
- CAM simulation environment configuration.
- Training and support offerings.
- Contact qualified partners for project quotes and timelines.
Finding and editing post processors: Frequently asked questions
How do I deal with a missing post processor in my software?
If you have downloaded a post processor but it doesn’t appear in your CAM software’s post processor list, there are a few steps you can take, including:
- Verifying file location: Ensure the CPS file is in the correct posts directory.
- Restarting your software completely.
- Checking file permissions: Ensure the posts folder isn't read-only.
- Validate CPS format: Confirm the file isn't corrupted or incomplete.
- Review software version compatibility: Some posts require specific software versions.
How do I fix errors caused by editing post processors?
If you have edited or modified a post processor, you might face errors or software crashes when trying to run it. In those cases, you need to retrace your steps and understand where you went wrong:
- Restore the original post processor and make smaller incremental changes, testing as you go.
- Check your JavaScript syntax using a code editor with error-checking functionality, such as VS Code.
- Test each modification separately to isolate problems rather than having to unpick later.
- Compare your modifications with working post processors to understand the proper structure required.
- Ask for help on the HSM Post Processor Forum.
Can I request new post processors?
Yes, you can request new post processors through the Post Processor Idea Station. To do so:
- Search existing requests to avoid duplicates and find similar machines.
- Vote on similar requests from others to show community demand for what you need.
- Provide detailed specifications when you’re submitting new requests, including:
- Machine manufacturer and model.
- Control system type and version.
- Special requirements or features.
- Machine documentation if available.
Follow up on requests: Engage with the development team’s feedback and provide additional information when requested.