Since add-ins were first supported in Fusion, the code shown below was created when you created a new add-in.
import adsk.core, adsk.fusion, traceback

def run(context):
    ui = None
    try:
        app = adsk.core.Application.get()
        ui = app.userInterface
        ui.messageBox('Hello addin')
    except:
        if ui:
            ui.messageBox('Failed:\n{}'.format(traceback.format_exc()))

def stop(context):
    ui = None
    try:
        app = adsk.core.Application.get()
        ui = app.userInterface
        ui.messageBox('Stop addin')
    except:
        if ui:
            ui.messageBox('Failed:\n{}'.format(traceback.format_exc()))
This code is a valid add-in and demonstrates the bare minimum functionality of an add-in: automatically load at start-up, continue running the entire fusion session or until the user explicitly unloads it, and handle when the add-in is unloaded. This add-in has these capabilities but does nothing to illustrate how to take advantage of them and create a useful add-in.
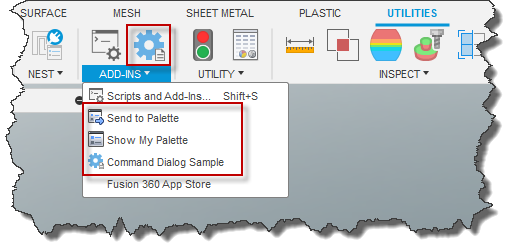
When you create a new add-in now, a small add-in (referred to as the add-in template) is created that demonstrates the API capabilities typically used within an add-in and provides a framework to simplify development. If you run the add-in after creating it, you will see that it adds three new commands into the ADD-INS panel, as shown below.
Here's a quick summary of the functionality each of the three commands demonstrates.
Command Dialog Sample – This command illustrates what at least 95% of all commands do; add a button to the UI, display a command dialog to get information from the user, and do something when the OK button is clicked. When you run this command, the dialog shown below is displayed.
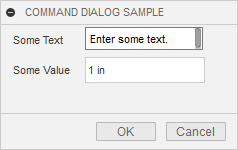
You can use this command to jump-start the creation of your commands that use a dialog. The things you'll change are the location of the command button in the UI, the icon, the name of the command, the inputs in the dialog you need the user to provide, and the action that occurs when the user clicks OK. How you'll make these changes is described in more detail below when we look at the add-in code.
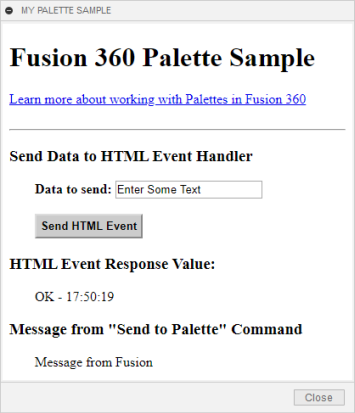
Show My Palette – This command illustrates the basics of using the palette functionality of the API, and when you click it, the dialog shown below is displayed. A palette is a dialog whose content is defined by rendering an HTML file. This sample command demonstrates how to display a palette and how your HTML and associated JavaScript can interact with your add-in.
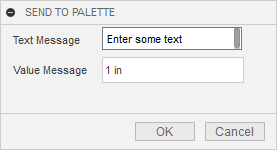
Send to Palette – This command works with the palette created by the previous command and demonstrates how your add-in can interact with the HTML and JavaScript associated with the palette. Before running this command, you should run the Show My Palette command, so the palette is displayed. When you run this command, the dialog shown below is displayed. You can edit the values in the dialog and click OK; the information will be displayed in the palette.
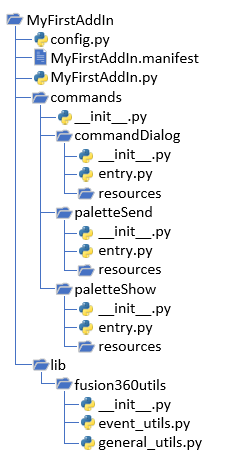
In addition to demonstrating the add-in functionality, the newly created add-in also uses an architecture that makes extending the add-in to support additional commands much easier than it has been in the past. First, let's look at the details of what is created when you create a new Python add-in. Below is the complete folder structure of a new add-in.
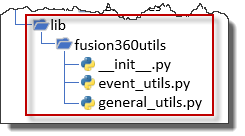 Before looking at the files you'll want to change, some utility functions are provided to simplify things, especially when working with events. These are all defined in the "lib" folder, and you won't need to do anything to these files. You'll see import statements to "fusion360utils," which results in referencing functions defined in event_utils.py and general_utils.py.
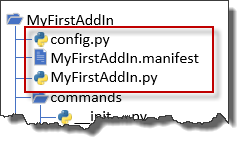 There are three files in the top-level folder of the add-in; config.py, MyFirstAddIn.manifest, and MyFirstAddIn.py. The .py and .manifest files that have the same name as the add-in, are the two files required for any add-in.
The MyFirstAddIn.py file contains the run and stop functions, which are called by Fusion when the add-in is loaded and unloaded. The code in this .py is very simple since all the run function does is call another function to load the commands. And all the stop function does is call two functions; one to clean up the UI and another to unload the commands, as shown below. Because this code is generic, you don't need to edit this .py file.
# Assuming you have not changed the general structure
# of the add-in no modification is needed in this file.
from . import commands
from .lib import fusion360utils as futil

def run(context):
    try:
        # This will run the start function in each of your
        # commands as defined in commands/__init__.py
        commands.start()
    except:
        futil.handle_error('run')

def stop(context):
    try:
        # Remove all of the event handlers your app has created.
        futil.clear_handlers()

        # This will run the stop function in each of your
        # commands as defined in commands/__init__.py
        commands.stop()
    except:
        futil.handle_error('stop')
The .manifest file contains information about the add-in that Fusion uses to display the add-in in the "Scripts and Add-Ins" dialog and know when to load it. The contents of the .manifest file is explained in detail in the Creating Scripts and Add-Ins topic.
The config.py is used to manage global variables. Unfortunately, Python doesn't support global variables between components, but this serves as a workaround to define them in a module and then import the module where access is needed. There are three variables here that you need to be aware of. The first is the DEBUG setting which defines if your add-in should run in debug mode or not. If it is in debug mode, it will print out information to the TEXT window as it is running. Having this information is useful when you're writing and debugging your add-in. When you are ready to deliver your add-in, you can set this to False. The other setting you should change is the value assigned to the COMPANY_NAME variable. This name is used to help create unique names for UI elements. Finally, you'll want to edit the sample_pallete_id to a name that makes sense for your palette, or if you're not using palettes in your add-in, you can delete this line.
# Application Global Variables
# This module serves as a way to share variables across different
# modules (global variables).

import os

# Flag that indicates to run in Debug mode or not. When running in Debug mode
# more information is written to the Text Command window. Generally, it's useful
# to set this to True while developing an add-in and set it to False when you
# are ready to distribute it.
DEBUG = True

# Gets the name of the add-in from the name of the folder the py file is in.
# This is used when defining unique internal names for various UI elements
# that need a unique name. It's also recommended to use a company name as
# part of the ID to better ensure the ID is unique.
ADDIN_NAME = os.path.basename(os.path.dirname(__file__))
COMPANY_NAME = 'ACME'

# Palettes
sample_palette_id = f'{COMPANY_NAME}_{ADDIN_NAME}_palette_id'
If you need to share information between commands, you can add your variables to this file.
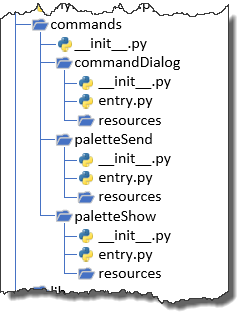 The area where you'll be doing most of the work when writing your add-in is in the "commands" folder. Each sub-folder within the commands folder represents a command. For example, the commandDialog, paletteSend, and paletteShow folders are in the add-in template. You can delete and add new folders as needed. See the "Quick Helps" section at the bottom of this topic for step-by-step help with common workflows like deleting the palette functionality, so you only have one command dialog command and adding a second command.
Whatever folders you're left with, you'll want to rename them to something that makes sense for your add-in. For example, if I'm writing an add-in to create bevel gears and it has a single command with a dialog, I would delete the two palette folders and rename the "commandDialog" folder to something like "bevelGearDialog".
Once you have a folder for each command your add-in will support, you must edit the __init__.py file in the "commands" folder. For example, for the Bevel Gear command, an import is added for the bevelGearDialog folder, and it is added to the command list. You also need to remove the commands that are no longer needed. The code below shows the changes that were made to do this.
# Here you define the commands that will be added to your add-in. # TODO Import the modules corresponding to the commands you created. # If you want to add an additional command, duplicate one of the existing # directories and import it here. # # You need to use aliases (import "entry" as "my_module") assuming you have # the default module named "entry". from .bevelGearDialog import entry as bevelGearDialogfrom .commandDialog import entry as commandDialog from .paletteShow import entry as paletteShow from .paletteSend import entry as paletteSend# TODO add your imported modules to this list. # Fusion will automatically call the start() and stop() functions. commands = [ bevelGearDialog, commandDialog, paletteShow, paletteSend] # Assumes you defined a "start" function in each of your modules. # The start function will be run when the add-in is started. def start(): for command in commands: command.start() # Assumes you defined a "stop" function in each of your modules. # The stop function will be run when the add-in is stopped. def stop(): for command in commands: command.stop()
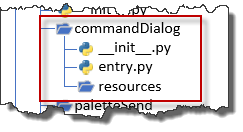 As described above, for each command, you should have a folder with your command's name in the "commands" folder. When creating a new add-in, the folders for sample commands have two files (__init__.py and entry.py) and a "resources" folder. The __init__.py folder is empty, and you can ignore it. The resources folder contains the images used for the command button. You'll want to create appropriate images for your command and replace the example images. More information about this can be found in the User-Interface Customization topic. The main code for the command is in the entry.py file, and this is where you'll do most of your work.
Each command is unique and has its own identity. Part of that identity is the icon used for the command button. The other parts of the command identity are a unique name, the name the user will see, and the tooltip displayed when the user moves the mouse over the command's button. As shown below, these are all defined in the top portion of entry.py. The "CMD_ID" variable defines the unique ID for this add-in. The ID must be unique to all commands, including the native Fusion commands and commands added by other add-ins. The code below uses the company name defined in config.py and combines it with the name of the add-in and the name of the command to create a unique name. The only thing you need to edit here is the command name portion, which is "cmdDialog" by default. The "CMD_NAME" variable is the command's name that will be displayed to the user, and the value of the "CMD_DESCRIPTION" variable will be used as the tooltip.
# TODO *** Specify the command identity information. ***
CMD_ID = f'{config.COMPANY_NAME}_{config.ADDIN_NAME}_cmdDialog'
CMD_NAME = 'Command Dialog Sample'
CMD_Description = 'A Fusion Add-in Command with a dialog'
Most commands will have a button in the user interface to allow the user to execute the command. You define the location of your command using the section of code in the entry.py file shown below. The IS_PROMOTED variable defines if the command should be displayed in the toolbar for the panel instead of only being available in the panel's drop-down. Promoting is equivalent to the "Pin to Toolbar" option in the user interface. The WORKSPACE_ID, PANEL_ID, and COMMAND_BESIDE_ID are used to define the location where the command will be added to the user interface. Detailed information about the user interface and how to determine the names to use can be found in the Positiong Your Controls section of the User Interface Customization user manual topic.
# Specify that the command will be promoted to the panel.
IS_PROMOTED = True

# TODO *** Define the location where the command button will be created. ***
# This is done by specifying the workspace, the tab, and the panel, and the
# command it will be inserted beside. Not providing the command to position it
# will insert it at the end.
WORKSPACE_ID = 'FusionSolidEnvironment'
PANEL_ID = 'SolidScriptsAddinsPanel'
COMMAND_BESIDE_ID = 'ScriptsManagerCommand'
The rest of the code in the template is the code that calls the API to define the command, create the button, and react when the button is clicked by creating the command dialog and reacting to some command-related events. This is in the entry.py file for each command. Below is the start function, which is called when the add-in is loaded. The call to the addButtonDefinition function is a standard API call. But you can see all the arguments are coming from the previously defined variables at the top of the file. API functions are also used to add the button into the user interface. Still, the most interesting is the futil.add_handler call that connects to the commandCreated event. The event functionality is described in more detail in the section below.
# Executed when add-in is run.
def start():
    # Create a command Definition.
    cmd_def = ui.commandDefinitions.addButtonDefinition(CMD_ID, CMD_NAME,
                                                        CMD_Description, ICON_FOLDER)

    # Define an event handler for the command created event.
    # It will be called when the button is clicked.
    futil.add_handler(cmd_def.commandCreated, command_created)

    # ******** Add a button into the UI so the user can run the command. ********
    # Get the target workspace the button will be created in.
    workspace = ui.workspaces.itemById(WORKSPACE_ID)

    # Get the panel the button will be created in.
    panel = workspace.toolbarPanels.itemById(PANEL_ID)

    # Create the button command control in the UI after the specified existing command.
    control = panel.controls.addCommand(cmd_def, COMMAND_BESIDE_ID, False)

    # Specify if the command is promoted to the main toolbar.
    control.isPromoted = IS_PROMOTED
The add-in template primarily serves as an example showing how to use the API to create a command. It also provides an architecture that makes adding additional commands to an add-in easier. It does not create a wrapper for the API except for one exception: working with events. Previously, it required several lines of code to connect to and handle events when using Python. In addition, using events was more difficult in Python than in C++. Therefore, an event library is included in the add-in template to simplify using events.
The highlighted line below is from the start function and is all that's needed to connect to the command's commandCreated event. futil is the alias for the fusion360utils library, which is imported at the top of the file and contains the add_handler function. cmd_def.commandCreated is referencing the commandCreated event associated with the command definition created at the beginning of the start function. command_created is referencing the function that will act as the event handler.
# Define an event handler for the command created event.
# It will be called when the button is clicked.
futil.add_handler(cmd_def.commandCreated, command_created)
Below is the command_created function, which serves as the commandCreated event handler. The command_created function is called when the user clicks the command button, and it is within this function where you create command inputs to define the different inputs that will be displayed in the dialog. You'll replace the add methods here with the add methods for the inputs you need for your command. Notice at the bottom of this function, there are several more calls to the add_handler function to connect to other command-related events. See the user manual topic on commands to better understand how commands work and the various command-related events.
# Function that is called when a user clicks the corresponding button in the UI.
# This defines the contents of the command dialog and connects to the command related events.
def command_created(args: adsk.core.CommandCreatedEventArgs):
    # General logging for debug.
    futil.log(f'{CMD_NAME} Command Created Event')

    # https://help.autodesk.com/view/fusion360/ENU/?contextId=CommandInputs
    inputs = args.command.commandInputs

    # TODO Define the dialog for your command by adding different inputs to the command.

    # Create a simple text box input.
    inputs.addTextBoxCommandInput('text_box', 'Some Text', 'Enter some text.', 1, False)

    # Create a value input field and set the default using 1 unit of the default length unit.
    defaultLengthUnits = app.activeProduct.unitsManager.defaultLengthUnits
    default_value = adsk.core.ValueInput.createByString('1')
    inputs.addValueInput('value_input', 'Some Value', defaultLengthUnits, default_value)

    # TODO Connect to the events that are needed by this command.
    futil.add_handler(args.command.execute, command_execute, local_handlers=local_handlers)
    futil.add_handler(args.command.inputChanged, command_input_changed, local_handlers=local_handlers)
    futil.add_handler(args.command.executePreview, command_preview, local_handlers=local_handlers)
    futil.add_handler(args.command.validateInputs, command_validate_input, local_handlers=local_handlers)
    futil.add_handler(args.command.destroy, command_destroy, local_handlers=local_handlers)
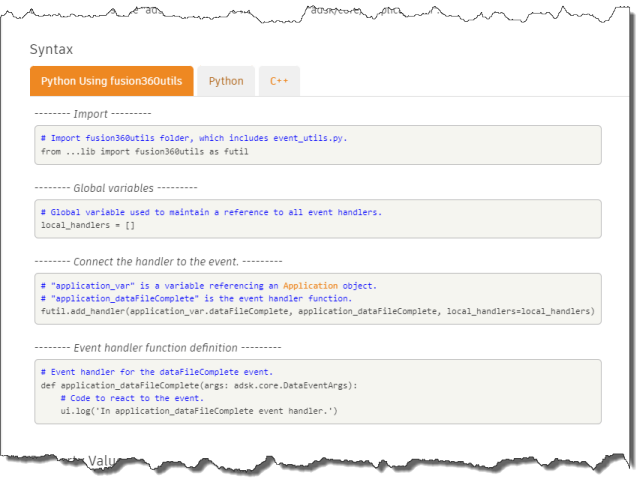
The help for events has also been enhanced by adding a "Python Using fusion360utils" tab so you can get example code for this new style of using events, as shown below.
The most common command is one that uses a command dialog so a common workflow will be to create a new add-in and delete the palette commands. Here are the steps to do that.
Delete the lines highlighted below from YourAddIn/config.py.
# part of the ID to better ensure the ID is unique.
ADDIN_NAME = os.path.basename(os.path.dirname(__file__))
COMPANY_NAME = 'ACME'

# Palettes
sample_palette_id = f'{COMPANY_NAME}_{ADDIN_NAME}_palette_id'
Delete the lines highlighted below from your YourAddIn/commands/__init__.py.
# Here you define the commands that will be added to your add-in.

# TODO Import the modules corresponding to the commands you created.
# If you want to add an additional command, duplicate one of the existing
# directories and import it here.
#
# You need to use aliases (import "entry" as "my_module") assuming you have
# the default module named "entry".
from .commandDialog import entry as commandDialog
from .paletteShow import entry as paletteShow
from .paletteSend import entry as paletteSend

# TODO add your imported modules to this list.
# Fusion will automatically call the start() and stop() functions.
commands = [
    commandDialog,
    paletteShow,
    paletteSend
]

# Assumes you defined a "start" function in each of your modules.
# The start function will be run when the add-in is started.
def start():
    for command in commands:
        command.start()

# Assumes you defined a "stop" function in each of your modules.
# The stop function will be run when the add-in is stopped.
def stop():
    for command in commands:
        command.stop()
Delete the palleteSend and palletShow folders from the YourAddIn/commands/ folder.
Another common workflow will be the need to add an additional command to an existing add-in. Here are the steps for that.
Copy the command folder of a similar command. For example, if you already have a makePocket command you can copy the folder and its contents to a new folder in add-in’s commands folder called whatever your new command will be; makePizza in this example.
In the new folder change the names of the .py and .manifest files to use the new name. For example, makePizza.py and makePizza.manifest.
Edit YourAddIn/commands/__init__.py and add the two lines shown below.
# Here you define the commands that will be added to your add-in.

# TODO Import the modules corresponding to the commands you created.
# If you want to add an additional command, duplicate one of the existing
# directories and import it here.
#
# You need to use aliases (import "entry" as "my_module") assuming you have
# the default module named "entry".
from .makePocket import entry as makePocket
from .makePizza import entry as makePizza

# TODO add your imported modules to this list.
# Fusion will automatically call the start() and stop() functions.
commands = [
    makePocket,
    makePizza
]

# Assumes you defined a "start" function in each of your modules.
# The start function will be run when the add-in is started.
def start():
    for command in commands:
        command.start()

# Assumes you defined a "stop" function in each of your modules.
# The stop function will be run when the add-in is stopped.
def stop():
    for command in commands:
        command.stop()
Edit the contents of entry.py to change the name of the command, its location in the UI and its behavior.