Shows or hides the Bookmark Lister, which lets you create, edit, recall, and save bookmarked views.
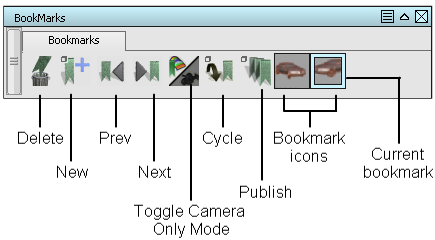
The Bookmark Lister contains the tools necessary to create, edit, delete, view and publish bookmarks.
The tools are followed by a list of icons representing your bookmarks. (There will not be any bookmarks until you create them). The current bookmark has a light blue outline. You make a bookmark current when you click it to view it.
Selection
You select a bookmark icon by clicking it with the ![]() . You can select multiple bookmark icons on the current shelf (for moving, deletion or publishing) by holding down the
. You can select multiple bookmark icons on the current shelf (for moving, deletion or publishing) by holding down the ![]() key and selecting the bookmark icons. A highlighted white border surrounds each selected bookmark. If the current bookmark is selected, it is surrounded by a light blue border. The current bookmark is selected by default but can be deselected by clicking it while holding the
key and selecting the bookmark icons. A highlighted white border surrounds each selected bookmark. If the current bookmark is selected, it is surrounded by a light blue border. The current bookmark is selected by default but can be deselected by clicking it while holding the ![]() key.
key.
Shelves
You can also add and manage shelves using the standard shelf interaction conventions.
To create a new shelf, click the ![]() in the title bar of the Bookmark Lister or click the menu icon
in the title bar of the Bookmark Lister or click the menu icon  and choose New shelf from the drop down menu. Enter a Shelf Name in the confirm box that appears. If two shelves are given the same name, a sequential number is appended to create unique names (for example, Shelf, Shelf#2, Shelf#3 and so on).

If you do not create any shelves, your bookmarks are placed on the default shelf called BookMarks.
Tools
Put the cursor over a tool to see its name.
Delete Bookmark
Remove the selected bookmark(s) from the list.
You can also use the ![]() to drag selected bookmarks, or an entire shelf tab, to the Delete tool icon (trash can).
to drag selected bookmarks, or an entire shelf tab, to the Delete tool icon (trash can).
New Bookmark
Create a new bookmark and add it to the list. The bookmark includes model orientation (camera view), shading attributes, and sketched annotations (drawn using tools from the Paint palette).
Double-clicking on the New Bookmark tool opens its option box, where you can set the following option:
- Remember visibility
-
If checked, the bookmark also remembers which objects, layers, and categories are visible and invisible.
Note: The visibility of objects created after the bookmark was saved is not affected when viewing or publishing the bookmark.
Prev Bookmark
View the previous bookmark in the list.
Next Bookmark
View the next bookmark in the list.
Toggle Camera Only Mode
Display bookmarks either with the camera view only, or with both the view and display attributes (default).
Bookmarks capture the current camera view and settings as well as a selection of display attributes and diagnostic display values.
Clicking this button toggles on the “camera-only mode”. In this mode, the current display (diagnostic shading, hardware shading, and so on) does not change when a bookmark is selected. Only the view (camera) is set. Clicking the button again toggles off “camera-only mode”.
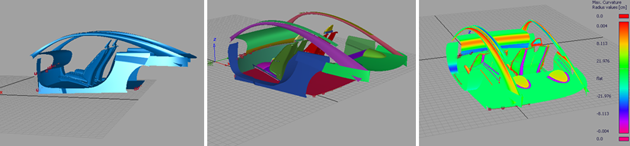
Three bookmarked views with Toggle Camera Only turned Off
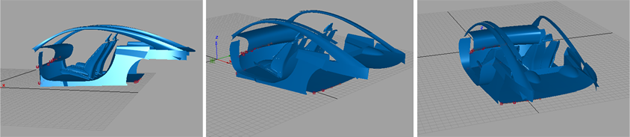
After viewing the first bookmark, Toggle Camera Only is turned On. Display attributes remain the same when viewing the other two bookmarks.
The Toggle Camera Only Mode option is also available as a hotkey from the Hotkey Editor.
Cycle Bookmark
View the bookmarks in a slide show fashion. The slide show starts at the current bookmark and displays the following bookmarks in order, all the way to the end of the shelf. It then loops around to the first bookmark.
To stop the slide show, click anywhere in the window.
Double-clicking on the Cycle tool opens its option box, where you can set the following options:
- Bookmark cycle time
-
Specifies how long each bookmark is displayed.
- Repeat cycles
-
If turned on (check mark), the slide show repeats indefinitely.
Publish bookmark
Save one or several bookmarked view(s) as image file(s) on your local disk.
Double-clicking on the Publish tool opens its option box, where you can set the following options:
- Image File Type
-
Specifies the file format of the published image. Choose between jpeg, tiff, bmp(32 bits), als, or tiff with alpha.
- Bookmark Publish
-
Selected – publishes all selected bookmarks.
Current Shelf – publishes all the bookmarks on the current shelf.
All – publishes all bookmarks from all shelves.
- Specify Image Size
-
If checked, two sliders enable you to set (in pixels) the dimensions of the output image.
- Maintain Aspect Ratio
-
If this option is checked, changing the horizontal or vertical size will automatically adjust the other slider so that the aspect ratio of the image is preserved.
This option only appears when Specify Image Size in on.
- Horizontal / Vertical Size
-
Size (in pixels) of the output image.
These options only appear when Specify Image Size in on.
- Quality Level
-
This option only appears when the Image File Type is jpeg.
Use the pull-down menu (Maximum, High, Medium or Low) or the slider (values from 1 to 100) to adjust the quality of the jpeg image. A higher quality will result in a larger file size.