- Define the weld properties: Note: Pause the cursor over a data entry field, and use the tooltips to identify the field name. Make certain that the Autodesk Inventor application window is active (and not this tutorial window), or tooltips will not appear under the cursor.
- Enter 6 mm in the Depth field (use the following illustration for reference).
- Enter 6 mm in the Leg 2 field.
- Select the Flat symbol from the Contour drop-down menu.
- Select G (grind) from the Method drop-down menu (this menu is only visible after you specify a contour).

- Click OK. Note: Pause the cursor over a data entry field, and use the tooltips to identify the field name. Make certain that the Autodesk Inventor application window is active (and not this tutorial window), or tooltips will not appear under the cursor.
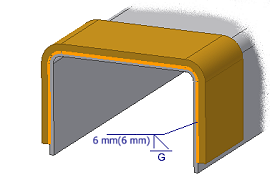
The program represents a cosmetic weld with a bright orange line. The weld symbol is attached to the cosmetic weld.
 Note: Your weld symbol may not appear exactly as shown in the previous illustration.
 - On the ribbon, click Weld tab
 Return panel
  Return.
- Save the file.