Inventor 2013 has added new Material and Appearance libraries which replace material and color styles. New libraries and contents are provided. However, if you prefer to use an existing library from a previous release it can be migrated by following the steps outlined below.
What's changed?
- The Style Management Wizard is no longer available.
- Removed the Material and Color categories from style and standard editor dialog The Materials and Appearances are no longer styles. NOTE: You still use the Style Manager to transfer other Styles content, such as Drafting Standards, between Style Libraries.
- Added new Material and Appearance commands located which are on Tools tab within the Material and Appearances panel.
- Added Material and Appearance configuration settings located in project settings.
- The Realistic Appearance Color Style option
In Inventor 2012 the Realistic Appearance color style option was introduced and each style had an assigned appearance. You could change which appearance was assigned, but could neither create nor edit Appearances. When checked, the Realistic Appearance was used for the Realistic Visual Style display. When unchecked, the Color Style definition was used for the Realistic Visual Style display. The following image contrasts the results of the option state OFF/ON.
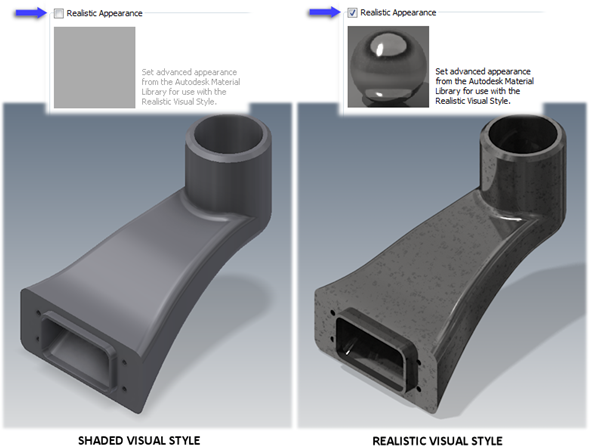
Figure 1 Autodesk Inventor 2012 - effect of the Realistic Appearance option
In Inventor 2013 Appearances replace color styles. The Appearance Browser and Editor provide the tools to create new and edit existing appearances. Migration uses the legacy color style definition to move your styles from a prior release to Inventor 2013. As was mentioned before, the option state (checked/unchecked) dictates which part of the color style definition is migrated. To help in making the choice we provide the following:
- Condition
- You prefer or use the Realistic Appearance, including changing assignments. You left the option checked (ON).
- Action
- No Action is required. Your assigned appearance will migrate.
- Condition
- You did not use the Realistic Visual Style display mode and/or prefer the Shaded Visual Style appearance. The option Realistic Appearance option may be checked (ON).
- Action
-
- Edit all color styles you want to maintain and Uncheck the Realistic Appearance option.
- Save the style change. Note: if you maintain unique color styles in models and not in a library, you must open every model having a custom color style and modify the style before migrating the model.
- Migrate the models.
If you do not, color styles will migrate using the realistic appearance and not the color style properties.
- Condition
- You unchecked (OFF) the Realistic Appearance option for color styles.
- Action
- No Action is required. The Realistic Appearance assignment is ignored.
- Condition
- You have some color styles with the Realistic Appearance ON and some with it OFF.
- Action
- No Action is required. You have already specified your preference and migration will respect it.
How to migrate libraries from previous versions
- Migrate all other style types as before by using the Style Library Manager utility. Detail see Migrate Custom Styles
- Migrate legacy material and color styles to new Materials libraries
- Start Inventor.
- Start a new part or assembly.
- Locate the Material command in the ribbon on the Tools tab within the Material and Appearances panel. Alternatively you may access the Material command in the Quick Access Toolbar. Click Material command to open the Material Browser dialog, See figure 1.
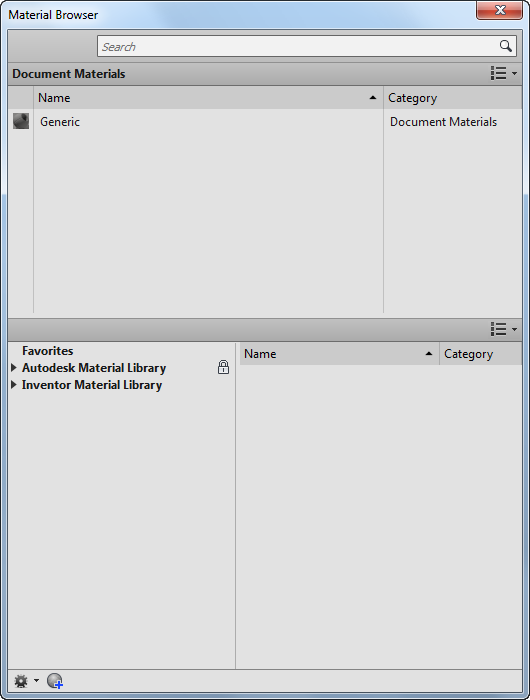
Figure 1
- Click
 and select Migrate Inventor Styles and get figure 2.
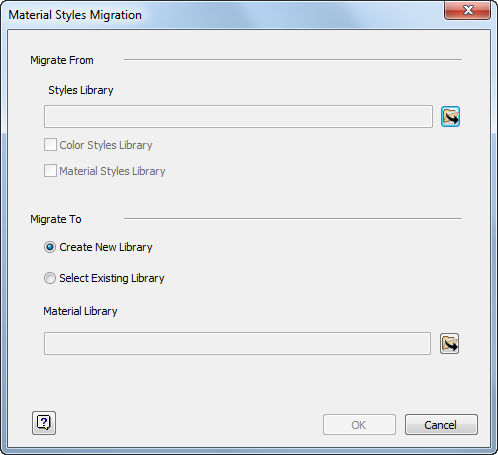
Figure 2
- Within the Material Styles Migration dialog specify the folder location of legacy styles you wish to migrate by selecting the Styles Library browse button. Note: This folder should include material.xml and color.xml.
- Select the desired option to migrate a material style or color style library.
- If the Material Styles Library option is selected, the Color Styles Library option is checked as well and cannot be unselected. Just as before materials reference an appearance and both must exist in a material library. However a library may only contain appearances. If you prefer using a separate library for appearances migrate the color style library separately. Select the option to Create New Library. If you already created a library in the new format and wish to add the legacy styles to it select Existing Library option. Note: The existing material library should be read-write and the legacy material name will be changed with a number if there are duplicated material name with existing material library.
If material and color styles were migrated to the same library, you need to add the library in both Material libraries and Appearance libraries.
- Click OK to begin migration. Note: A dialog may display if material or color names are changed during the migration process. Example "default" name will be changed as "generic". Click Accept button to finish migration.
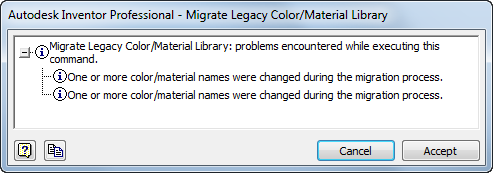
Figure 3
- Migrate legacy color styleto Appearance libraries.
The procedure is the same with migrate legacy material styles to Material library.
Note: If you have migrated material style to Material library, the color style will be migrated automatic at the same time. So you can use "Open Exist Library" to load the migrated Material library in the Appearance Browser dialog. - Configure your project to use the new library. See figure 4.

Figure 4
- Start the Projects command.
- On any project, hover over the Appearance Libraries or Material Libraries item and access the context menu to add libraries.
- On a library item, access the context menu to remove any undesired library.
- On a library item, set the Active library by accessing the context menu.
Note: A library may contain both materials and appearances or it may contain appearance only. If material and color styles were migrated to a single library, add the library to both Appearance Libraries and Material Libraries to your project. If you migrated color styles as a separate library add it only to the Appearance Libraries item. - Copy custom template styles to Material or Appearance library. Before Inventor 2013, we can use Style Management Wizard or Save Style to copy template styles to style library. But in Inventor 2013, we have new method to migrate template style to Material or Appearance library. The procedure:
- Backup the template and Material or Appearance library.
- Open template and the materials and colors are migrated to the new materials and appearances in document. The migration process is automatic completed when the template is saved. See figure 5.
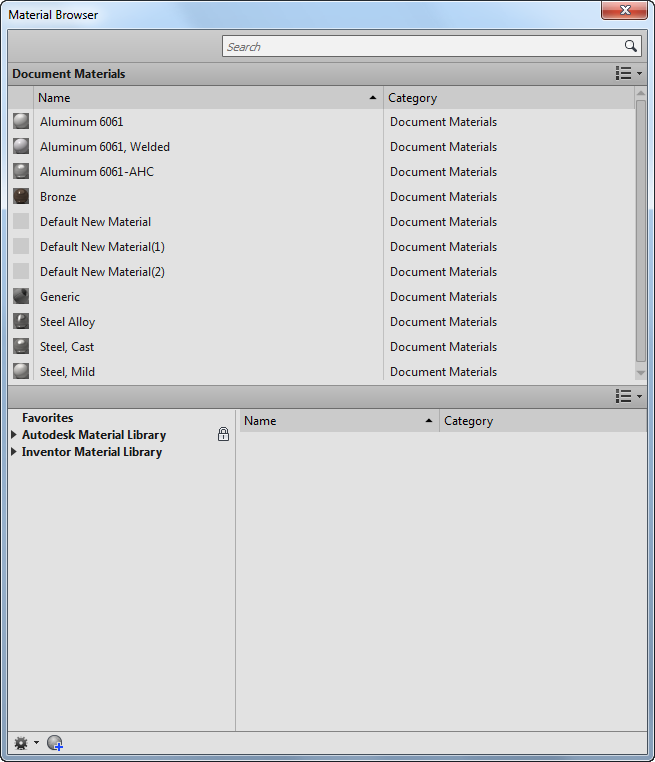
Figure 5
Note: You can add the migrated material or appearance to a custom library by doing the following:- Check the library section of Material Browser or Appearance Browser to confirm the custom library is accessible.
- In the document section of the dialog box, drag the material or appearance to the appropriate custom library or select document material or appearance and context menu->Add to-> appropriate custom library.
- Repeat the step 2 for all document materials or appearances you want to add to the libraries.
- Migrated materials and color styles in existing files.
To migrate any document, just simply open the document and begin working. Conversion to the new format occurs automatically. Alternatively you may batch migrate documents using the Task Scheduler utility installed with Inventor.
For additional information refer to Migrating Inventor Legacy Material and Color Styles in the Autodesk Inventor Help.