In this task, will look at the tools that are available to rotate and zoom in and out of sections of the model you opened in the previous task.
Ensure the model from the previous task is open.
- Click
 .
. - Click anywhere on the model and, with the left mouse button held down, move the mouse. The model will pivot around a central point. This is useful when investigating the geometry of the part.
- Using the
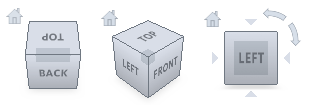 ViewCube, click Front view to return the model to its original orientation.
Other views of the model can be quickly obtained by clicking on the five other sides of the ViewCube.
- This view can be adjusted by clicking
 . Click and drag on the model until it is in the desired position.
 - Click
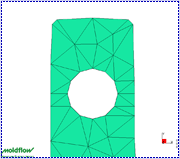
 . Holding the left mouse button down, select the area around the top left hole in the model. The area you selected is now expanded to fill the Model pane.
- Click
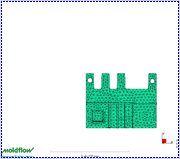
 . Click and drag down in the Model Display panel, shrinking the image until the whole of the model is visible.
The model is now showing in the lor right hand section of the panel.
- Rotate the model (see Step 1). The model moves around the center of the panel.
- You can select the pivot point by clicking
 . Click on the upper right of the model and rotate the part again.
This feature is used to help investigate local conditions.
- To return the model to its original condition, select Front View using the ViewCube and then
 .
.
Click the Next topic link below to move on to the next task of the tutorial.