A model of the part needs to be imported for analysis. The model is saved into a Study in a Project .
A project is used to store studies . Each study is a version of the original imported model and can be analyzed with different combinations of features, such as injection locations, processing parameters, runner/cooling configurations, material, analysis sequences, etc. Analysis results for a study are stored in separate files from the study and are linked to the study in the project. You can generate a new study at any time by using
For file management reasons, most users create a new project for each mold analyzed.You will now create a new project and import a study into it.
Creating a new Project
- Click
 (). The Create New Project dialog appears.
The default file location for a project is defined during installation, but can be changed at any time from the Options dialog associated with the
 Application menu. Select the Directories tab of the dialog. If you want to create the project in a different location than the one shown in the Project directory textbox, click Browse and navigate to the required folder.
 - Enter Getting Started in the Project name text box.
Note that the Create in text box outlines the pathway to where the project will be stored, and that the new Project name you have entered is included in this description. A subfolder called "Getting_Started" has been created for the new project.
- Click OK.
A new Getting Started project is created and opened.
- Click
 .
. - Select the Files of type drop-down list. The list of file types directly supported is shown. Select Study files (*.sdy) .
- Navigate to the Tutorial folder, typically C:\Program Files\Autodesk\Simulation Moldflow Insight 20xx\tutorial).
- Click on the file tutorial_model.sdy and click Open.
The model is imported, and a new study is automatically created in the "Getting Started" project. This is illustrated in the Project View pane.
- Click
 (). Click anywhere in the model display pane and drag the cursor vertically up or down the screen to resize the model.
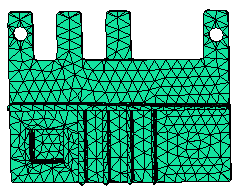
The imported study should appear as follows:
 import
a model from outside this product and store it within a project as a study. Once it is stored within a project, you
Open
the study from within the project.
import
a model from outside this product and store it within a project as a study. Once it is stored within a project, you
Open
the study from within the project. Click the Next topic link below to move on to the next task of the tutorial.