External Commands
Developers can add functionality by implementing External Commands which appear in the External Tools menu-button.
Loading and Running External Commands
When no other commands or edit modes are active in Revit, registered external commands are enabled. When a command is selected, a command object is created and its Execute() method is called. Once this method returns back to Revit, the command object is destroyed. As a result, data cannot persist in the object between command executions. However, there are other ways to save data between command executions; for example you can use the Revit shared parameters mechanism to store data in the Revit project.
You can add External Commands to the External Tools Panel under the External Tools menu-button, or as a custom ribbon panel on the Add-Ins tab, Analyze tab or a new custom ribbon tab. See the Walkthrough: Hello World and Walkthrough: Add Hello World Ribbon Panel for examples of these two approaches.
External tools, ribbon tabs and ribbon panels are initialized upon start up. The initialization steps are as follows:
- Revit reads manifest files and identifies:
- External Applications that can be invoked.
- External Tools that can be added to the Revit External Tools menu-button.
- External Application session adds panels and content to the Add-ins tab.
IExternalCommand
You create an external command by creating an object that implements the IExternalCommand interface. The IExternalCommand interface has one abstract method, Execute, which is the main method for external commands.
The Execute() method has three parameters:
- commandData (ExternalCommandData)
- message (String)
- elements (ElementSet)
commandData (ExternalCommandData)
The ExternalCommandData object contains references to Application and View which are required by the external command. All Revit data is retrieved directly or indirectly from this parameter in the external command.
For example, the following statement illustrates how to retrieve Autodesk.Revit.Document from the commandData parameter:
|
Code Region 3-1: Retrieving the Active Document |
Document doc = commandData.Application.ActiveUIDocument.Document; |
The following table illustrates the ExternalCommandData public properties
Table 1: ExternalCommandData public properties
|
Property |
Description |
|
Application (Autodesk.Revit.UI.UIApplication) |
Retrieves an object that represents the current UIApplication for external command. |
|
JournalData (IDictionary<String, String>>) |
A data map that can be used to read and write data to the Revit journal file. |
|
View (Autodesk.Revit.DB.View) |
Retrieves an object that represents the View external commands work on. |
message (String):
Error messages are returned by an external command using the output parameter message. The string-type parameter is set in the external command process. When Autodesk.Revit.UI.Result.Failed or Autodesk.Revit.UI.Result.Cancelled is returned, and the message parameter is set, an error dialog appears.
The following code sample illustrates how to use the message parameter.
|
Code Region 3-2: Setting an error message string |
class IExternalCommand_message : IExternalCommand
{
        public Autodesk.Revit.UI.Result Execute(
                Autodesk.Revit.ExternalCommandData commandData, ref string message,
                Autodesk.Revit.ElementSet elements)
        {
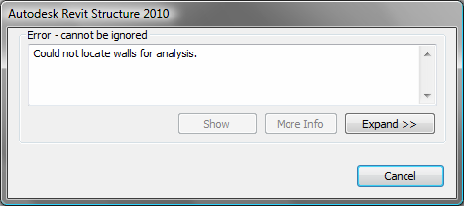
                message = "Could not locate walls for analysis.";
                return Autodesk.Revit.UI.Result.Failed;
        }
}
|
Implementing the previous external command causes the following dialog box to appear:

Figure 12: Error message dialog box
elements (ElementSet):
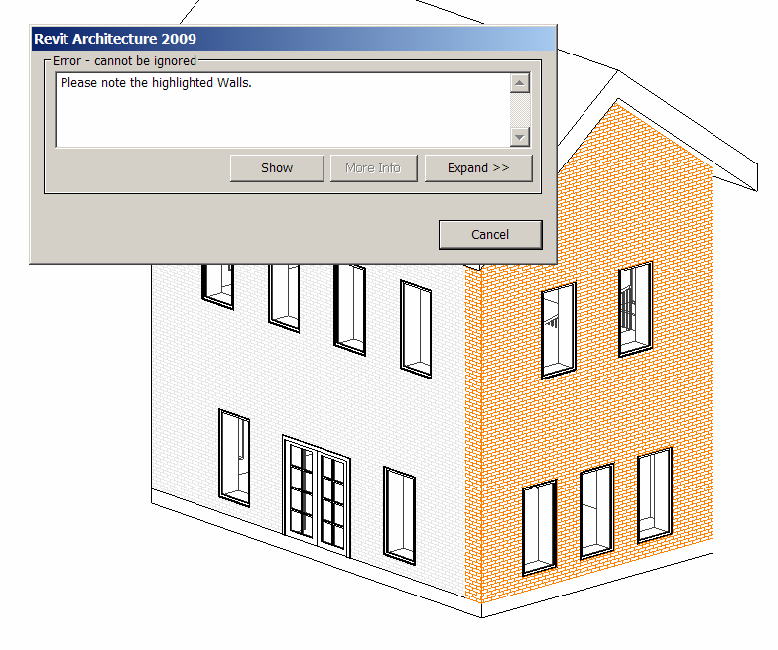
Whenever Autodesk.Revit.UI.Result.Failed or Autodesk.Revit.UI.Result.Canceled is returned and the parameter message is not empty, an error or warning dialog box appears. Additionally, if any elements are added to the elements parameter, these elements will be highlighted on screen. It is a good practice to set the message parameter whenever the command fails, whether or not elements are also returned.
The following code highlights pre-selected walls:
|
Code Region 3-3: Highlighting walls |
class IExternalcommand_elements : IExternalCommand
{
        public Result Execute(
                Autodesk.Revit.UI.ExternalCommandData commandData, ref string message,
                Autodesk.Revit.DB.ElementSet elements)
        {
                message = "Please note the highlighted Walls.";
                FilteredElementCollector collector = new FilteredElementCollector(commandData.Application.ActiveUIDocument.Document);
                ICollection<Element> collection = collector.OfClass(typeof(Wall)).ToElements();
                foreach (Element e in collection)
                {
                        elements.Insert(e);
                }

                return Result.Failed;
        }
}
|
The following picture displays the result of the previous code.

Figure 13: Error message dialog box and highlighted elements
Return
The Return result indicates that the execution failed, succeeded, or is canceled by the user. If it does not succeed, Revit reverses changes made by the external command.
Table 2: IExternalCommand.Result
|
Member Name |
Description |
|
Autodesk.Revit.UI.Result.Succeeded |
The external command completed successfully. Revit keeps all changes made by the external command. |
|
Autodesk.Revit.UI.Result.Failed |
The external command failed to complete the task. Revit reverses operations performed by the external command. If the message parameter of Execute is set, Revit displays a dialog with the text "Error - cannot be ignored". |
|
Autodesk.Revit.UI.Result.Cancelled |
The user cancelled the external command. Revit reverses changes made by the external command. If the message parameter of Execute is set, Revit displays a dialog with the text "Warning - can be ignored". |
The following example displays a greeting message and allows the user to select the return value. Use the Execute() method as the entrance to the Revit application.
|
Code Region 3-4: Prompting the user |
public Autodesk.Revit.UI.Result Execute(ExternalCommandData commandData,
     ref string message, ElementSet elements)
{
        try
        {
                Document doc = commandData.Application.ActiveUIDocument.Document;
                UIDocument uidoc = commandData.Application.ActiveUIDocument;
                // Delete selected elements
                ICollection<Autodesk.Revit.DB.ElementId> ids =
                        doc.Delete(uidoc.Selection.GetElementIds());

                TaskDialog taskDialog = new TaskDialog("Revit");
                taskDialog.MainContent =
                        ("Click Yes to return Succeeded. Selected members will be deleted.\n" +
                        "Click No to return Failed.  Selected members will not be deleted.\n" +
                        "Click Cancel to return Cancelled.  Selected members will not be deleted.");
                TaskDialogCommonButtons buttons = TaskDialogCommonButtons.Yes |
                        TaskDialogCommonButtons.No | TaskDialogCommonButtons.Cancel;
                taskDialog.CommonButtons = buttons;
                TaskDialogResult taskDialogResult = taskDialog.Show();

                if (taskDialogResult == TaskDialogResult.Yes)
                {
                        return Autodesk.Revit.UI.Result.Succeeded;
                }
                else if (taskDialogResult == TaskDialogResult.No)
                {
                        elements = uidoc.Selection.Elements;
                        message = "Failed to delete selection.";
                        return Autodesk.Revit.UI.Result.Failed;
                }
                else
                {
                        return Autodesk.Revit.UI.Result.Cancelled;
                }
        }
        catch
        {
                message = "Unexpected Exception thrown.";
                return Autodesk.Revit.UI.Result.Failed;
        }
}
|
IExternalCommandAvailability
This interface allows you control over whether or not an external command button may be pressed. The IsCommandAvailable interface method passes the application and a set of categories matching the categories of selected items in Revit to your implementation. The typical use would be to check the selected categories to see if they meet the criteria for your command to be run.
In this example the accessibility check allows a button to be clicked when there is no active selection, or when at least one wall is selected:
|
Code Region 3-5: Setting Command Availability |
public class SampleAccessibilityCheck : IExternalCommandAvailability
{
        public bool IsCommandAvailable(AutodeskAutodesk.Revit.UI.UIApplication applicationData,
                CategorySet selectedCategories)
        {
                // Allow button click if there is no active selection
                if (selectedCategories.IsEmpty)
                        return true;
                // Allow button click if there is at least one wall selected
                foreach (Category c in selectedCategories)
                {
                        if (c.Id.IntegerValue == (int)BuiltInCategory.OST_Walls)
                        return true;
                }
                return false;
        }
}
|