Open the bullet assembly in your CAD system from the appropriate folder. The folder location depends on the operating system:
Windows 7:
ProgramData\Autodesk\Simulation CFD 2014\Tutorials\ CAD \bullet
or
ProgramData\Autodesk\Simulation CFD 360 2014\Tutorials\ CAD \bullet
The ProgramData folder is not accessible by default. To access it in Windows® 7:
- Open a file browser window (Start menu > Computer).
- From the top left corner, click Organize > Folder and search options.
- Click the View tab.
- Select the Show hidden files, folder, and drives option.
- Click Ok.
If you have any questions, please check with your system administrator.
Windows XP:
Documents and Settings\All Users\Application Data\Autodesk\Simulation CFD 2014\Tutorials\ CAD \bullet
or
Documents and Settings\All Users\Application Data\Autodesk\Simulation CFD 2014 360\Tutorials\ CAD \bullet
Note: CAD is one of the following CAD systems:
- Autodesk® Inventor
- Autodesk® Inventor Fusion
- UGNX (the model is a part in UGNX)
- PTC Creo (or Pro/Engineer) with Granite Launch Configuration
- SolidWorks
- ACIS
- Parasolid
To launch from CAD
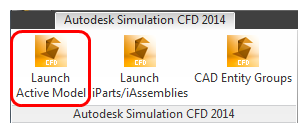
If launching from Autodesk® Inventor, PTC Creo (or Pro/Engineer), or SolidWorks, select the option to launch the Active model.

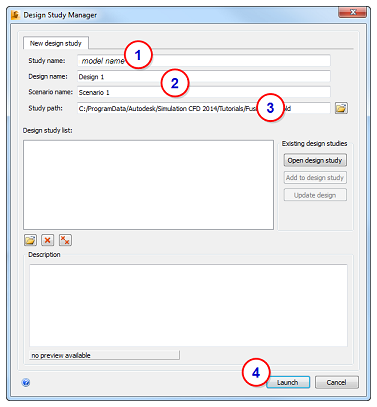
To create a new design study in the Design Study Manager:
- Specify a name in the Design study name field. The default name is the name of the top level assembly or the part.
- Optionally, change the names for the Design and Scenario.
- The default location of the study is the same path as the CAD model.
- Click Launch.

Autodesk Simulation CFD starts, and the Design Study is created.
If the Geometry Tools dialog appears, close it before proceeding to the next step.
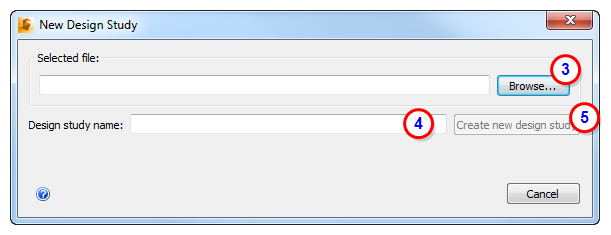
To launch from a file (Parasolid or Acis)
- Start Autodesk Simulation CFD from the Desktop.
- Click New from the Get Started tab.
- In the New Design Study dialog, click Browse, and select the Parasolid or Acis file.
- Enter a name for the new Design Study in the Design study name field.
- Click Create new design study.

If the Geometry Tools dialog appears, close it before proceeding to the next step.
To launch from Autodesk® Inventor Fusion
Fusion extends launch capabilities into Sim CFD from a wide range of CAD systems. If you are using a CAD tool other than the ones listed above, please use the Fusion version of the tutorial model:
- Open the CAD model directly into Autodesk® Inventor Fusion.
-
To transfer the model into Simulation CFD, click Simulation CFD or Simulation CFD 360 from the Simulation tab:

The Design Study Manager opens. To create a new design study:
- Specify a name in the Design study name field. The default name is the name of the top level assembly or the part.
- Optionally, change the names for the Design and Scenario.
- The default location of the study is the same path as the CAD model.
- Click Launch.

If the Geometry Tools dialog appears, close it before proceeding to the next step.