The ability to view pertinent vault details and properties for specified files makes it easier to reference the information necessary for managing these files throughout the lifecycle of a model. The Data Cards feature provides convenient summaries of the metadata assigned to a file or group of files through a single point of access. With data cards, you can determine a file's vault status, see a thumnail of the file, and review and modify property information without leaving the Inventor application.
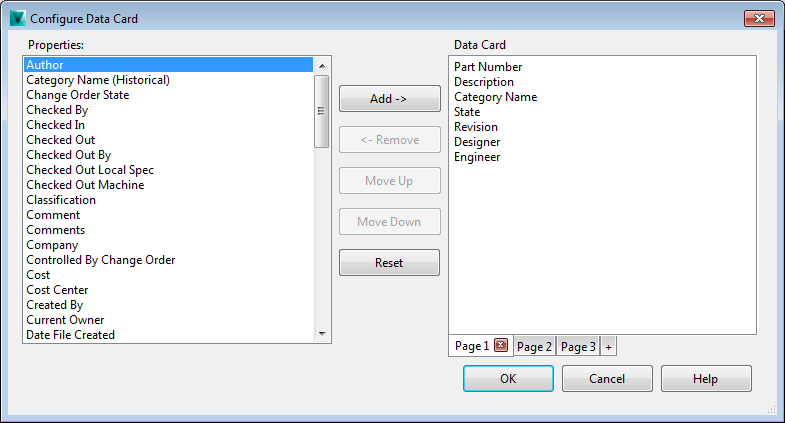
Administrators can configure the data card layout on the Configure Data Card dialog in the Vault Settings dialog. Here they can determine how many pages a data card uses and which properties are displayed for modification. With the versatility to add and remove properties for editing, the administrator can streamline property management.
Select Tools  Administration
 Vault Settings
  Behaviors tab and then click the Data Cards button to access the Configure Data Card dialog.

Configuring Data Card Layout
Manage tabs and determine which properties are available for the CAD user to modify on the Configure Data Card dialog. A properties list displays all of the properties that can be added to the selected tab. A property can be added to a single tab only once. Several different tabs, however, can list the same property.
| Actions | Description |
|
Add |
Select one or more properties from the properties list and click Add to include them on the selected data card tab. |
|
Remove |
Select a property already assigned to a tab and click Remove to delete it from that tab. |
|
Move Up |
Moves a property up on the selected tab. |
|
Move Down |
Moves a property up on the selected tab. |
|
Reset |
Returns the current tab to the last layout. |
|
Rename tab |
Double-click the tab to rename it. |
|
Add new tab |
Click the small tab with the a plus sign (+) to add a new tab to the data card. By default, the tabs are numbered sequentially. |
|
Delete a tab |
Click the X on the selected tab to delete the tab itself. |
|
OK |
Saves the changes to the data card layout and closes the dialog. |
Configure Data Card Layout
- Select Tools
 Administration
  Vault Settings
  Behaviors tab
  Data Cards button.
 - On the Configure Data Card dialog, select one or more properties from the properties list and click Add to add them to the selected tab.
Select a property and click Remove at any time to refine the properties on the selected tabs.
- If necessary, click the Move Up or Move Down buttons to reorganize the properties on the tab as you prefer.
- Double-click the selected tab and rename it.
- Click the + tab to create a new tab.
- When finished, click OK to save your settings and close the dialog.
- Click Reset at anytime to restore the dialog to the last save layout.