Use the Model Explorer to control the selectability and visibility of features.
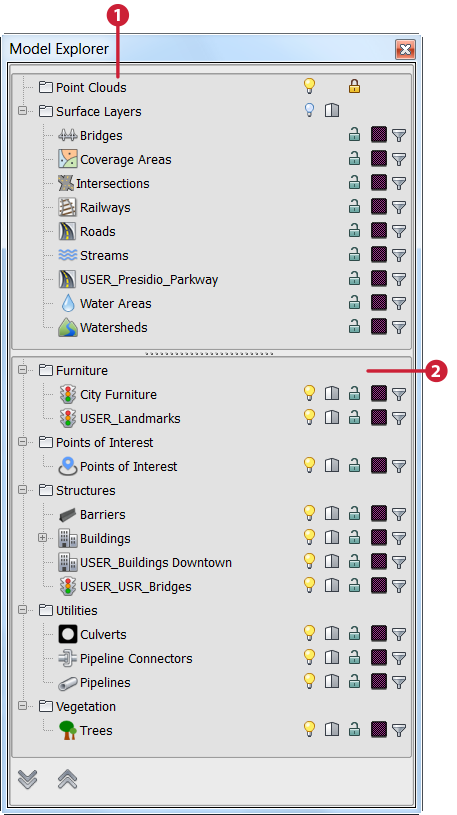
The elements in the Model Explorer panel are:
- Data Source List — Use the Expand All
 and Collapse All
  arrows to display each data source or collapse the list to show only feature type titles. Once you collapse the list, you can expand individual feature types.
 Right-click any data source to see relevant options.
-
Display Icons
Icon Name Description 

Hide/Show Layer Hide or show data sources in the model. When the light bulb image is yellow, the data source is displayed; when it's white, the data source is hid.
Features that conform directly to the terrain (terrain, coverage, water, railways and roads) are considered "surface layers." The Hide/Show control for those features controls their display as a group. To hide or show them individually, right-click the Surface Model Layers entry and click Manage Surface Layers.
Note: This functionality is also available from the Data Sources panel.

Maximum/Adaptive LOD You can adjust how much detail you can see from various distances. When you set the general Level Of Detail to a high setting, you'll be able to see greater detail from a greater distance. The level of detail decreases as you get further away, with the furthest objects having the lowest level of detail.
Use the Maximum/Adaptive LOD control to override the adaptive LOD setting for the selected data source. It will then use the maximum level of detail (LOD) available. When the icon is filled, it's set to maximum LOD; when it's blank, it uses the adaptive LOD setting.


Make Selectable/Unselectable Make the selected data source selectable or unselectable. When the icon is yellow and displays a closed lock, the data source is unselectable.
Note: If the data source is locked, you can not use Select Data Source Features on the Data Sources panel.
Activate/Clear Highlighting Highlight all features in this data source. When the icon is bright yellow, features are highlighted; when it's dim, they're not.
Highlighting features with this option doesn't select them, nor does it zoom to show all highlighted items.

Create Subset Create a subset of features using an expression.
Use Create New Subset to create a filtered feature set that matches criteria that you specify. Right-click the subset to see operations you can perform on it.