![]()

Trimming a surface with a CV curve on surface
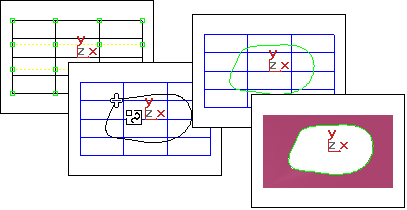
There are two methods for drawing and editing curves on surfaces: drawing in a viewport, or using the Edit Curve on Surface dialog. The choice is useful because you draw in two dimensions, with a mouse or other pointing device, while the curve on a surface can exist in three dimensions. The more complex the 3D surface, the more effort it can require to create and edit a curve on a surface.
Visual feedback can help you draw the curve. The point whose surface you first click is shown as a blue square, and the surface's minimum UV point is shown as a plus sign (+). As you draw the curve, it is displayed interactively in viewports.
Drawing in a Viewport
When you click to position a CV, the click is projected in the viewport's Z dimension. That is, your click is projected "through the screen" and onto the surface. This is a straightforward way to create a curve on a surface if the portion of the surface where the curve will lie is clearly visible in the viewport. However, this method doesn't let you place CVs on surface locations that are not visible in the viewport (they are on back faces, lie behind other geometry, and so on).
Using the Edit Curve on Surface Dialog
The Edit Curve on Surface dialog lets you edit curves on surfaces as you edit regular curves in a viewport. The main part of the dialog is a two-dimensional view of the surface. The controls provide typical curve editing functions. While you are creating a CV curve on surface, the 2D View toggle controls display of the Edit Curve on Surface dialog.
You can edit the CVs in CV curves on surfaces at the Curve CV sub-object level, as you edit other kinds of curve CVs. You can transform CVs in CV curves on surfaces, but you can't move the CVs off the surface. Using the Curve CV sub-object level is an alternative to editing these CVs by using the Edit Curve on Surface dialog.
Procedures
To create a CV curve on surface:
- In the NURBS toolbox, turn on
 (Create CV Curve On Surface).
 - Do one of the following:
- Draw the curve in the viewport, using the mouse above the surface.
- Turn on 2D View. This displays an Edit Curve on Surface dialog, which lets you create the curve in a two-dimensional (UV) representation of the surface.
- Right-click to end curve creation.
The NURBS object must contain at least one surface.
Interface
CV Curve on Surface rollout (creation time)

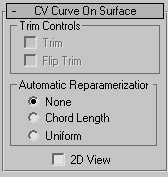
Trim Controls group
- Trim
-
When on, trims the surface against the curve. When off, the surface isn’t trimmed.
If it's impossible to trim with this curve, the surface is displayed in the error color (orange by default). For example, the curve is unusable for trimming if it doesn't form a closed loop.
- Flip Trim
-
When on, trims the surface in the opposite direction.
Automatic Reparameterization group
The radio buttons in this group let you choose automatic reparameterization. With reparameterization, the curve maintains its parameterization as you edit it. Without reparameterization, the curve's parameterization doesn't change as you edit it, and can become irregular.
- None Do not reparameterize.
- Chord Length Chooses the chord-length algorithm for reparameterization.
Chord-length reparameterization spaces knots (in parameter space) based on the square root of the length of each curve segment.
Chord-length reparameterization is usually the best choice.
- Uniform Spaces the knots uniformly.
A uniform knot vector has the advantage that the curve will change only locally when you edit it. With the other two forms of parameterization, moving any CV can change the entire curve.
- 2D View
-
When on, displays the Edit Curve on Surface dialog, which lets you create the curve in a two-dimensional (UV) representation of the surface.
CV Curve on Surface rollout (modification time)

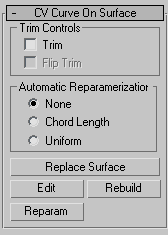
Trim Controls group
- Trim
-
When on, trims the surface against the curve. When off, the surface isn’t trimmed.
If it's impossible to trim with this curve, the surface is displayed in the error color (orange by default). For example, the curve is unusable for trimming if it doesn't form a closed loop.
- Flip Trim
-
When on, trims the surface in the opposite direction.
Automatic Reparameterization group
The radio buttons in this group let you choose automatic reparameterization. With reparameterization, the curve maintains its parameterization as you edit it. Without reparameterization, the curve's parameterization doesn't change as you edit it, and can become irregular.
- None Do not reparameterize.
- Chord Length Chooses the chord-length algorithm for reparameterization.
Chord-length reparameterization spaces knots (in parameter space) based on the square root of the length of each curve segment.
Chord-length reparameterization is usually the best choice.
- Uniform Spaces the knots uniformly.
A uniform knot vector has the advantage that the curve will change only locally when you edit it. With the other two forms of parameterization, moving any CV can change the entire curve.
- Edit
-
Click to display the Edit Curve on Surface dialog, which lets you edit the curve in a two-dimensional (UV) representation of the surface.
To edit multiple curves on a surface, select more than one CV curve sub-object on the same surface, then click Edit.
- Rebuild
-
Displays the Rebuild CV Curve dialog to let you rebuild the CV curve on surface.
- Reparam
-
Displays the Reparameterize dialog to let you reparameterize the CV curve on surface.