Use these settings for bridging pairs of polygons, polygon selections, or borders in Interactive Manipulation mode.

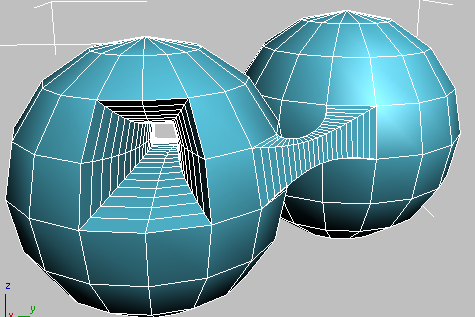
Examples of an internal bridge (left) and an external bridge (right), the latter connecting two elements
Interface
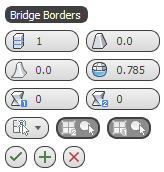
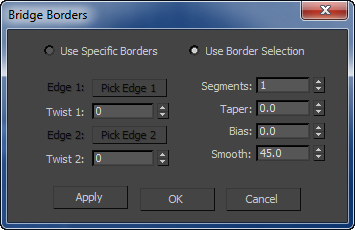
Bridging uses the caddy interface when Enable Caddy Controls is on; when off, the standard settings dialog is used. For details on using the caddy controls, see The Caddy Interface.


Left: the caddy interface; Right: the standard dialog
Bridge lets you use existing poly/border selections, or pick them with caddy controls.
-
 Segments
 -
Specifies the number of polygons along the length of the bridge connection. This setting also applies to manually bridged polygons.
Tip: When using Taper, set Segments to a value greater than 1. -
 Taper
Taper -
Sets the extent to which the bridge width becomes smaller or larger toward its center. Negative settings taper the bridge center smaller; positive settings taper it larger.
Note: To change the location of maximum taper, use the Bias setting. -
 Bias
Bias -
Determines the location of maximum taper amount.
The range of the Bias value is -99.0 to 99.0. At the default value of 0.0, the taper amount is greatest at the center of the bridge. At -99.0, the taper amount is greatest near the first selected polygon or border; at 99.0, it's greatest near the second selected polygon or border.
-
 Smooth
 -
Determines the maximum angle between columns across which smoothing can occur. A column is a string of polygons extending along the length of the bridge.
-
 Twist 1 /
 Twist 2
 -
Rotates the order of connection between the edges of the two selections. The two controls let you set a different twist amount for each end of the bridge.
- Use Selection / Use Specific [sub-objects]
-
Choose whether to bridge sub-objects that you choose with the caddy controls, or use an existing selection. The options are:
-
 Use Polygon/Border Selection If one or more qualifying selection pairs exist, choosing this option connects them immediately. If not, you can select pairs of sub-objects in a viewport to connect them.
 If you make more than two qualifying selections, Bridge connects them in increasing order of ID. For example, if you select polygon 12, 35, and 89, Bridge connects polygons 12 and 35. But if you then deselect polygon 35, Bridge then connects polygons 12 and 89.
-
 Use Specific Polygons/Borders In this mode, use the Pick buttons to designate polygons or borders for bridging.
-
-

 Pick Polygon/Border 1/2
 -
Click each Pick button in turn, and then click a polygon or border edge in a viewport. At the Border sub-object level, clicking any edge on a border designates the entire border for bridging. Also, the edges you pick on each border are connected directly, and the remaining edges are connected in consecutive order. You can change the order of the edge correspondences with the Twist settings. Available only in Use Specific mode.
After you pick a sub-object, the small circle on the Pick button changes appearance from empty to filled in. You can change the selection at any time by clicking the Pick button again and picking a different sub-object.
_____
-
 OK
OK -
Applies the settings to the current selection and closes the caddy. Keyboard equivalent:

-
 Apply and Continue
 -
Applies the settings to the current selection, retaining them for the preview if you then change the selection. Keyboard equivalent:
 +
+
-
 Cancel
 -
Closes the caddy without applying the settings to the current selection. Does not reverse previous uses of Apply And Continue. Keyboard equivalent:

 +click