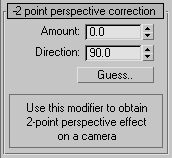
The Camera Correction modifier applies two-point perspective to a camera view. By default, camera views use three-point perspective, in which vertical lines appear to converge with height. In two-point perspective, vertical lines remain vertical.
The amount of correction you need to use depends on how steeply the camera tilts. For example, a camera that looks up from ground level to the top of a high building will need more correction than a camera that looks toward the horizon.

Normal camera view (left) and corrected camera view (right)
Procedures
To apply two-point perspective to a camera:
-
 Select a camera. Tip: For best results, set a viewport to this camera’s view. The change in perspective appears both in the viewport and when you render this view.
 - Apply the Camera Correction modifier.
- On the 2-Point Perspective Correction rollout, click Guess.
The Camera Correction modifier creates a first-guess Amount value for the two-point perspective.
- Adjust the Amount and Direction to get the effect you want.
In the viewports, the camera’s field-of-view “cone” distorts or moves to show the perspective adjustments.
-
 Render the view.
Interface

- Amount
-
Sets the amount of correction for two-point perspective. Default=0.0.
- Direction
-
Biases the correction. Default=90.0.
Setting Direction greater than 90.0 biases the correction to the left. Setting it less than 90.0 biases it to the right.
- Guess
-
Click to have the Camera Correction modifier set a first-guess Amount value.