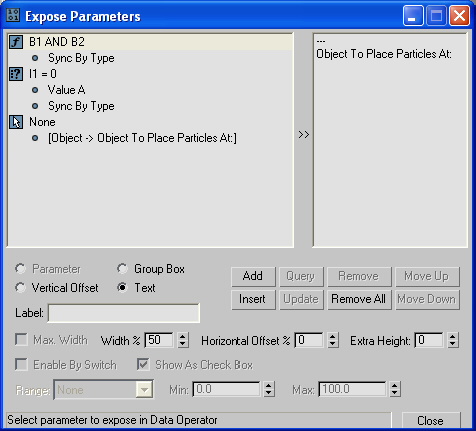
The standard procedure when exposing parameters is to highlight a parameter in the left-hand column, set the parameters in the lower part of the dialog, and then click Add.
For an example of how to use Expose Parameters, see Advanced Data Manipulation Quick Start Tutorial.
Interface

- [control type]
- The radio buttons above the Label field let you define explicitly the type of control to be exposed. The available radio buttons in this set depend on the type of control highlighted in the list. The choices are:
- Parameter
- Group Box
- Vertical Offset
- Text
- Label
- The name the exposed parameter will have in the operator UI in Particle View.
- Max. Width
- Applies to drop-down list and button control types. When on, creates a frame box for the control instead of a text label on the left side.
- Width %
- Sets the horizontal size of the parameter with respect to the width of the Parameters rollout.
- Horizontal Offset %
- The distance of the parameter from the right side of the rollout. In some cases you'll need to adjust the Width % and Horizontal Offset % values after exposing the parameter.
- Extra Height
- Adds vertical distance, in pixels, between the parameter and the one below it.
- Enable By Switch
-
The Switch suboperator can pass along any of several different data streams, depending on its Active Input value. It might happen that some exposed values are taken from alternate data, upstream. In such a case, if, due to the Active Switch value, the data are taken from a different stream, the exposed parameter is not used, so, for clarity, you can gray them out. To tell the UI about this situation, when exposing such a parameter, you can turn on Enable By Switch. Then, after clicking the Add button, the user is asked to choose a Switch suboperator.
- Show As Check Box
- Lets you choose how to expose the active input of a Switch suboperator. Available only if the Switch suboperator has two inputs. In this case, when on (the default), the control appears as a check box. When off, the control appears as a drop-down list.
Also see the Max. Width option, preceding.
- Range
- Choose whether the permissible parameter range is:
- None Unlimited range
- From Parameter As specified by the settings in Data View
- Custom Lets you set the range explicitly, using the Min and Max settings (see following).
- Min/Max
-
When Range is set to Custom, use these to set the minimum and maximum values in the range.
- Add
- Exposes the parameter. Click Add to place the parameter highlighted in the left-hand column at the end of the list in the right-hand column and on the Parameters panel, using the specified settings. Note: After you add the first parameter, a "---" entry automatically appears at the beginning of the list. This represents a blank line above the topmost parameter.
- Query
- Updates the dialog settings with the values from the highlighted parameter in the right-hand column.
- Remove
- Deletes the highlighted parameter in the right-hand column.
- Move Up
- Moves the highlighted parameter in the right-hand column one position higher.
- Insert
- Adds the parameter above the highlighted position in the list, rather than at the end.
- Update
- Revises the highlighted parameter in the right-hand list, using the current settings. To use this, highlight a parameter, click Query if necessary to get the current settings, change the settings, and then click Update.
- Remove All
- Clears the right-hand column and deletes the Parameters rollout.
- Move Down
- Moves the highlighted parameter in the right-hand column one position lower.