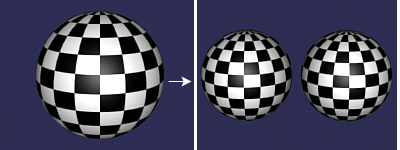
The Preserve modifier lets you retain, as much as possible, the edge lengths, face angles, and volume of an edited and deformed mesh object using an unmodified copy of the object before it was deformed. When you push and pull vertices at the sub-object level, the process typically stretches the edges and often alters the face angles, resulting in irregular topology. You can use the Preserve modifier to generate more regular edge lengths, and a "cleaner" mesh.
Procedures
Using the Preserve modifier:
- Create an object. Before you edit it, create a copy.
- Edit the copy at the sub-object level, pushing and pulling vertices, faces, and so on.
- Apply the Preserve modifier to the copy, click the Pick Original button, and then select the original, unmodified object.
- Adjust controls in the Preserve modifier to fine-tune the mesh.
Example: Use the Preserve modifier on a geosphere:
- Create a GeoSphere and use
 Shift+Move to make a copy of it. Tip: If you want to see the effect of Preserve on mapping, apply a checker-mapped material to the sphere and display it in the viewports before making the copy.
 - Convert the copy to an editable mesh.
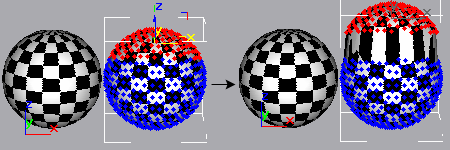
- At the Vertex sub-object level, select a third of the vertices at the top of the sphere, and move them upward (as seen from the front) about one radius in distance.
Notice the stretched edges between the moved vertices and the remaining vertices.
- While still at the Vertex sub-object level, apply the Preserve modifier.
- Click the Pick Original button, and then select the original (unedited) sphere.
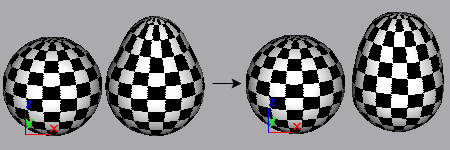
The selected vertices move back toward the sphere in an attempt to maintain the original volume and edge lengths.
- Turn on Invert Selection.
The selected vertices return to their moved position, and the unselected vertices (the inverted selection) move up toward the selected vertices.
- Turn off Invert Selection and slowly reduce the Iterations to 0.
The object now looks as it did before you applied Preserve.
- Increase Iterations to the default 25, and then increase it to approximately 75.
The object is now almost completely spherical again.
- Set Iterations back to 25, and then try different Edge Lengths, Face Angles, and Volume settings. (You can restore the defaults by settings Edge Lengths to 1.0, and Face Angles and Volume to 0.3.


Steps in applying the Preserve modifier to a geosphere
Example: Animating a preserved object:
- Remove the Preserve modifier from the copied sphere, and go to object level (instead of sub-object level).
- With the copied (and deformed) sphere still selected, choose
 Create panel
  Compound Objects
  Morph to make it into a Morph object.
 - Make sure Instance is chosen in the Pick Targets rollout.
- At frame 0, click Pick Target, and then select the original sphere.
- On the
 Modify panel, go to frame 100, select sphere02 in the Morph Targets list, and click Create Morph Key.
 The object now morphs from a sphere to a deformed sphere.
- Apply Preserve to the morph object.
- Click Pick Original, and select the original sphere.
The object now morphs from the sphere to a preserved and deformed sphere. Note that because the object selection is passed up the stack, the Preserve effect is applied to the entire sphere.
- Choose Selected Verts Only in the Selection group.
Now only the selected vertices are affected by Preserve. However, the morph still works.
You can animate the Preserve parameters, but the following procedure shows you how to use Morph and Preserve together.
Example: Using the Selection checkboxes:
- Reset 3ds Max, create a box, and convert it to an editable mesh.
- Use
 Shift+Move to make a copy.
 - Use the
 Modify panel to select the top four vertices in the second box. Move them upward in Z, making the copied box taller than the original.
 - Apply Preserve, and pick the first box as the original.
The selected vertices move down to match the original edge lengths.
- Set Iterations to 0 to move the vertices back up, then turn on Invert Selection, and set iterations back up to 25.
The selected vertices stay in their original locations, but the unselected vertices move upward to restore the original edge lengths.
- Turn Iterations back down to 0. Turn on Apply To Whole Mesh (Invert Selection becomes unavailable), and then turn Iterations back up to 25.
Preserve is now applied to the whole mesh. Since all vertices are affected, the top and bottom of the box approach each other.
- Turn off Apply To Whole Mesh.
All vertices are translated, but maintain the same positions relative to each other.
- Turn off Invert Selection and turn on Selected Verts Only.
You're back to the original effect. You can move the Iterations spinner up and down to see that you're affecting only the selected vertices.
Example: Simulating cloth:
- Reset 3ds Max, create a Quad Patch Grid, and convert it to an editable mesh.
- Make a copy, and then make a reference of the copy.
You should have a total of three objects in the scene.
- Apply Preserve to the third patch, using the first as the original.
- Turn on Selected Verts Only and Invert Selection.
- Set Iterations to 100.
-
 Select the second patch and go to the Sub-Object
  Vertex level.
 -
 Select a single vertex in the middle of the patch and move it upward in Z.
 The third patch becomes a floating handkerchief.
-
 Undo the vertex move.
 -
 Select the far two corner vertices of the second patch, and drag them upward in Z.
 Now, you've got the beginnings of a sheet hanging on the line.
Interface

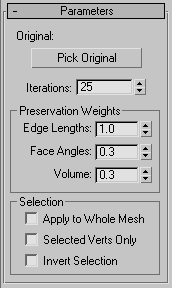
- Original
-
Displays the name of the selected original object. (Note that the so-called "original" object doesn't actually have to be the original. It's simply a copy of the object that represents its unmodified topology.)
- Pick Original
-
Click this, and then select an unmodified copy of the current object. You should pick an object with the same topology as the current object, which has the same number of vertices. While you can select a completely different object with equal vertices, the results are unpredictable.
- Iterations
-
Specifies the number of calculations toward the solution. The higher this number, the closer the object comes to matching the original object and the slower the process. When this is set to zero, the original object has no effect, as if the Preserve modifier were never applied.
Preservation Weights group
- Edge Lengths, Face Angles, Volumes
-
Adjusts the relative importance of the three components you're attempting to preserve: edge lengths, face angles, and volume. In most cases, you'd leave these at their default settings, but you can achieve some interesting effects by altering them. Higher face angles, for example, produce stiffer meshes.
Selection group
Provides options that let you specify which selection level to take from previous selection modifiers in the stack. The Preserve modifier acts on the specified selection.
- Apply to Whole Mesh
-
Applies Preserve to the entire object, regardless of the selection passed from previous levels of the stack. Disables the other two checkboxes.
- Selected Verts Only
-
Uses previous sub-object vertex selections. Note that it doesn't matter if the Vertex sub-object level is active in a previous stack item. As long as vertices have been selected, Preserve will use that selection.
- Invert Selection
-
Inverts the selection passed up the stack.
Note: If all of the checkboxes are turned off, Preserve uses whatever active selection is passed up the stack. Thus, if a Mesh Select modifier is set to the Vertex level, then that vertex selection is used. If the same Mesh Select modifier is set to the top (object) level, then the entire object is affected.