Fillet surface created from two parent surfaces
Usually you use both edges of the fillet surface to trim the parent surfaces, creating a transition between the fillet and its parents.
Procedures
To create a fillet surface:
- In the NURBS toolbox, turn on
 (Create Fillet Surface).
 - Click to choose the first parent surface, then click to choose the second parent surface. Potential parent surfaces are highlighted in blue as you move the mouse in a viewport.
The fillet surface is created. If the fillet surface can't be created, a default error surface is displayed (by default, the error surface displays as orange).
The NURBS object must contain at least two surfaces.
Interface
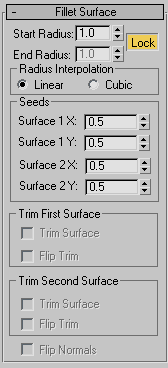
Fillet Surface rollout (creation time)

- Start Radius and End Radius
-
Set the radius used to define the fillet at the first surface you chose and the second surface you chose, respectively. The radiuses control the size of the fillet surface. Default=1.0.
- Lock
-
Locks the Start and End radius values so they are identical. When on, the End Radius setting is unavailable. Default=on.
Radius Interpolation group
This group controls the radius of the fillet. The Radius Interpolation setting has no effect unless one or both surfaces that define the fillet have curvature to them.
- Linear (The default.) When chosen, the radius is linear.
- Cubic When chosen, the radius is treated as a cubic function, allowing it to change based on the parent surface's geometry.
Seeds group
These spinners adjust the seed values for the fillet surface. If there is more than one way to construct the fillet, 3ds Max uses the seed values to choose the nearest edge for that surface.
- Surface 1 X
-
Sets the local X coordinate of the seed on the first surface you chose.
- Surface 1 Y
-
Sets the local Y coordinate of the seed on the first surface you chose.
- Surface 2 X
-
Sets the local X coordinate of the seed on the second surface you chose.
- Surface 2 Y
-
Sets the local Y coordinate of the seed on the second surface you chose.
Trim First Surface and Trim Second Surface groups
For each of the parent surfaces, these controls affect trimming.
- Trim Surface
-
Trims the parent surface at the edge of the fillet.
- Flip Trim
-
Reverses the direction of the trim.
- Flip Normals
-
Turn on to reverse the direction of the fillet surface's normals.
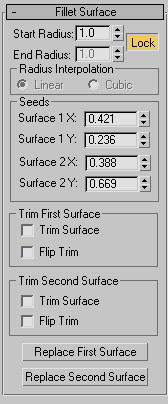
Fillet Surface rollout (modification time)

- Start Radius and End Radius
-
Set the radius used to define the fillet at the first surface you chose and the second surface you chose, respectively. The radiuses control the size of the fillet surface. Default=10.0.
- Lock
-
Locks the Start and End radius values so they are identical. When on, the End Radius setting is unavailable. Default=on.
Radius Interpolation group
This group controls the radius of the fillet. The Radius Interpolation setting has no effect unless one or both surfaces that define the fillet have curvature to them.
- Linear (The default.) When chosen, the radius is linear.
- Cubic When chosen, the radius is treated as a cubic function, allowing it to change based on the parent surface's geometry.
Seeds group
These spinners adjust the seed values for the fillet surface. If there is more than one way to construct the fillet, 3ds Max uses the seed values to choose the nearest edge for that surface.
- Surface 1 X
-
Sets the local X coordinate of the seed on the first surface you chose.
- Surface 1 Y
-
Sets the local Y coordinate of the seed on the first surface you chose.
- Surface 2 X
-
Sets the local X coordinate of the seed on the second surface you chose.
- Surface 2 Y
-
Sets the local Y coordinate of the seed on the second surface you chose.
Trim First Surface and Trim Second Surface groups
For each of the parent surfaces, these controls affect trimming.
- Trim Surface
-
Trims the parent surface at the edge of the fillet.
- Flip Trim
-
Reverses the direction of the trim.
- Flip Normals
-
Turn on to reverse the direction of the fillet surface's normals.
- Replace First Surface and Replace Second Surface
-
Let you replace the parent surfaces. Click a button, then click the surface to replace the original first or second surface.