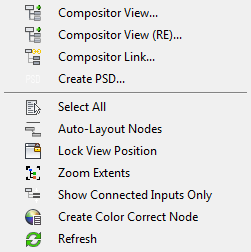
Contains commands for displaying and managing Compositor View.

- Compositor View
- Opens the Compositor window as part of the State Sets dialog. Any states with saved rendered output display a miniature version of the output on the node thumbnail; otherwise the thumbnail is blank. This applies even if the output was created in a previous session. Note: Compositor View shows nodes only for full rendered output. To view render element nodes as well, use Compositor View (RE) (see following).
- Compositor View (RE)
- Opens the Compositor window, including render elements, as part of the State Sets dialog.
 In Autodesk 3ds Max 2015, Compositor View (RE) has been enhanced to make using elements easier. Specifically:
 - Elements are ordered in a convenient way, with lighting effects on top—reflections, shadows, specular elements—followed by full-image elements such as scene views; and at the bottom, data elements such as Object ID and Z Depth.
- The Blend Mode for elements is initialize to an appropriate setting: For example, Addition for self-illumination and reflection elements, Normal for full-frame passes, Multiply for lighting, and so on.
- Compositor Link
- Opens the Compositor Link panel. This sets the link file State Sets uses to transfer data between 3ds Max and Adobe After Effects.
The Compositor Link panel opens docked at the bottom of the State Sets dialog. At the right end of its title bar are two icon buttons: a vertical pushpin and an X. The pushpin button toggles between maximized the default) and minimized states. When minimized, the panel appears as a Compositor Link tab at the bottom of the State Sets dialog. In this state you can open the panel by moving your mouse over the tab; it minimizes again when you move the mouse away from the panel.
To close the panel, click the X button.
Note: When both the Compositor Link panel and the Set Render Output File Pattern panel are open, they are available as tabbed panels superimposed at the bottom of the State Sets dialog. To activate either panel, click its tab. - Create PSD
- Opens the Render To PSD dialog for generating and saving a Photoshop-format bitmap image based on the Compositor Output node. Click the Browse button to set the output path and file name, then click Render.

State Sets renders each state or element to a separate layer of the PSD file.
 State Sets saves alpha data in a Layer Mask for each layer, making it easier to control compositing in Photoshop.
 The image is rendered using the Output Size setting on the Render Setup dialog.
- Select All
- Selects all nodes.
- Auto-Layout Nodes
- Toggles the auto-layout mode, which creates and maintains a regular arrangement of all nodes automatically. With Auto-Layout Nodes active, you can't change a node's position manually, and adding a node automatically positions it within the arrangement.
You can resize nodes with Auto-Layout on.
- Lock View Position
- Prevents the view from being panned or zoomed directly. You can still use Auto-Layout Nodes with Lock View Position on. If Auto-Layout Nodes is off, you can scroll indirectly by dragging a node past the view border.
- Zoom Extents
- Zooms and pans the view to fill it with selected nodes. If no node is selected, zooms to all nodes.
- Show Connected Inputs Only
- Toggles the visibility of unconnected inputs. This can simplify the view after you've made all necessary connections.
- Create Color Correct Node
- Adds a freestanding Color Correct node to the layout. Typically you'd wire this between a bitmap node and the Compositor Output node.
- Refresh
- Restores Compositor View to its status as originally opened, deleting any components added in Compositor View such as Color Correct nodes. This is equivalent to closing Compositor View and then reopening it. Important: Be careful when using Refresh, as this command has the potential to destroy some of your work.