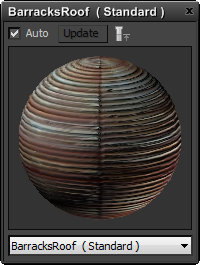
The Preview window for materials and maps helps you visualize how the material or map will appear in the scene.
You can open any number of Preview windows. You can also use a single Preview window to display previews for all nodes in the active View, by using the drop-down list at the bottom of the Preview window.
Procedures
To display a Preview window:
- Right-click the node, and from the pop-up menu, choose Open Preview Window.
To close a Preview window:
- Click the X button in the upper-right corner of the window.
To change the sample geometry used in the preview window:
- Right-click a material node, and choose Preview Object Type
 Sphere (the default), Cylinder, or Box.
Interface

- Auto toggle / Update button
-
When the Auto toggle is on, 3ds Max automatically renders the preview again when you make changes to the material or map settings. Default=on.
When the Auto toggle is off, the Update button is enabled. Click Update to render the preview again, in order to see changes made to the material or map settings.
- Show End Result
-
This button is enabled when the Preview window displays a map.
 When the button is off, the preview shows only the map itself.
  When the button is on, the preview shows the end result: that is, the map as it is used by the material.
 - [preview rendering]
-
The main part of the Preview window is a rendering of the material or map, applied to a sample object. (You can change the sample object type: see Preview Object Type.)
You can resize the Preview window by dragging its edges or corners like any Windows window. Making the Preview window larger can help you visualize how a material will appear in the scene. However, larger windows take longer to render.
- [material/map drop-down list]
-
The drop-down list at the bottom of the Preview window lets you choose any material or map that is currently in the View. Changing this selection changes the preview.
The choice Follow Current Selection lets the preview show any material or map in the current View: As you click in the View to select material or map nodes, the preview shows the node you selected most recently. (If you select multiple nodes, the preview shows only the last node you selected before making a multiple selection.)