The functions available at the editable spline object level (that is, when no sub-object level is active) are also available at all sub-object levels, and work exactly the same at each level.
Interface
Rendering, Interpolation, and Selection rollouts
See the Editable Spline topic for information on the Rendering and Interpolation rollouts, and Selection rollout settings.
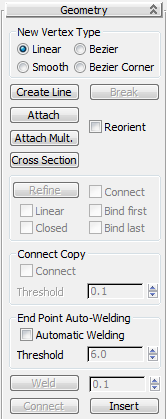
Geometry rollout

New Vertex Type group
The radio buttons in this group let you determine the tangency of the new vertices created when you Shift+Clone segments or splines. If you later use Connect Copy, vertices on the splines that connect the original segment or spline to the new one will have the type specified in this group.
This setting has no effect on the tangency of vertices created using tools such as the Create Line button, Refine, and so on.
- Linear New vertices will have linear tangency.
- Smooth New vertices will have smooth tangency.
When this option is chosen, new vertices that overlap are automatically welded.
- Bezier New vertices will have bezier tangency.
- Bezier Corner New vertices will have bezier corner tangency.
- Create Line
- Adds more splines to the selected spline. These lines are separate spline sub-objects; create them in the same way as the line spline. To exit line creation, right-click or click to turn off Create Line.
- Break
- Splits a spline at the selected vertex or vertices. Select one or more vertices and then click Break to create the split. There are now two superimposed non-connected vertices for every previous one, allowing the once-joined segment ends to be moved away from each other.
- Attach
- Lets you attach another spline in the scene to the selected spline. Click the object you want to attach to the currently selected spline object. The object you're attaching to must also be a spline.

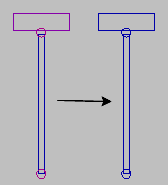
Unattached splines (left) and attached splines (right)
When you attach an object, the materials of the two objects are combined in the following way:
- If the object being attached does not have a material assigned, it inherits the material of the object it is being attached to.
- Likewise if the object you're attaching to doesn't have a material, it inherits the material of the object being attached.
- If both objects have materials, the resulting new material is a multi/sub-object material that encompasses the input materials. A dialog appears offering three methods of combining the objects' materials and material IDs. For more information, see Attach Options Dialog.
Attached shapes lose their identity as individual shapes, with the following results:
- The attached shape loses all access to its creation parameters. For example, once you attach a circle to a square you cannot go back and change the radius parameter of the circle.
- The modifier stack of the attached shape is collapsed.
Any edits, modifiers, and animation applied to the attached shape are frozen at the current frame.
- Reorient
- When on, rotates the attached spline so that its creation local coordinate system is aligned with the creation local coordinate system of the selected spline.
- Attach Mult.
- Click this button to display the Attach Multiple dialog, which contains a list of all other shapes in the scene. Select the shapes you want to attach to the current editable spline, then click OK.
- Cross Section
- Creates a spline cage out of cross-sectional shapes. Click Cross Section, select one shape then a second shape, splines are created joining the first shape with the second. Continue clicking shapes to add them to the cage. This functionality is similar to the Cross Section modifier, but here you can determine the order of the cross sections. Spline cage tangency can be defined by choosing Linear, Bezier, Bezier Corner or Smooth in New Vertex Type group.
End Point Auto-Welding group
- Automatic Welding When Automatic Welding is turned on, an end point vertex that is placed or moved within the threshold distance of another end point of the same spline is automatically welded. This feature is available at the object and all sub-object levels.
- Threshold A proximity setting that controls how close vertices can be to one another before they are automatically welded. Default=6.0.
- Insert
-
Inserts one or more vertices, creating additional segments. Click anywhere in a segment to insert a vertex and attach the vertex to the mouse. Optionally move the mouse and then click to place the new vertex. Continue moving the mouse and clicking to add vertices. A single click inserts a corner vertex, while a drag creates a Bezier (smooth) vertex.
Right-click to complete the operation and release the mouse. At this point, you're still in Insert mode, and can begin inserting vertices in a different segment. Otherwise, right-click again or click Insert to exit Insert mode.