The Advanced Rendering parameters define performance-boosting options.
Interface
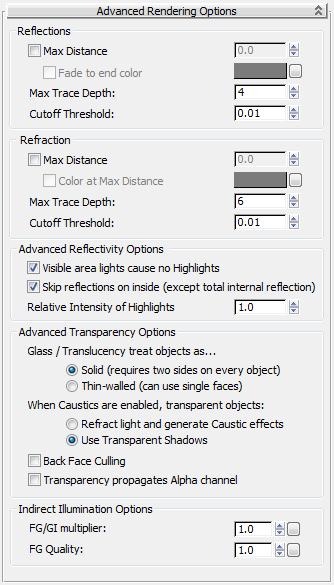
Reflections group
- Max Distance
- Allows limiting reflections to a certain distance, which both speeds up rendering and avoids pulling distant objects into extremely glossy reflections.
- Fade to end color
- When on, reflections fade to this color. When off, reflections fade to the environment color. The former tends to be more useful for indoor scenes; the latter, for outdoor scenes.
Available only when Max Distance is on.
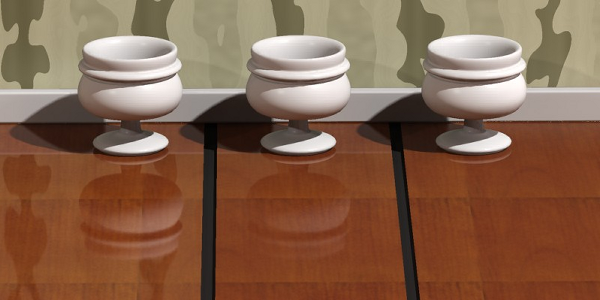
Left: Full reflections (Max Distance=off)
Center: Max Distance=100mm
Right: Max Distance=25mm
- Max Trace Depth
- When this trace depth is reached, the material behaves as if the Highlights+FG Only switch is on; that is, it shows only highlights and “emulated” reflections created with the help of Final Gathering.
- Cutoff Threshold
- The level at which reflections are rejected; that is, not traced. It’s a relative value: For example, the default setting of 0.01 means that rays that contribute less than 1 percent to the final pixel are ignored. A setting of 0.25 means that mental ray discards rays that contribute less than a quarter of the value of the final pixel.
Refraction group
The optimization settings for refraction (transparency) are nearly identical to those for reflections. The exception is that of Color At Max Distance, which behaves differently.
- Max Distance
- Allows limiting refraction to a certain distance.
- Color at Max Distance
- When on, the material simulates physically correct absorption. At the distance specified by Max Distance, the refracted image has the color given by Color At Max Distance, but the rays are not limited in reach. At twice the distance, the influence of Color At Max Distance is double, at half the distance half, and so on.
When off, transparency rays simply fade to black. This is like smoked glass and other highly absorbent materials. Transparency just stops at the specified distance. This has the same performance advantage as using the Max Distance for reflections: Tracing shorter rays is much faster.
Available only when Max Distance is on.
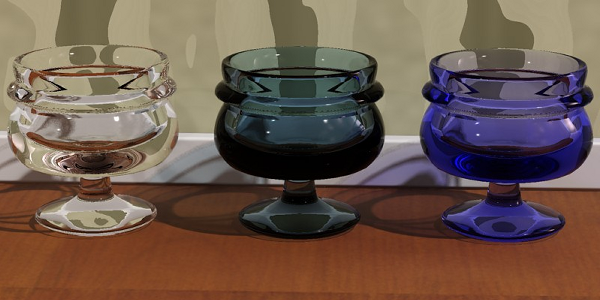
Left: No limit (Max Distance=off)
Center: Fade to black
Right: Fade to blue
- Max Trace Depth
- When this trace depth is reached, the material refracts black.
- Cutoff Threshold
- The level at which refraction is rejected; that is, not traced. It’s a relative value: For example, the default setting of 0.01 means that rays that contribute less than 1 percent to the final pixel are ignored. A setting of 0.25 means that mental ray discards rays that contribute less than a quarter of the value of the final pixel.
Advanced Reflectivity Options group
- Visible area lights cause no Highlights
- When on, mental ray area lights (Omni and Spotlight) with the Show Icon In Renderer property on create no specular highlights. Default=on.
The Show Icon In Renderer checkbox is found on the light's Area Light Parameters rollout. When on, the light is visible and reflects in any glossy, reflective objects. If both the reflection of the visible area light and the highlight are rendered, the light is added twice, causing an unrealistic brightening effect. When on, this switch causes visible area lights to lose their highlights and instead appear only as reflections. Note that this does not apply to the Highlights+FG Only mode, which doesn’t actually reflect anything.
- Skip reflections on inside (except total internal reflection)
- Most reflections inside transparent objects are very faint, except in the special case known as total internal reflection (TIR), which occurs at certain angles. When on, this option saves rendering time by ignoring the weak reflections completely but retaining the TIRs. Default=on.
- Relative Intensity of Highlights
- Defines the intensity of specular highlights versus the intensity of true reflections. When the value is 1.0, the two intensities are equal. A lower value subdues the intensity of highlights compared to reflections, while a higher value intensifies the highlights.
Advanced Transparency Options group
The options give you control over some of the deepest details of the Arch & Design material.
- Glass/Translucency treat objects as...
-
- Solid The object behaves as if it is made of a solid, transparent substance.
- Thin-walled The object behaves as if made of wafer-thin sheets of a transparent material.
For more information, see Solid versus Thin-Walled.
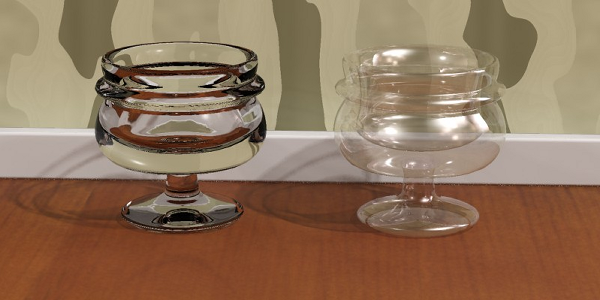
Left: Solid
Right: Thin-walled
- When Caustics are enabled, transparent objects
- When not rendering caustics, the Arch & Design material uses a shadow shader to create transparent shadows. For objects such as window panes, this is perfectly adequate, and actually creates a better result than using caustics, because the direct light is allowed to pass more or less undisturbed through the glass into a space such as a room.
Traditionally, enabling caustics in mental ray causes all materials to stop casting transparent shadows and instead start to generate refractive caustics. In most architectural scenes this is undesirable: You might want a glass decoration on a table to generate a caustic effect, but still want the windows of the room to let in normal direct light. This toggle makes this possible at the material level.
- Refract light and generate Caustic effects The material refracts light and generates caustics.
- Use Transparent Shadows No caustics are produced; the material and object simply transmit the light, with greater shadowing in thicker areas.
In the following illustration, the left side shows the result with Use Transparent Shadows chosen, and the right side shows the result with Refract Light And Generate Caustic Effects chosen. You can freely mix the two modes in the same rendering. Photons are automatically treated accordingly by the built-in photon shader, shooting straight through as direct light in the former case, and being refracted as caustics in the latter.
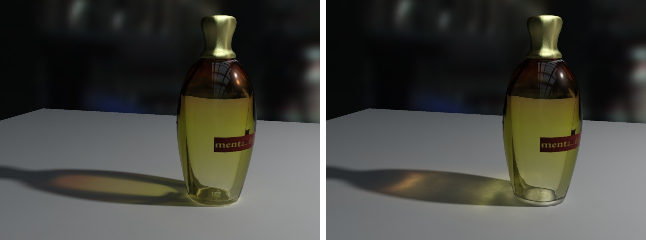
Left: Using transparent shadows
Right: Using refractive caustics
- Back Face Culling
- When on, enables a special mode that makes surfaces invisible to the camera when seen from the reverse side. Default=off.
You can use Back Face Culling to create “magic walls” in a room. If all walls are planes with the normals facing inwards, the Back Face Culling switch allows the room to be rendered from “outside.” The camera can see into the room, but the walls will still exist and cast shadows, bounce photons, and so on, while being invisible when the camera goes outside.

Left: Back Face Culling=off
Right: Back Face Culling=on
- Transparency propagates Alpha channel
- Defines how transparent objects treat any alpha-channel information in the background. When on, refraction and other transparency effects propagate the alpha of the background “through” the transparent object. When off, transparent objects have an opaque alpha.
Indirect Illumination Options group
- FG/GI multiplier
- Allows tweaking of how strongly the material responds to indirect light.
- FG Quality
- A local multiplier for the number of final gather rays shot by the material.