The Shell modifier “solidifies” or gives thickness to an object by adding an extra set of faces facing the opposite direction of existing faces, plus edges connecting the inner and outer surfaces wherever faces are missing in the original object. You can specify offset distances for the inner and outer surfaces, characteristics for edges, material IDs, and mapping types for the edges.
Also, because the Shell modifier doesn't have sub-objects, you can use the Select options to specify a face selection for passing up the stack to other modifiers. Please note that the Shell modifier doesn't recognize existing sub-object selections, nor does it pass such selections up the stack.

Left: Sphere with part of surface removed
Right: Sphere with Shell applied
You'd typically use Shell on an object with part of its surface removed, such as a sphere with several deleted vertices or faces, as illustrated above. For best results, the original polygons should face outward. If an object has no faces with at least one free edge, Shell will not create any edges.
Examples of Shell Usage
Following are some examples of modeling tasks for which the Shell modifier would be appropriate:
- An artist is modeling a vehicle such as a car, a tank, or, in this case, a helicopter. The artist builds a solid external shell as the body of the copter. When done, the modeler breaks up his model: he selects window areas and detaches them as new objects, followed by the area for the doors (also detached as new objects). The modeler now has open objects representing the body, windows, and doors. The modeler applies Shell to the body, and sets it to extrude both outward and inward, with the inward extrusion amount greater than the outward. Next, Shell is applied to the windows, with inward extrusion only. The modeler then copies the Shell modifier from the body to the doors, and reduces the doors' outward extrusion amount. The result is a solid body with an interior that can accept additional modeling, inset windows, and doors that are slightly less thick than the shell of the helicopter.
- A designer is modeling a manufactured object that will need to be shown in an exploded view. It might be a cell phone, an engine, a mouse, shaped glass, or something similar; this example will use part of a cell phone. When working on the phone keypad area, if the modeler builds with detail in mind, she might accurately model the shell with a moderately dense mesh, using ShapeMerge to create the shapes for the holes where the keys will poke through, and then deleting those faces. When satisfied, the modeler applies the Shell modifier, sets Segments to 2, and then turns on the Bevel Edges option to use a curve for the profile of the holes' edges. She then applies a MeshSmooth modifier on top. The extra segment helps control the curve of the edges where the outer surface curves down to the keypad holes. The modeler then goes back to the cage portion of the stack and refines the base mesh details to her liking.
- A modeler is creating a suit of futuristic armor for a character. The modeler copies a selection of polygons from the character mesh to a new object; for example, the polygons that make up the arm. The modeler deletes some faces from the copied arm, and perhaps cuts some holes from it. He then applies the Shell modifier, followed by a MeshSmooth modifier, resulting in form-fitting armor.
Procedures
To use the Shell modifier:
Interface

- Inner/Outer Amount
-
Distance in 3ds Max generic units by which the inner surface is moved inward and the outer surface is moved outward from their original positions. Defaults=0.0 / 1.0.
The sum of the two Amount settings determines the thickness of the object's shell, as well as the default width of the edges. If you set both to 0, the resultant shell has no thickness, and resembles an object set to display as 2-sided.
- Segments
-
The number of subdivisions across each edge. Default=1.
Change this setting if you need greater resolution on the edge for use by subsequent modeling or modifiers.
Note: When you use a Bevel Spline, the spline's properties override this setting. - Bevel Edges
-
When on, and you specify a Bevel Spline, 3ds Max uses the spline to define the edges' profile and resolution. Default=off.
After you define a Bevel Spline, use Bevel Edges to switch between a flat edge whose resolution is defined by the Segments setting and a custom profile defined by the Bevel Spline.
- Bevel Spline
-
Click this button and then select an open spline to define the edge shape and resolution. Closed shapes such as Circle or Star will not work.
The original spline is instanced to the Bevel Spline, so changing the spline's shape and properties are reflected in the Bevel Spline. With non-corner vertices, you can change the edge resolution with the spline's Interpolation rollout settings.

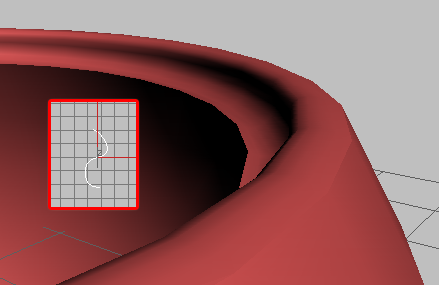
A bevel spline as viewed from the top (inset) and the resulting bevel
Tip: For best results, create the spline in the Top viewport, and draw it from top to bottom. The top point on the spline is applied to the outside edge, and the bottom point to the inside edge. Displacements to the right will create outward protrusions on the edge profile, and displacements to the left create inward protrusions. - Override Inner Mat ID
-
Turn on to specify a material ID for all of the inner surface polygons using the Inner Mat ID parameter. Default=off.
If you don't specify a material ID, the surface uses the same material ID or IDs as the original faces.
- Inner Mat ID
-
Specifies the material ID for inner faces. Available only when Override Inner MatID is on.
- Override Outer Mat ID
-
Turn on to specify a material ID for all of the outer surface polygons using the Outer Mat ID parameter. Default=off.
If you don't specify a material ID, the surface uses the same material ID or IDs as the original faces.
- Outer Mat ID
-
Specifies the material ID for outer faces. Available only when Override Outer MatID is on.
- Override Edge Mat ID
-
Turn on to specify a material ID for all of the new edge polygons using the Edge Mat ID parameter. Default=off.
If you don't specify a material ID, the surface uses the same material ID or IDs as the original faces from which the edges are derived.
- Edge Mat ID
-
Specifies the material ID for edge faces. Available only when Override Edge MatID is on.
- Auto Smooth Edge
-
Applies automatic, angle-based smoothing across the edge faces using the Angle parameter. When off, no smoothing is applied. Default=on.
This doesn't apply smoothing across the junction between the edge faces and the outer/inner surface faces.
- Angle
-
Specifies the maximum angle between edge faces that will be smoothed by Auto Smooth Edge. Available only when Auto Smooth Edge is on. Default=45.0.
Faces that meet at an angle greater than this value will not be smoothed.
- Override Smooth Group
-
Lets you specify a smoothing group for the new edge polygons using the Smooth Grp setting. Available only when Auto Smooth Edge is off. Default=off.
- Smooth Grp
-
Sets the smoothing group for the edge polygons. Available only when Override Smooth Group is on. Default=0.
When Smooth Grp is set to the default value of 0, no smoothing group is assigned to the edge polygons. To specify a smoothing group, change the value to a number between 1 and 32.
Note: When Auto Smooth Edge and Override Smooth Group are both off, 3ds Max assigns smoothing group 31 to the edge polygons. - Edge Mapping
-
Specifies the type of texture mapping that is applied to the new edges. Choose a mapping type from the drop-down list:
- Copy Each edge face uses the same UVW coordinates as the original face from which it's derived.
- None Each edge face is assigned a U value of 0 and a V value of 1. Thus, if a map is assigned, the edges will take the color of the upper-left pixel.
- Strip The edges are mapped in a continuous strip.
- Interpolate The edge mapping is interpolated from the mapping of the adjacent inner and outer surface polygons.
- TV Offset
-
Determines the spacing of the texture vertices across the edges. Available only with the Edge Mapping choices Strip and Interpolate. Default=0.05.
Increasing this value increases the repetition of the texture map across the edge polygons.
- Select Edges
-
Selects the edge faces. This selection is passed up the stack to other modifiers. Default=off.
- Select Inner Faces
-
Selects the inner faces. This selection is passed up the stack to other modifiers. Default=off.
- Select Outer Faces
-
Selects the outer faces. This selection is passed up the stack to other modifiers. Default=off.
- Straighten Corners
-
Adjusts corner vertices to maintain straight-line edges.
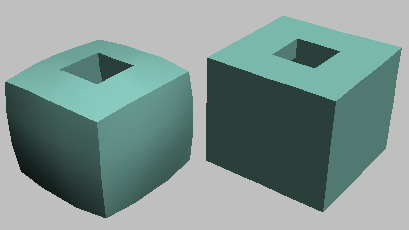
If you apply Shell to a subdivided object with straight edges, such as a box set to 3x3x3 segments, you might find that the corner vertices don't stay in a straight line with the other edge vertices. This gives the edges a bulging look. To resolve this, turn on Straighten Corners.

Box with Straighten Corners off (left) and on (right)