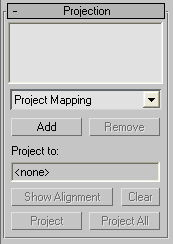
The Projection rollout has controls for projecting data from the object with the Projection modifier to a different object. This data flow is the reverse of what it is when you project normals from a high-resolution object to a low-resolution object.
Interface

- [projector list]
-
Shows the active projector plug-ins.
- [projector plug-in drop-down list]
-
Lets you choose a projector plug-in. Only one projector, Project Mapping, is provided with 3ds Max. See Project Mapping Rollout (Projection Modifier). Additional projectors might be available from third-party sources.
Note: Multiple instances of the Project Mapping plug-in can be active. - Add
-
Adds a projector of the type chosen in the drop-down list.
- Remove
-
Removes the projector that is currently highlighted in the projector list.
- Project to
-
Shows the name of the geometry to which you're projecting. To choose this geometry, use the Reference Geometry rollout.
- Show Alignment
-
Click to display the faces of the geometry selection that will project to the selected faces of the object that has the Projection modifier. This shows which hi-res faces will be projected to the selected low-res faces.
This works only for selected faces, not selected vertices: you can lock a face selection and then make adjustments to the cage, then click Show Alignment to see the effects of the cage modification.
This button is unavailable if no selection has been made in the Reference Geometry rollout.
- Clear
-
Click to turn off the Show Alignment display.
- Project
-
Click to perform the projection.
- Project All
-
Click to perform all projections that are in the projector list.