Viewport Canvas provides tools for painting color and patterns onto any bitmap in an object’s material in the viewport. You can paint in multiple layers directly onto a 3D object, or on a 2D canvas superimposed on the viewport. Viewport Canvas can export the painting in PSD format so you can modify it in Adobe Photoshop or a compatible program, and then save the file and update the texture in 3ds Max.

You start by choosing a brush and activating one of the painting tools: Paint, Erase, Clone, and a number of others. You then paint directly on the object, switching tools and changing layers whenever you like.
Among the Viewport Canvas features are the ability to use a custom palette, randomize brush settings, use a graphics tablet and pen to vary brush radius and other settings based on pressure, mirror brush strokes, and save and load all settings. You can also switch instantly between painting on an object and a 2D canvas with real-time feedback in both areas.
For maximum accuracy, use TIFF or another lossless file format. Also, make sure the viewport display of textures uses the highest possible resolution. You can do that by going into Customize menu  Customization Preferences Viewports Configure Driver and, setting Download Texture Size to 512, and turning on Match Bitmap Size As Closely As Possible. Viewport Canvas is supported by all display drivers except OpenGL.
Procedures
To use Viewport Canvas (optionally, with layers):
- Select an object to paint on.
The object need not have a material assigned, but it must have mapping coordinates. If not, Viewport Canvas will not work with it.
- Open the Materials menu and on the Create/Edit Maps panel, click Viewport Canvas.
The Viewport Canvas dialog opens. If necessary, position it so doesn’t obscure your object.
Tip: Customize the dialog by adjusting the position and settings as you like and then make the changes permanent with Save Current Settings As Default. You can also dock the dialog to the left or right side of the program window: Drag it into position or right-click the dialog title bar and choose Dock Left or Right. - Click
 (Paint) or any other tool.
 If the object does not have a material assigned, the Assign Material dialog opens, giving you the option to assign a Standard material, browse for a material using the Material/Map Browser, or cancel. For details on these options, see Assign Material Dialog. To get started quickly, choose Assign Standard Material.
After you assign a material, or if the object already has a material, a list of available map types opens. The list also shows any assigned maps.
- Choose a map type from the list. For example, to paint the object’s coloring with a Standard material, choose the Diffuse Color map.
If the map type does not have a bitmap image file assigned, choosing the map type opens the Create Texture dialog, where you can use the browse button (
 ) to specify a new or existing bitmap file. Otherwise Viewport Canvas uses the current bitmap. Note: If you use Create Texture to specify an existing bitmap file, the file is overwritten. Also, if the assigned map type is not a bitmap, you’re prompted to choose a component of the map, typically a color, for which to create a bitmap. Viewport Canvas requires a bitmap file to work with.
After setting up the material and map, if necessary, the Layers dialog opens and the mouse cursor becomes the icon for the active tool when over the active viewport, such as a circle for the Paint and Erase tools. When using the Paint tool and the cursor is over the object to be painted, the paint image is visible within the brush icon.
The background layer is now active and ready for painting on.
- Choose a color or brush image and/or mask and paint on the object surface, if you wish.
However, you might want to paint in a new layer instead; see the following tip:
Tip: As the background (default) layer cannot be erased, it is highly recommended that you always paint into a layer other than the background. - On the Layers dialog, click
 (Add New Layer).
 A new layer is added to the painting and becomes the active layer.
- Drag over the object surface to paint.
While painting, you can switch tools, colors, and brush images; add, delete, and switch layers, change the layer order, and specify filters and how layers interact; and navigate the viewport to paint different parts of the object.
- To exit painting mode, right-click in the active viewport or click the Paint button again.
If you’ve added one or more layers to a single-layer bitmap, the Save Texture Layers dialog opens, prompting you to specify what to do with your painting. These options are detailed here.
To preserve the layers in the current map, choose “Save as PSD and replace texture in material,” then use the file dialog that opens to specify the PSD file to save. This file becomes the new map in the object’s material.
You can return to editing that map by activating any painting tool, or, to edit a different map in the material, choose it from the Options rollout.
This procedure serves as both a general-purpose introduction to Viewport Canvas and a guide to using the Layers feature.
Example: To use the Clone tool in Viewport Canvas:
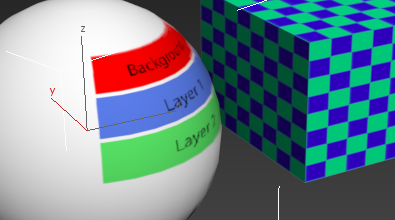
- Set up a scene containing two objects with different texture maps. The object to paint on should have a multi-layer bitmap (PSD file) as the Diffuse map, and the other object can have any type of Diffuse map, such as Checker.
 Tip: You can use Viewport Canvas to create a multi-layer PSD file; see the preceding procedure for details.
 - Select the object to paint on.
- Open the Materials menu and on the Create/Edit Maps panel, click Viewport Canvas.
The Viewport Canvas dialog opens. If necessary, position the dialog so it doesn’t obscure the viewport.
- On the Options rollout, turn off Save Texture.
This lets you experiment without saving changes to the original bitmap file.
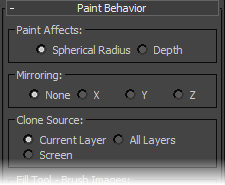
- Open the Paint Behavior rollout and note that Clone Source is set to Current Layer.
- Click
 (Clone) and choose the material’s Diffuse map.
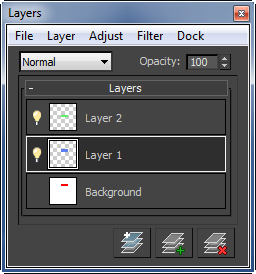
 The Layers dialog opens, showing the bitmap’s layers.
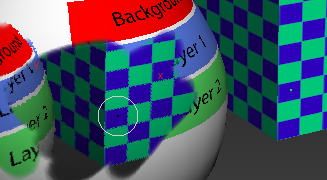
- Choose a layer to clone from by clicking it in the Layers list. In the preceding illustration, Layer 1 is active.
You’re now ready to pick the texture to clone.
- Position the mouse cursor over the texture to clone in the active viewport, press and hold
 , click
  (the left mouse button), then release .
 A green dot appears on the texture where you clicked, showing the center of the area to be cloned.
You’re now ready to paint using the cloned image.
- Move the mouse around over the selected object.
The area of the cloned texture that fits inside the brush circle moves with the brush as a preview, while the green dot remains stationary.
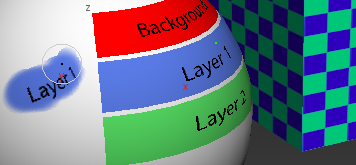
Cloning from Layer 1 after Alt+clicking the "a"
- Click once on the surface of the selected object, then release the mouse button.
The cloned image is copied to the selected object.
Note: In regular usage it’s not necessary to click once to start cloning a texture; you can drag instead, as with other painting tools. We suggest clicking first in this procedure in order to show how the Clone tool works.All subsequent painting with the Clone brush, before exiting the tool or changing a setting, copies the texture relative to this point.
- Move the mouse around near the point you just clicked.
The brush now appears to be sliding over the cloned texture as the green dot also moves, previewing exactly which portions of the texture will be cloned when start painting again.
Note: When the mouse cursor is not over the selected object, the green dot turns red to indicate that painting isn't possible here.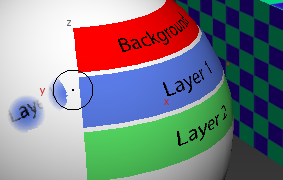
The green dot turns red when away from the sphere.
- Drag to paint some more of the cloned texture.
Continuing to clone Layer 1
Only the contents of the current layer are cloned.
- On the Layers dialog, choose a different layer.
The green dot disappears because you've changed a setting. The Clone brush is still active, but if you tried to paint now, no paint would be deposited because the clone point has been lost. However, at any time you can specify a new clone point in the current layer by
+clicking again. 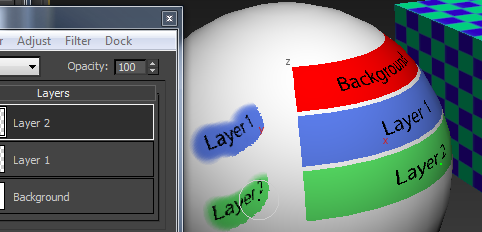
Cloning from Layer 2
- On the Paint Behavior rollout, set Clone Source to All Layers and again +click the area to clone from.
- Paint with the Clone brush.
Now you’re cloning from every layer, not just the active one.
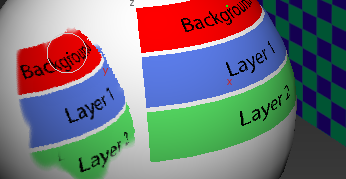
Cloning from all layers
Tip: The Clone tool copies the texture exactly as it appears in the viewport, complete with curvature, foreshortening, and so on. To paint with an undistorted texture, set it up that way in the viewport. For example, use a viewport background image, or map the texture to a plane parallel to the viewing plane in an orthographic viewport. - On the Paint Behavior rollout, set Clone Source to Screen and +click the second object from step 1.
- Paint on the selected object with the Clone brush.
Now you’re cloning from the entire screen.
Cloning from the screen
Note: When Clone Source is set to Current Layer or All Layers, cloning a texture does not incorporate viewport shading, but when set to Screen, it does. - Continue painting. To finish using Clone, right-click in the viewport or click the (Clone) button again to toggle it off.
Because Save Texture is off, your painting is discarded.
The Clone tool enables painting a texture from a different part of the object, using one or all layers of its bimap, or from anywhere in the active viewport. For example, you can clone a texture from one object to another. This procedure provides an example of using all three cloning sources.
Interface
This initial section describes the controls on the upper portion of the Viewport Canvas dialog: painting tools, brush and color settings, and buttons for opening 2D View and the Layer dialog. The remaining controls are available from separate rollouts on the dialog and are described in Additional Viewport Canvas Rollouts.
Left or Right. When docked, you can float the dialog by dragging or by right-clicking near the top and choosing Float. 
Painting tools
To paint an object with Viewport Canvas, select one object and then choose a painting tool from the upper section of the Viewport Canvas dialog. The painting tools work only with a single selected object, and the object must have a material with a bitmap file assigned to at least one map. If necessary, Viewport Canvas can apply the material and create the map for you. The object also needs UVW coordinates, which Viewport Canvas cannot create.
For details, see this procedure.
To prevent applying the paint to the model (for example, when experimenting), turn off Options rollout Save Texture. Right-clicking then simply discards the painting before exiting the tool. Also, most brushes have an optional preview mode.
- Paint
- Starts the Paint tool for adding color to an object surface. You can paint with solid colors, or with a bitmap in the form of a brush image.
You can paint anywhere on the model, changing the color, opacity, brush image and other settings and navigating the viewport as you go.
-
 Erase
Erase - When active, you remove the contents of the layer by painting, using the current brush settings. Attention: Erase is not available for the background layer. Therefore we recommend that you do most of your painting in additional layers.
While using other painting tools, you can activate Erase temporarily by pressing and holding
 . When you release the key, the tool returns to its original function. Note: Erase has its own Opacity setting, which is distinct from that of other tools but uses the same field. When Erase is active (including using the key with other tools), the Opacity setting applies to Erase only; at all other times the Opacity setting applies to all applicable tools except Erase.
 - Clone
- Starts the Clone tool, which lets you copy part of the image from elsewhere on the object or in the viewport.
To use Clone, first press and hold
while clicking a point on the screen to clone from, then release and paint on the selected object. The paint is sampled from the area you first clicked. For more information, see this procedure. While using Clone, you can choose to sample from the current layer, all layers, or the entire screen. For details, see Clone Source.
Attention: When using the Clone tool to pick up paint from the canvas, we recommend that you set the viewport driver Texel Lookup to Nearest, if possible. This provides the sharpest representation of the texture in the viewport, thus producing more accurate results when the paint is projected. This is because you can clone only from what is visible in the viewport. -
 Fill
Fill - When painting a 3D surface, applies the current color or brush image to the entire element you click on. Depending on the object’s UVW mapping, this might affect other elements as well.
When painting the 2D View canvas, fills the entire layer with the current color or brush image.
When filling with a brush image, use the Fill Tool - Brush Images to specify whether the filled image is tiled or simply wrapped once.
-
 Gradient
 - Applies the color or brush image as a gradient. In effect, Gradient is a partial fill with edge falloff that you set with the mouse.
To use, click at the starting point of the gradient and drag to the endpoint. The fill is performed on the part of the object “behind” the drag direction, perpendicular to the viewing plane, and then falls off to full transparency at the endpoint that you set.
-
 Blur
Blur - Applies a blurring effect by painting.
To adjust the blurring amount, use the Blur/Sharpen setting.
-
 Sharpen
 - Sharpens blurred edges.
To adjust the degree of sharpening, use the Blur/Sharpen setting.
Tip: Overuse of the Sharpen tool can lead to unwanted artifacts such as white outlines around edges. For best results, apply with a light touch by lowering the Opacity value. -
 Contrast
 - Increases the contrast in the painted area. This can help emphasize subtle features in the texture.
-
 Dodge
Dodge - Lightens the painted area. Works mainly on medium tones; does not affect pure-black pixels.
-
 Burn
Burn - Darkens the painted area. Works mainly on medium tones; does not affect pure-white pixels.
-
 Smudge
 - Pushes pixels around on the screen, somewhat like finger-painting. For a rougher smudging effect, use a brush image mask instead of a solid color. Tip: Like the Sharpen tool, Smudge works best when applied with a light touch by lowering the Opacity value.
-
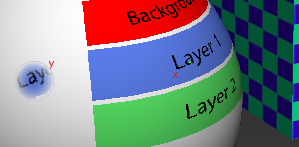
 Move Layer
 - When on, move the active layer by dragging anywhere in the viewport. While dragging, a message next to the mouse cursor shows the offset amount on the U and V texture axes.
Move Layer is not available for the background layer.
-
 Rotate Layer
 - When on, rotate the active layer by dragging anywhere in the viewport. While dragging, a message next to the mouse cursor shows the rotation angle.
Rotate Layer is not available for the background layer.
Tip: Rotation always occurs around the center of the image (not the canvas). For example, if a layer contains only one paint stroke, it rotates around the center of the stroke. To best see where the center is, open the 2D Paint window. -
 Scale Layer
 - When on, scale the active layer by dragging anywhere in the viewport. While dragging, a message next to the mouse cursor shows the scaling percentage.
Scale Layer is not available for the background layer.
Tip: Scaling always occurs about the center of the image (not the canvas). For example, if a layer contains only one paint stroke, it scales around the center of the stroke. To best see where the center is, open the 2D Paint window.
Mouse and Keyboard Options for the Painting tools
The following mouse and keyboard options are available while using the painting tools:
- Normal (no key) Paints or edits the image with the current color or brush image.
- Eraser: Erases parts of what you have drawn during the current activation of the tool. This mode uses the Opacity setting of the Erase tool, rather than the standard Opacity setting used by the other tools.
-
 Samples color from the selected object surface; picks a single pixel from the center of the brush.
 -
 Hold and click to draw a straight line from the last painted point to where you click. This works with all stroke-type painting tools, including Paint and Erase.
 - + Hold and drag vertically to change the brush radius interactively.
- + Hold and drag vertically to change the brush opacity interactively.
- + Hold and drag vertically to change the brush hardness interactively.
 (right-click) Exits the tool and applies the paint to the model’s texture, saving it to the bitmap file. In most cases this takes less than a second, but if it takes longer, a progress bar updates in the interface during calculations.
 If you right-click or otherwise exit a painting tool after adding one or more layers to a single-layer bitmap, the Save Texture Layers dialog opens to prompt you to determine how to treat the multi-layer image.
Note: Because the bitmap is saved after exiting the tool, you cannot undo strokes after doing so. However, while painting, Undo works normally.
Color group

- Color
- Click the color swatch to open the Color Selector, which lets you change the paint color.
-
 Black/White
 - Set the paint color to black or white by clicking the respective button.
-
 Open Color Palette
 - Opens the custom Color Palette dialog with an array of color swatches; click a swatch to use its color.
To customize a swatch, right-click it and use the Color Selector that opens to adjust the color. Use the buttons at the bottom of the dialog to load a custom palette, save the current palette, or save the current palette as the default.
Brush Settings group

- Radius
- The radius of the brush sphere in pixels. To change the radius interactively in the viewport, hold + while dragging vertically. Note: As noted, the Viewport Canvas brush is spherical in shape, so when painting thin sections of 3D objects you might find that the brush penetrates the object and applies paint to two or more surfaces simultaneously. If this situation occurs, try reducing the Radius setting or using 2D View.
- Opacity
- Sets the opacity for the for all tools except Erase. When Erase is active, this field sets the value for the Erase tool only. A value of 100 is fully opaque.
To change the opacity interactively in the viewport, hold
+ while dragging vertically. - Hardness
- The falloff at the brush edges. A high Hardness value yields a sharp-edged brush; the lower the value, the softer the edge.
To change the hardness interactively in the viewport, hold
+ while dragging vertically. - Spacing
- When painting a continuous stroke by dragging, the distance relative to the brush radius between each copy of the brush deposited along the stroke. The default value, 0.25, means the copies are deposited one-fourth of the radius apart. To deposit copies edge-to-edge, set Spacing to 2.0.
- Scatter
- Randomizes the placement of each copy of the brush during a stroke. The higher the Scatter value, the greater the randomization.
- Blur/Sharpen
- The amount of blurring or sharpening applied by the Blur or Sharpen tool. Available only for those tools.
- 2D View
- Toggles the 2D Paint window for painting on a rectangular canvas.
- Layers Dialog
- Toggles the Layers dialog for managing bitmap layers.