The Object rollout is the first rollout you see on the Command panel once you apply the Cloth modifier. It comprises mostly controls to create a Cloth simulation and adjust fabric properties.
Interface

Click a group box in the image to jump to the description of the corresponding settings.
- Object Properties
-
Opens the Object Properties dialog, where you can define which objects to include in the simulation, whether they are cloth or collision objects, and the parameters associated with them.
- Cloth Forces
-
Add forces (that is, space warps in the scene) such as wind to the simulation. Click Cloth Forces to open the Forces dialog. To add forces to the simulation, in the Forces In Scene list on the left side, highlight the forces to add, and then click the > button to move them to the Forces In Simulation list, thus adding them to the simulation. Thereafter, the forces affect all cloth objects in the simulation.
To remove forces from the simulation, in the Forces In Simulation list on the right side, highlight the forces to remove, and then click the < button to move them to the Forces In Scene list.
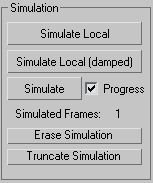
Simulation group

To run a cloth simulation, click any of the three Simulate buttons in this group. To halt a simulation, press  or if the Cloth Simulation dialog is open (that is, Progress is on), click the Cancel button.
- Simulate Local
-
Starts the simulation process without creating animation. Use this to drape the clothes on a character or sew the panels of a garment together.
- Simulate Local (damped)
-
Same as Simulate Local, but with a large amount of damping added to the cloth. When sewing a garment together, sometimes the panels come together at high speed, causing problems. Using a damped simulation alleviates this problem.
- Simulate
-
Creates a simulation over the active time segment. Unlike Simulate Local, this creates animation data in the form of a simulation cache at every frame.
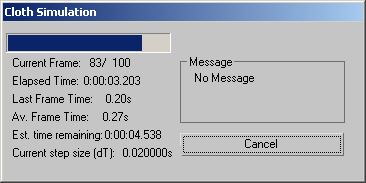
The simulator advances by a time step called dT. The initial value is the Step setting on the Simulation Parameters rollout. When the simulator encounters certain situations, it decreases dT in order to overcome the obstacles. Sometime later, the simulator increases dT again up to the maximum Step value you set. The current value of dT appears on the Cloth Simulation dialog that shows the progress of the simulation as it takes place (see following).
When the simulator decreases dT, it shows "dT decreased" on the Cloth Simulation dialog along with one of the following messages (explanation follows each message):
- could not solve equations – The solver could not solve the equations of motion.
- cloth has become over-stretched – In attempting to solve one step, some edges of the cloth became too elongated, indicating a failure of the solver.
- cloth-solid collision velocity was too large – The speed of the cloth relative to that of the collision object is too high.
- cloth-cloth collision velocity was too large – The speed of colliding cloth parts is too high.
- Progress
-
When on, opens the Cloth Simulation dialog during the simulation. The dialog shows the progress of the simulation, including information about time, and messages about errors or time step size adjustments.

The Cloth Simulation dialog shows information about the simulation while it's running.
- Simulated Frames
-
Shows the number of frames simulated so far.
- Erase Simulation
-
Deletes the current simulation. This deletes the cache of all cloth objects and sets the Simulated Frames count back to 1.
- Truncate Simulation
-
Deletes animation created by the simulation after the current frame.
For example, if you've simulated an animation to frame 50 but want to keep only animation keys from frames 0 to 30, set the time slider to frame 30, then click this button. The simulation is then deleted from frame 31 on.
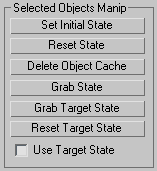
Selected Object Manip group

- Set Initial State
-
Updates the first frame of the selected cloth object’s cache to the current position.
- Reset State
-
Resets the selected cloth object's state to the state before Cloth in the modifier stack. When you click this, the simulation is erased; that is, Simulated Frames returns to 1.
- Delete Object Cache
-
Deletes the cache for selected non-cloth objects. If an object is simulated as cloth, and is then turned into a collision object (or inactive) via the Object Properties dialog, it will retain the cloth motion in its cache.
This is useful for simulating clothes in layers. For example, you may simulate a character’s pants, then turn the pants into a collision object for simulating a coat. By simulating in layers, you avoid the problems of cloth-to-cloth collision detection. If you want to remove the cached motion from the selected object(s), click this button.
- Grab State
-
Grabs the current state from the top of the modifier stack and updates the cache for the current frame.
Following is an example of how this might be used:
- Simulate to frame 100. When you play back the simulation, you see a collision object poking through the cloth at frame 24.
- Add an Edit Mesh modifier after Cloth and pull the cloth vertices so the object doesn't poke through.
- Go down the stack to Cloth and click Grab State. The vertices are now moved twice as far as you intended because the vertex displacement was applied once by Cloth, and again with Edit Mesh.
- Remove the Edit Mesh modifier. The vertices should now be where you want them.
- Grab Target State
-
Lets you specify the target shape for Keep Shape. Grabs the current deformation from the top of the modifier stack and uses that mesh to define the target bend angles between triangles. Also turns on Use Target State.
Note: Only the bend angles from the Target State mesh are used, not the edge lengths.Tip: To add some natural creasing to your cloth, drop the cloth on the floor, click Grab Target State, and then run the simulation. After clicking Grab Target State and before running the simulation, click Reset State (unless you want the cloth to stay on the floor!). - Reset Target State
-
Resets the default bend angles to the mesh below Cloth in the stack.
Note: For Garment Maker objects, the target bend angles will depend on the output method set in the Garment Maker modifier. To see what is actually being used, use Show Target State. - Use Target State
-
When on, preserves the shape of the mesh as stored by Grab Target State. It uses the Bend % and Stretch % settings in the Keep Shape group on the Object Properties dialog for Cloth.
If multiple cloth objects with different Use Target State settings are selected, this checkbox appears unavailable, but you can click it to make the setting for all selected objects.
Note: In previous versions, this checkbox was labeled Keep Shape and was found on the Object Properties dialog for Cloth.

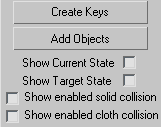
- Create Keys
-
Creates keys for a selected cloth object. The object is collapsed to an editable mesh, and any deformation is stored as vertex animation.
- Add Objects
-
Lets you add objects to the simulation without opening the Object Properties dialog. Click Add Objects, and then click an object to add. To add multiple objects at once, press H and use the Pick Objects dialog.
- Show Current State
-
Shows the current state of the cloth at the end of the last simulation time step.
If the simulation is cancelled, the last time step could lie between two frames. If the simulation is allowed to successfully finish, the last time step corresponds to the last frame.
- Show Target State
-
Shows the current target state of the cloth; that is, the desired bend angles used by the Keep Shape option.
- Show enabled solid collision
-
When on, highlights all groups of vertices for which Solid Coll is on. This is handy for seeing exactly which vertices will be involved in solid-object collisions.
- Show enabled self collision
-
When on, highlights all groups of vertices for which Self Coll is on. This is handy for seeing exactly which vertices will be involved in cloth-to-cloth collisions.