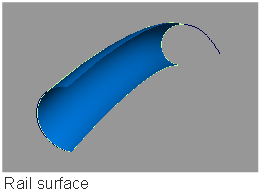
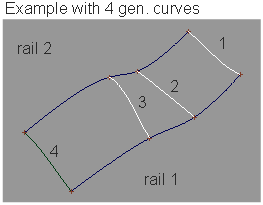
Create a surface by calculating the area swept out by a generation curve moving along one or more rail curves. You can use one generation curve or blend between two or more generation curves.
General workflow
- Choose Surfaces > Swept Surfaces > Rail Surface

 .
. - In the option window, set the number of Generation Curves and Rail Curves you have.
- Click the generation curve or curves. To deselect a generation curve, click it again.
- If you chose 2+ generation curves, click Go when you are finished selecting generation curves.
- Click the rail curve or curves.
Maintain continuity with other surfaces
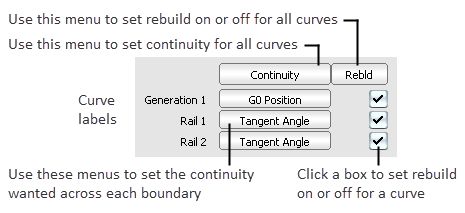
In the Rail Control window, use the pop-up menus next to the names of the generation and rail curves to choose what type of continuity you want along that edge.
Sweep one generation curve along one rail curve
The procedure for using the Rail Surface tool has several optional steps, depending on the settings in the Rail Surface Control window.
- Choose Surfaces > Swept Surfaces > Rail Surface from the tool palette, or double-click its icon.
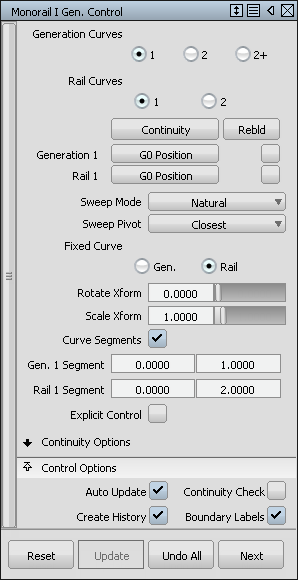
The Rail Surface Control window appears.
- Make sure Create History is checked.
You almost always want construction history on. This allows you to change the settings after you sweep the curves.
This example uses the following settings.
When you are satisfied with the new surface, you can delete the history information with Delete > Delete Construction History
 .
. - Click the generation curve. This is the curve that is swept along the rail curve to create the surface.
The generation curve can be a free curve, isopam curve, curve on surface, or trim edge.
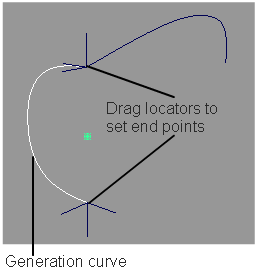
- If Curve Segments is on, use the locators to place the start and end edit points of the generation curve.
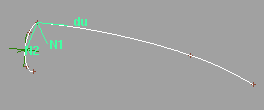
- If Sweep Pivot is On Curve or Off Curve, use the locator to set the pivot point of the generation curve.
- Click the locator and drag to move the locator along the curve (On Curve) or in space (Off Curve).
- Type a parameter (On Curve) or 3D coordinate (Off Curve) to set the pivot exactly.
- Click Go to continue.
- Click the rail curve. This is the path along which the generation curve travels.
The rail curve can be a free curve, isoparametric curve, curve on surface, or trim edge.

- If Curve Segments is on, use the locators to set the start and end edit points of the rail curve.
- If Sweep Pivot is On Curve or Off Curve, use the locator to set the pivot point on the rail curve.
- Click the locator and drag to move the locator along the curve.
- Type a parameter to set the pivot exactly
- Click Go to continue.
- If the Sweep Mode is Spine, click the spine curve. This curve controls the orientation of the generation curve as it travels along the rail curve.
Sweep one or more generation curves along two rail curves
- Choose Surfaces > Swept Surfaces > Rail Surface from the tool palette, or double-click its icon.
The Rail Surface Control window appears.
- Make sure Create History is checked.
You almost always want construction history on. This allows you to change the settings after you sweep the curves.
When you are satisfied with the new surface, you can delete the history information with Delete > Delete Construction History
. - In the Rail Surface Control window, set Rail Curves to 2.
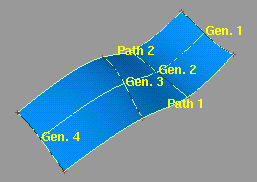
Set Generation Curves to the number of generation curves to use:
- Choose 1 to sweep one curve along the rails.
- Choose 2 to blend from one generation curve to another along the rails.
- Choose 2+ to blend a series of generation curves along the rails.
- Click the first-generation curve.
The generation curve(s) can be a free curve, isoparametric curve, curve on surface, or trim edge.
- If Generation Curves is 2, choose the second-generation curve.
If Generation Curves is 2+, pick all the generation curves in order, then click Go.
- Click the first rail curve, then click the second rail curve.
The generation curve(s) must intersect both rail curves.
The rail curves can be free curves, isoparametric curves, curves on surface, or trim edges.
Create a funnel shape
- Create a generation curve and a rail curve.
- Choose Surfaces > Swept Surfaces > Rail Surface from the tool palette, or double-click its icon.
- In the Rail Surface Control window:
- Set Generation Curves to 1.
- Set Rail Curves to 1.
- Set the Sweep Pivot to Off Curve.
- Select Auto Update.
- Click the generation curve.
- A 3D locator appears and you are prompted for the generation curve pivot. Use magnet snapping to move it to the center of the generation curve. Then click Go.
- Click the rail curve.
- A curve locator appears for the rail curve pivot. Move the locator to the starting point of the rail curve. Then click Go.
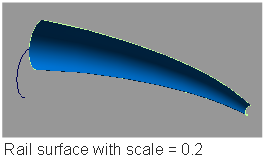
- In the Scale Xform field, enter the factor by which you want the generation curve to grow as it travels along the rail curve.
For example, if you enter 2, the generation curve grows twice as large as it travels the length of the rail curve. If you enter 0.5, it shrinks by half.
Edit the construction history of a Rail surface
- Pick the surface you want to edit.
- Choose Surfaces > Swept Surfaces > Rail Surface from the tool palette, or double-click its icon.
The Rail Surface Control window appears.
- Use the curve modification tools (in the Transform, Curve Edit, and Object Edit palettes) to reshape the curves used to create the surface, and use the Rail Surface Control window to change the surface creation options.
Tips and notes
- The Spine sweep mode can be very tricky. If you have trouble with it, try the following:
- Create a copy of the rail curve to use as the spine curve.
- Turn on Create History and Auto Update in the Rail Surface Control window.
- Reshape the spine curve in small steps and observe the effect on the surface.
- After you start a surface in Natural, Parallel, or View mode, you cannot convert it to Spine mode.
- You cannot create a rail surface along a rail curve with multi-knots or weighted CVs.
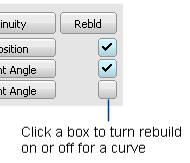
Turn on the Rebuild option for all rail curves to remove multi-knots and set the weight of all CVs to 1 before creating the surface.
- It is the generation curve pivot that travels along the rail curve. If the pivot is not on the generation curve, the new surface will be offset.
- Changing the settings after you have clicked the generation curve does not affect the rest of the procedure for using the Rail Surface tool.
For example, if you turn on the Curve Segments option after you have already picked the generation curve, you will not be asked to define curve segments. However, after the surface is built, text boxes will appear in the Rail Surface Control window where you can change the start and end parameters for the curve segments. You can also click the Next button and start again.
- The Rail Surface tool does not support rail curves with sharp corners (cusps).
- Use curve snapping to make sure the generation curves intersect the rail curves.
- The Rail Surface tool tests whether the curves intersect using the Curve Fit Distance value in Construction Options. The default tolerance depends on your Alias product. If the curves are within the default tolerance of each other, they are seen as intersecting.
To change the Curve Fit Distance option, choose Construction Options from the Preferences menu.
- When using two or more generation curves, after you pick the first generation curve you can unpick it by clicking it. You can then pick a different first generation curve.
- The Rail Surface tool can produce poor surfaces with long generation curves.
In these cases, try reversing the choice of generation and rail curves, and choose the shorter, simpler curves for the generation curves and long, winding curves as the rails.
What if...?
I can’t create a surface from my curves?
- Make sure your curves intersect. If modifications to the boundary curves cause them to stop intersecting (while construction history is on), a small red and yellow arrow appears at that corner. Right mouse clicking on the arrow displays a bubble with an explanation of the problem.

- The Rail Surface tool tests whether curves intersect within the Curve Fit Distance tolerance in Construction Options. To change the Curve Fit Distance option, choose Preferences > Construction Options
 .
. - You can’t create a surface along rail curves with sharp corners, CV multiplicity, or multi-knots. To remove multi-knots, turn on the Rebuild option for rail curves.
The surface is created away from the rails?
It is the generation curve’s pivot point that travels along the rail curve. If the pivot point is not on the generation curve, the new surface will be offset.
The resulting surface is too complex?
- Turn on the Rebuild options for the curves used to create the surface.
- Turn on the Explicit control option, then manually choose how many spans the surface may have and what degree it should be in the U and V directions.
I want to change a rail surface after I’ve worked on other objects?
Choose Object Edit > Query Edit![]() and click the surface.
and click the surface.