Create a section of a surface of revolution with the Surfaces > Revolve tool by specifying a curve, and two points that define an arc of revolution. This type of surface (called Helix surface) is useful for modeling vehicle side windows.
To create a Helix surface, you select one or more curves, to be revolved around the specified axis. You then select two points which, along with a point on the (first) curve, define an arc of revolution. You can then adjust the Pitch option to move the curves up or down as they revolve, creating a spiral effect.
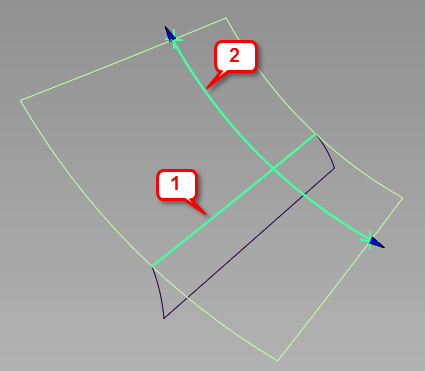
1: input curve; 2: arc of revolution. Axis of revolution is off screen, on the upper right.
Build a Helix surface
- Choose Surfaces > Revolve


- Set Surface type to Side Glass, then set Mode to Helix.
- Select one or more curves. The curves can be free curves, curves-on-surface, surface edges, or trim edges. They can be disjoint.
The curves are highlighted in green.
- Click the Accept button in the view window.
- Select two points to specify the ends of the arc of revolution. A third point located on the first curve is used to define the arc.
- The arc is drawn as a green line with arrow manipulators on both ends. If you do not see the arc, change the axis of revolution in the control window. The axis cannot be in the same plane as the arc of revolution.
- The Helix surface is built.
- The axis of revolution is drawn in blue.
- Do one of the following:
- Adjust the parameters in the control window to specify the Degree, Spans, and Segments of the surface in the V direction.
- Adjust the Pitch to create a spiral-shaped surface.
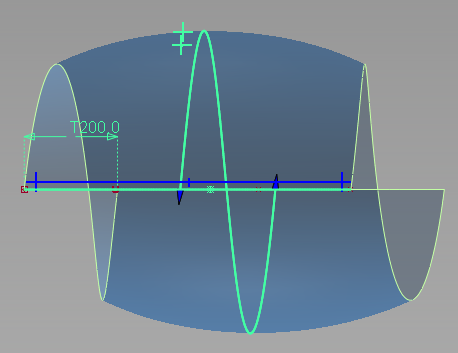
Pitch of 200.0
- Use the arrow manipulators on the arc of revolution (or the Start/End angle sliders) to modify the angle of revolution. You can move the arrows, or use the angle sliders to create a revolution of more than 360 degrees. This technique, along with the Pitch, is useful for creating screw-shaped surfaces. Note: Be careful to grab the arrows and not the end points.
- Move the two input points to modify the surface.
- Move the end points of the axis of revolution, or the whole axis. Note: Moving the axis removes the two input points on the arc of revolution. To return to point editing mode, click the Edit Points button in the view.
Like other revolve surfaces, Helix surfaces have history and update when options and constructors are modified.